Form validation in Bootstrap
In HTML 5, the default form validation is done for the fields marked with the required attribute. It will even check the email format for the field specified as type=”email” with the required attribute.
However, the message is basic and displayed as:
“Please fill in the field”
Where the specific field will also get focus as you try to submit the form.
As using the Bootstrap framework for creating the forms, the same default validation is applied. If you want to customize the validation messages for the form fields like displaying the field related message:
“You must enter your name” etc.
You may use JavaScript / jQuery for that. See the following section for simple and custom form validation using Bootstrap framework with jQuery.
A demo of simple form validation
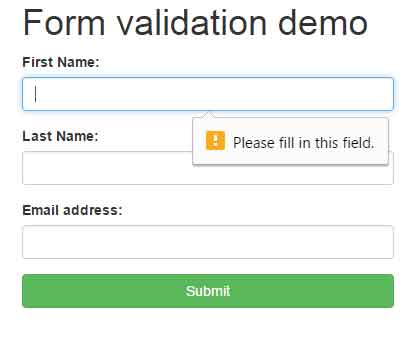
In this demo, the Bootstrap form validation is done by using the default behavior. Only the required attribute is added for the fields. Go to the demo page and press the submit button and see how validation message appears:

See online demo and code
The markup for this demo:
    <div class="container">

        <h1>Form validation demo</h1>

    </div>

    <form class="form">

    <div class="container">

        <div class="row">

            <div class='col-sm-4 form-group'>

                <label for="name">First Name:</label>

                <input id="fname" class="form-control" type="text" required>

            </div>

            <div class='col-sm-4 form-group'>

                <label for="name">Last Name:</label>

                <input id="lname" class="form-control" min="3" required>

            </div>

            <div class='col-sm-4 form-group'>

                <label for="name">Email address:</label>

                <input id="email" class="form-control" type="email" required>

            </div>

        </div>


        <div class="row">

            <div class="col-sm-4 col-sm-offset-4">

                <button type="submit" class="btn btn-success btn-block">Submit</button>

            </div>

        </div>

    </div>
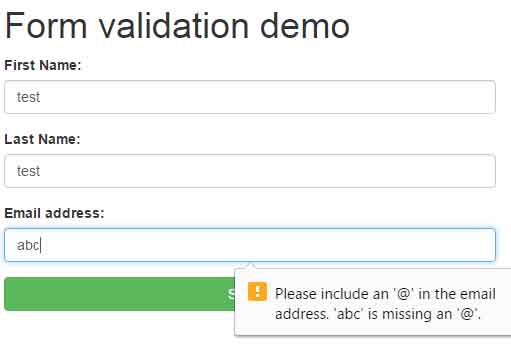
You can see, only adding the required attribute will not let move ahead if the field is left blank. In the case of email address, the format of the email is also checked as shown in the second graphic.
Also, you saw the standard messages are shown i.e. “Please fill in this field” with an icon.
A demo of Bootstrap form validation with jQuery for custom error message
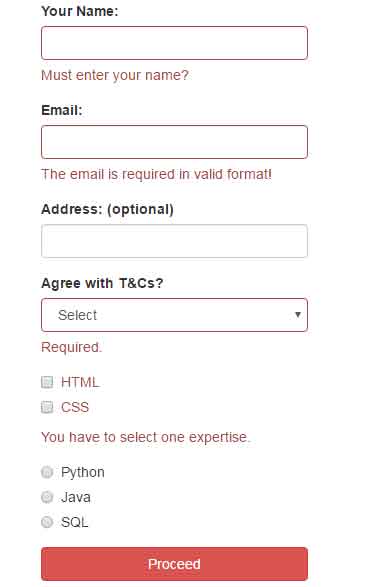
In this demo, a jQuery plug-in is used for validating Bootstrap form. A number of different types of fields are used in the form. For displaying a custom error message rather a single standard message you may use the data-error-msg attribute with each input type. For example, for the name field, you may specify the following message by using the data-error-msg data attribute:
“Please enter the name!”
Similarly, you may specify the message according to the field.

See online demo and code
The code:
    <div class="container">

        <h1>A demo of Bootstrap validate form</h1>

    </div>

    <!-- don't forget novalidate to stop browser form validation -->

    <form class="form">

    <div class="container">

        <div class="row">

            <div class='col-sm-4 form-group'>

                <label for="name">Your Name:</label>

                <input id="lname" class="form-control" min="3" required type="text" data-error-msg="Must enter your name?">

            </div>

            <div class='col-sm-4 form-group'>

                <label for="name">Email:</label>

                <input id="email" class="form-control" type="email" required data-error-msg="The email is required in valid format!">

            </div>

        </div>

        <div class='row'>

            <div class='col-sm-4 form-group'>

                <label for='address'>Address: (optional)</label>

                <input id='address' class='form-control' type='text'>

            </div>

        </div>

        <div class="row">

            <div class='col-sm-4 form-group'>

                <label for='terms'>Agree with T&Cs?</label>

                <select id='terms' class='form-control' required>

                    <option selected disabled>Select </option>

                    <option value="Y">Yes</option>

                    <option value="N">No</option>

                </select>

            </div>

            <div class='col-sm-4 form-group'>

                <div class="checkbox">

                    <label>

                        <input type="checkbox" name="option1" value="" required data-error-msg="You have to select one expertise.">

                        HTML

                    </label>

                </div>

                <div class="checkbox disabled">

                    <label>

                        <input type="checkbox" name="option1" value="">

                        CSS

                    </label>

                </div>

            </div>

            <div class='col-sm-4 form-group'>

                <div class="radio">

                    <label>

                        <input type="radio" name="optionsRadios" id="optionsRadios1" value="option1">

                        Python

                    </label>

                </div>

                <div class="radio">

                    <label>

                        <input type="radio" name="optionsRadios" id="optionsRadios2" value="option2">

                        Java

                    </label>

                </div>

                <div class="radio disabled">

                    <label>

                        <input type="radio" name="optionsRadios" id="optionsRadios3" value="option3">

                        SQL

                    </label>

                </div>

            </div>

        </div>

        <div class="row">

            <div class="col-sm-4 col-sm-offset-4">

                <button type="submit" class="btn btn-danger btn-block">Proceed</button>

            </div>

        </div>

    </div>
The jQuery code:
  <script>

    $(function() {

        $('form').validator({

            validHandlers: {

                '.customhandler':function(input) {

                    //may do some formatting before validating

                    input.val(input.val().toUpperCase());

                    //return true if valid

                    return input.val() === 'JQUERY' ? true : false;

                }

            }

        });


        $('form').submit(function(e) {

            e.preventDefault();


            if ($('form').validator('check') < 1) {

                alert('Hurray, your information will be saved!');

            }

        })

    })

    </script>
You can see, I have used the textboxes for the name and email while radio buttons and checkboxes are also used. The radios are optional while you have to check at least one checkbox. If all is well, the alert will display the following message:
“Hurray, your information will be saved!”
Otherwise, the error message will keep on displaying.
The validate plug-in
You may download this nice plug-in from the GitHub website here. After downloading, just include the validate-bootstrap.jquery.min.js file after referencing the jQuery and Bootstrap JS files.

