
The input type file
Among the other input types like text, password, etc. the file input type allows the creation of a form element that enables users to select a file to upload in the Bootstrap framework, which is basically an HTML tag.
This is just a matter of specifying the HTML tag:
<input type = “file”>
For example:
<label for="fileinput">File input</label>

<input type="file" id="fileinput">
However, designing and changing the text and designing of the file upload button is a tedious task. This is generally desired to match the upload file button with the rest of form fields in a web page, otherwise, it looks ugly and unmatched. This is not provided in the default classes by Bootstrap. You may use your own or third-party solutions for that.
Following is a guide to set up the Bootstrap file upload field if you are working in the Bootstrap framework and also included the jQuery library.
The guide is using a plug-in, bootstrap-lifestyle, which is available on Github website (credit link is given below). Let me start from simple to more stylish examples with icons in upload form controls to a complete form demo.
After the demos, you can see a step-by-step guide to set up this plug-in. The last demo is a sign-up form with PHP code to show you how to upload files while using this plug-in.
In the following demo, bootstrap-filestyle plug-in is used to create a file selection field. You have to include four dependency files in the <head> section for these demos to work (see the setup guide at the bottom part).
See the demo and code by clicking the link below:
See online demo and code
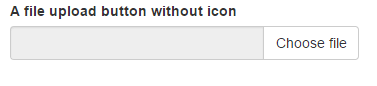
The button is initialized via data attribute:
<div class="col-xs-4">

<div class="form-group">

<label class="control-label">A file upload button without icon</label>

<input type="file" class="filestyle" data-icon="false">

</div>

</div>
Complete code with markup:
<!DOCTYPE html>
<html>
<head>
    <link rel="stylesheet" href="https://maxcdn.bootstrapcdn.com/bootstrap/3.3.5/css/bootstrap.min.css" integrity="sha512-dTfge/zgoMYpP7QbHy4gWMEGsbsdZeCXz7irItjcC3sPUFtf0kuFbDz/ixG7ArTxmDjLXDmezHubeNikyKGVyQ==" crossorigin="anonymous">
    <script src="https://maxcdn.bootstrapcdn.com/bootstrap/3.3.5/js/bootstrap.min.js" integrity="sha512-K1qjQ+NcF2TYO/eI3M6v8EiNYZfA95pQumfvcVrTHtwQVDG+aHRqLi/ETn2uB+1JqwYqVG3LIvdm9lj6imS/pQ==" crossorigin="anonymous"></script>
    <script type="text/javascript" src="//ajax.googleapis.com/ajax/libs/jquery/1.9.1/jquery.min.js"></script>
    <script type="text/javascript" src="js/bootstrap-filestyle.min.js"> </script>

    <meta name="viewport" content="width=device-width, initial-scale=1.0">
</head>

<body>
<div class="container">
<h2>Bootstrap File upload demo</h2>
    <div class="col-xs-4">
        <div class="form-group">
        <label class="control-label">A file upload button without icon</label>
        <input type="file" class="filestyle" data-icon="false">
    </div>
</div>
</body>
</html>
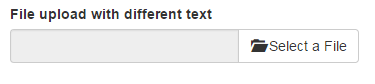
An upload file control with different text and icon via data attribute
This control is using a different text “Select a file” along with an icon while text path field is disabled.
Markup
<body>
<div class="container">
<h2>Bootstrap File upload demo</h2>
    <div class="col-xs-4">
    	<div class="form-group">
	      <label class="control-label">File upload with different text</label>
	      <input type="file" class="filestyle" data-buttonText="Select a File">
		</div>
    </div>
</div>
</body>
The following is a demo of a Bootstrap styled buttons, where you can use the same class names as in Bootstrap buttons.
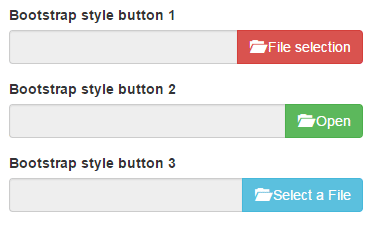
You can see, three upload file controls with three different styles and text. This time, the buttons are initiated by jQuery/JavaScript. The text and button name that represents the button style is specified in the jQuery section, just above the </body> tag.
The code:
 <div class="form-group">

<label>Bootstrap style button 1</label>

<input type="file" id="BSbtndanger">

</div>

<div class="form-group">

<label>Bootstrap style button 2</label>

<input type="file" id="BSbtnsuccess">

</div>

<div class="form-group">

<label>Bootstrap style button 3</label>

<input type="file" id="BSbtninfo">

</div>
The jQuery code
<script>

$('#BSbtndanger').filestyle({

buttonName : 'btn-danger',

buttonText : ' File selection'

});

$('#BSbtnsuccess').filestyle({

buttonName : 'btn-success',

buttonText : ' Open'

});

$('#BSbtninfo').filestyle({

buttonName : 'btn-info',

buttonText : ' Select a File'

});

</script>
A demo of different icon
In this Bootstrap / jQuery upload file button, a different icon is used than the above examples. You may set the icon in the JavaScript section by using the iconName option, as shown below:
![]()
You can see the demo page’s code section, the glyphicon glyphicon-file is used in the options part after initiating the button. Apart from that, button text and button name are also specified.
The markup:
 <div class="col-xs-4">

<div class="form-group">

<label>Change icon</label>

<input type="file" id="icondemo">

</div>

</div>
jQuery code:
<script>

$('#icondemo').filestyle({

iconName : 'glyphicon glyphicon-file',

buttonText : 'Select File',

buttonName : 'btn-warning'

});

</script>
The plug-in also includes the option to clear the selected file in the textbox area by clicking a “clear the file name” text.

The following code is used to create this button, including JS part:
The Markup:
<div class="form-group">

<label>

You may also allow to clear the selection!

<span id="clear" class="btn btn-default btn-xs">

Clear the file name

</span>

</label>

<input type="file" id="cleardemo">

</div>
The jQuery code:
<script>

$('#cleardemo').filestyle({

buttonText : ' Choose a file from System',

buttonName : 'btn-info'

});


$('#clear').click(function() {

$('#cleardemo').filestyle('clear');

});

</script>
You may use the multiple attribute in the input type file tag to allow users to select multiple files by pressing the control or shift keys with the mouse etc.
The following demo shows selecting multiple files from the computer or system. After you choose multiple files you can also clear the selection by using the clear button.
The following code is used for markup and jQuery:
The markup:
<div class="form-group">

<label>Select Multiple files</label>

<input type="file" multiple="multiple" id="multipledemo">

<button id="clear" class="btn btn-warning btn-xs">

Clear the files selection

</button>

</div>
The jQuery:
<script>

$('#multipledemo').filestyle({

buttonText : 'Multiple',

buttonName : 'btn-primary'

});

$('#clear').click(function() {

$('#multipledemo').filestyle('clear');

});

</script>
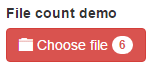
An example of file count
You can also show file count for the multiple file selection upload buttons. For that simply use the multiple attribute in the input type file tag and use input: false option in the jQuery section. See the demo:
See online demo and code
The following code is used:
The markup:
<div class="form-group">

<label>File count demo</label>

<input type="file" id="filecount" multiple="multiple">

</div>
The jQuery:
<script>

$('#filecount').filestyle({

input : false,

buttonName : 'btn-danger',

iconName : 'glyphicon glyphicon-folder-close'

});

</script>
Setting up Bootstrap file upload plugin for your project
Follow these steps to set up this great plug-in to create beautiful and customized Bootstrap / jQuery-based file upload buttons:
Step 1:
Include the Bootstrap framework files from CDN or host it at your own.
You need both CSS and JavaScript files e.g.:
<link rel=”stylesheet” href=”https://maxcdn.bootstrapcdn.com/bootstrap/3.3.5/css/bootstrap.min.css” crossorigin=”anonymous”>
<script src=”https://maxcdn.bootstrapcdn.com/bootstrap/3.3.5/js/bootstrap.min.js” crossorigin=”anonymous”></script>
Step 2:
You also need to include jQuery library, for example:
<script src=”http://ajax.googleapis.com/ajax/libs/jquery/1.10.2/jquery.min.js”></script>
Step 3:
Include Bootstrap FileStyle plug-in file:
bootstrap-filestyle.min.js
You may get it from the plug-in site (link given below).
I have placed it in the JS folder for the demos, and used this line to refer:
<script type=”text/javascript” src=”js/bootstrap-filestyle.min.js”> </script>
Step 4:
Start creating buttons as shown in the above examples by using markup and jQuery.
Credits: The plug-in website
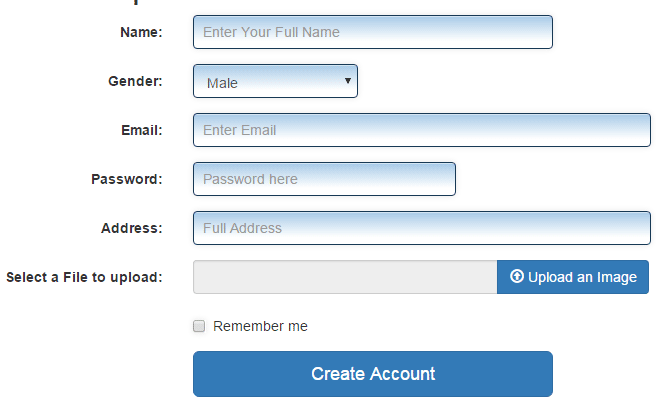
A Bootstrap form with input file and PHP upload script
The following is a general sign-up form created by using Bootstrap framework that also has input type file control by using above plug-in. The demo also includes the PHP code to upload the file to the server.
See the demo online which is followed by a little description to set this up at your server:
See online demo and code
Follow these steps to learn how this form will work:
Step 1:
The form is created by using the Bootstrap framework. For input type file customization, the above plug-in is also included in the head section. Following libraries are included in the head section:
<!DOCTYPE html>
<html>
<head>
<link rel=”stylesheet” href=”https://maxcdn.bootstrapcdn.com/bootstrap/3.3.5/css/bootstrap.min.css” crossorigin=”anonymous”>
<script src=”https://maxcdn.bootstrapcdn.com/bootstrap/3.3.5/js/bootstrap.min.js” crossorigin=”anonymous”></script>
<script type=”text/javascript” src=”//ajax.googleapis.com/ajax/libs/jquery/1.9.1/jquery.min.js”></script>
<script type=”text/javascript” src=”js/bootstrap-filestyle.min.js”> </script>
Step 2:
Following custom CSS for the form controls is used (skip this to learn file uploading only) or use default or your own scheme:
.inputstl {

padding: 9px;

border: solid 1px #173955;

outline: 0;

background: -webkit-gradient(linear, left top, left 25, from(#FFFFFF), color-stop(4%, #AACCE8), to(#FFFFFF));

background: -moz-linear-gradient(top, #FFFFFF, #AACCE8 1px, #FFFFFF 25px);

box-shadow: rgba(0,0,0, 0.1) 0px 0px 8px;

-moz-box-shadow: rgba(0,0,0, 0.1) 0px 0px 8px;

-webkit-box-shadow: rgba(0,0,0, 0.1) 0px 0px 8px;

}
Step 3:
Creating the form that uses Bootstrap classes along with Bootstrap Fileupload plug-in’s options in the <body> section.
To upload file, following <form> tag is used:
<form class=”form-horizontal” role=”form” action=”process.php” method=”post” enctype=”multipart/form-data”>
The form will be submitted to process.php file that should contain the script for managing uploaded file as well as saving the information in the database.
For this demo, I am only using the PHP upload script in the process.php file(given below).
You can see the complete form code in the demo page, after the <body> opening tag.
Step 4:
The PHP code to upload the file placed in process.php file:
<?php

$destfol = "uploadedimages/";

$destfol = $destfol . basename( $_FILES['sentfile']['name']) ;


if(move_uploaded_file($_FILES['sentfile']['tmp_name'], $destfol))

{

echo basename( $_FILES['sentfile']['name']). " file uploaded";

}

else {

echo "Oops, There was some Problem! Please fix it.";

}

?>
Note that, there must be uploadedimages (or change it as you want) destination folder created before running this code. Also, the sentfile is the name of file Upload input field in the form section.