
Purpose of jQuery AJAX method
The jQuery has handy methods to work with AJAX quite simply and easily. The methods include $.ajax, $.post, $.get, $.load, etc.
By using these methods, you may accomplish certain tasks like Submitting forms without reloading a web page, pulling data in an autocomplete field, loading table data, using tabs which data is based on AJAX calls, and so on.
I will show you demos of some useful components using AJAX jQuery method; first have a look at the basic syntax:
$.ajax(name:value)
The parameters are optional in $.ajax method. This is where you may specify the data source by giving a URL, any data sent to the server (e.g. userid, password), dataType expected in response, error handling and others. For example:
$.ajax({url:"ajaxtst.txt",success:function(ajaxresult)})
And using data parameter
$.ajax({url:"post_ajax.php",data:{name:txtname, email:txtemail},success: function(returned_result){
$("div").append(returned_result);
}});
A few useful parameters are also used in the demos with some explanation wherever required. If you are a beginner to this then go through this example. If you have some idea, then move to more advanced demos below.
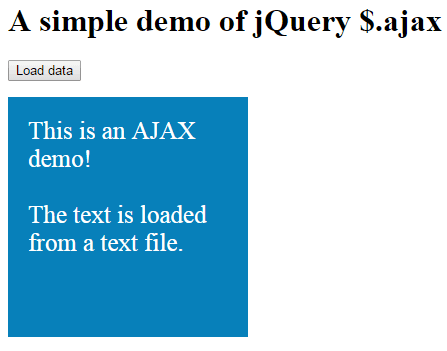
A basic example of using $.ajax method
In this simple example, a text file is used to explain how jQuery ajax method works. Only a few parameters are used:
- A text file is specified in the url parameter.
- If the request is successful, it will assign data to the string.
- By using the $.append method of jQuery, the returned data will be displayed in a div.
See the demo online first:
See online demo and code
In the click event of the button, I used the $.ajax method of jQuery. There, I specified the text file in the URL parameter. If the request is successful, a callback function runs that also contains the result (which is text file data in that case).
Finally, I simply displayed the returned data in an existing div element by using the append method. The jQuery code is:
<script>

$(document).ready(function(){

$("#ajaxbtn").click(function(){

$.ajax({url:"ajaxtst.txt",success:function(txtdata){

$(".divdemo").append(txtdata);

}});

});

});

</script>
An ajax example with jQuery accordion
The following example is a little advanced that uses AJAX in a jQuery UI accordion. For that, an accordion with three panels is created by using the jQuery UI library.
The information in the content area is pulled from the text files by using the jQuery $.ajax method for the first two panels. See this demo online:
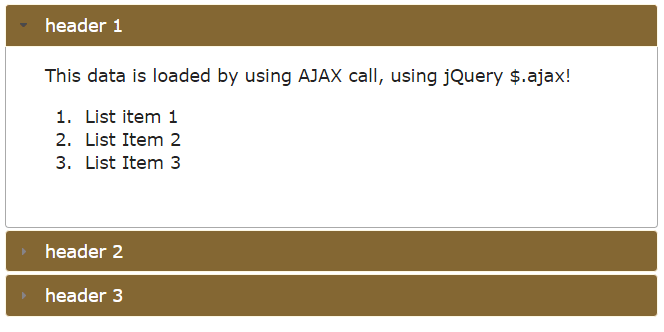
You can see, the first panel is showing some plain text with list items. Inside the $(document).ready function, two ajax calls are made to load data for first two panels.
For the first panel:
$.ajax({url:"accord1.txt",success:function(ajaxresult){

$("#accord1").append(ajaxresult);

}});
Where accord1.txt file is at the same location where the source file is placed. The #accord1 refers to the <p> tag that is used for the content area of the accordion.
For the second panel following jQuery code is used:
$.ajax({url:"accord2.txt",success:function(ajaxresult){

$("#accord2").append(ajaxresult);

}});
Complete code:
<!doctype html>
<html>
<head>
  <link rel="stylesheet" href="//code.jquery.com/ui/1.11.2/themes/smoothness/jquery-ui.css">
  <script src="//code.jquery.com/jquery-1.10.2.js"></script>
  <script src="//code.jquery.com/ui/1.11.2/jquery-ui.js"></script>
</script>
  <script>
  $(function() {
    $( "#jQuery_accordion" ).accordion({
      collapsible: true
    });
  });
  </script>
<script>
    $(document).ready(function(){

     $.ajax({url:"accord1.txt",success:function(ajaxresult){
     $("#accord1").append(ajaxresult);
    }});

     $.ajax({url:"accord2.txt",success:function(ajaxresult){
     $("#accord2").append(ajaxresult);
    }});

});
</script>

<style>
.ui-accordion .ui-accordion-header {
	display: block;
	cursor: pointer;
	position: relative;
	margin: 2px 0 0 0;

	min-height: 0; /* support: IE7 */
	font-size: 100%;
    border:1px solid #FDF8E4;
    background:#846733;
    color:#fff;
}
</style>

</head>
<body>
<div id="jQuery_accordion">
  <h3>header 1</h3>
    <p id="accord1">

    </p>
  <h3>header 2</h3>
    <p id="accord2">
    </p>
  <h3>header 3</h3>
    <div>
    <p id="accord3">
    This is section 3. Content can include listing as well.
<ol><li>item 1</li>
    <li>Item 2</li>
    <li>Item 3</li>
</ol>
    </p>
    </div>
</div>
</body>
</html>
The list items are included just for the demonstration that text files may also include HTML tags.
The third panel’s content area is pre-defined in the markup.
In other scenarios, you may load data from some database. See an example below where I used PHP/MySQL to display data in the HTML table.
You may make the ajax call as per user’s action like clicking a link or button rather than loading as web page loads.
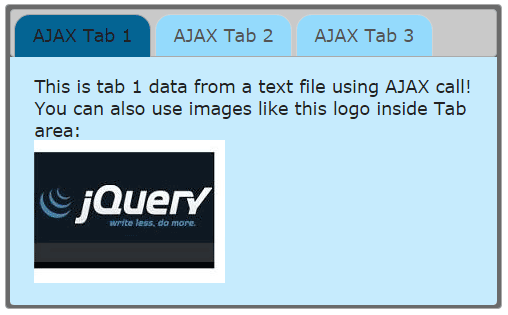
An ajax jQuery example with tabs
Just like accordion’s data, you may also load data in the tabs of a webpage. The tabs are a good way to present information if you have limited space with lengthy information. Or it can be used for distinguishing different categories.
For example, on a mobile website, you may present product information in one tab, and user reviews in another.
For the demo, I have created three tabs by using the jQuery UI plug-in.
Although, this is a built-in feature while using the jQuery tabs to pull data where almost all work is done to make a call to text, PHP or some other files.
I will also show you how to use the $.ajax method like I used for the accordion.
First, have a look at pulling data from built-in feature, that also uses AJAX (in the code below):
The code:
<!doctype html>
<html>
<head>
  <link rel="stylesheet" href="//code.jquery.com/ui/1.11.2/themes/smoothness/jquery-ui.css">
  <script src="//code.jquery.com/jquery-1.10.2.js"></script>
  <script src="//code.jquery.com/ui/1.11.2/jquery-ui.js"></script>
</script>
  <script>
  $(function() {
    $( "#tab_example" ).tabs();
  });
  </script>


<style>
.ui-tabs {
	position: relative;
	padding: .2em;
    background:#6A6A6A;
}
.ui-tabs .ui-tabs-nav {
	margin: 0;
	padding: .2em .2em 0;
    background:#C9C9C9;
}
.ui-tabs .ui-tabs-nav li {
	list-style: none;
	float: left;
	position: relative;
	top: 0;
	margin: 1px .2em 0 0;
	border-bottom-width: 0;
	padding: 0;
	white-space: nowrap;
    background:#94DAFC;
    border-top-right-radius:16px;
    border-top-left-radius:16px;
}
.ui-tabs .ui-tabs-nav li.ui-tabs-active {
	margin-bottom: -1px;

    background:#046493;
}

.ui-tabs .ui-tabs-panel {
	display: block;
	border-width: 0;
	padding: 1em 1.4em;
	background: #C6EBFD;
}
</style>


</head>
<body>
<div id="tab_example">
  <ul>
    <li><a href="ajax/tab1.txt">AJAX Tab 1</a></li>
    <li><a href="ajax/tab2.txt">AJAX Tab 2</a></li>
    <li><a href="ajax/tab3.txt">AJAX Tab 3</a></li>
  </ul>
</div>
</body>
</html>
You can see in the <a> tags of each tab, a link to the text file is specified that uses underlying built-in support to pull data by using AJAX.
<li><a href="ajax/tab1.txt">AJAX Tab 1</a></li>

<li><a href="ajax/tab2.txt">AJAX Tab 2</a></li>

<li><a href="ajax/tab3.txt">AJAX Tab 3</a></li>
You may also specify a PHP, ASP.Net or some other script file there that connects to the database server to fetch data.
By using $.ajax method:
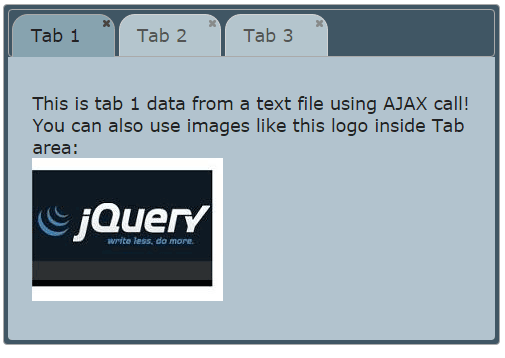
The same example as above, except some color scheme is changed by overriding the default properties of jQuery UI tabs. In this demo, I have used the same approach as used for the accordion. See the demo online first with the code:
See online demo and code
The same data is loaded in the tabs by calling it in the script section:
$.ajax({url:"ajax/tab1.txt",success:function(ajaxresult){

$("#ajaxtab1").append(ajaxresult);

}});


$.ajax({url:"ajax/tab2.txt",success:function(ajaxresult){

$("#ajaxtab2").append(ajaxresult);

}});


$.ajax({url:"ajax/tab3.txt",success:function(ajaxresult){

$("#ajaxtab3").append(ajaxresult);

}});
Again, you may specify the PHP or some other script to connect with the database server for displaying DB driven data in the tabs by using jQuery AJAX method.
An example of fetching data from MySQL database by using PHP
In the following example, a PHP file is used in the $.ajax method. The PHP file connects to the server and fetches the data from a MySQL database table. The PHP file also contains the markup for the HTML table. See the demo below which is followed by a little detail:

First of all, let us have a look at the PHP file code that communicates with the database.
Step1:
A test database is created in the MySQL database server for this demo. As this PHP file is called by using the $.ajax method it connects to the database and its specified table (tbl_products):
<?php


$dbhostname = 'localhost';


$dbusername = ‘User name here’;


$dbpassword = 'DB password here';


$conn = mysql_connect($dbhostname, $dbusername, $dbpassword);


if(! $conn )


{


die('Could not connect to database server: ' . mysql_error());


}


echo 'MySQL server Connected successfully'."<BR>";


mysql_select_db("ajaxdb") or die(mysql_error());


echo "Connected to DB server"."<BR>";


$sql_statemanet = "select * from tbl_products";
The next statement is to execute the SQL query to fetch table data:
$rec_select = mysql_query( $sql_statemanet);


if(! $rec_select )


{


die('Could not retrieve data: ' . mysql_error());


}
Step 2:
The final step in the PHP file is to write the markup for the HTML table. where a CSS class name is also given.
echo "<table class='demotbl'>";

echo "<tr> <th>Product ID</th> <th>Product </th> <th>Quality </th> <th>Quantity </th></tr>";

while($row = mysql_fetch_array( $rec_select )) {

// Display the table data in HTML table

echo "<tr><td>";

echo $row['Product_ID'];

echo "</td><td>";

echo $row['Product_Name'];

echo "</td><td>";

echo $row['Product_Quality'];

echo "</td><td>";

echo $row['Product_Quantity'];

echo "</td></tr>";

}

mysql_close($conn);

?>
That’s it, as for as PHP file is concerned. The CSS style is contained in the head section of calling file where I used the $.ajax method.
In the calling file, this jQuery code is used at the click event of the button:
<script>

$(document).ready(function(){

$("#ajaxbtn").click(function(){

$.ajax({url:"test2.php",success:function(ajaxresult){

$("body").append(ajaxresult);

}});

});

});


</script>
So, it will display the returned data in the body selector. You may use other selectors like a div, paragraph, etc.
In the demo page, you can see the demotbl CSS class style which is used for the table. Along with it, you can see the complete code for this demo there (for both files).
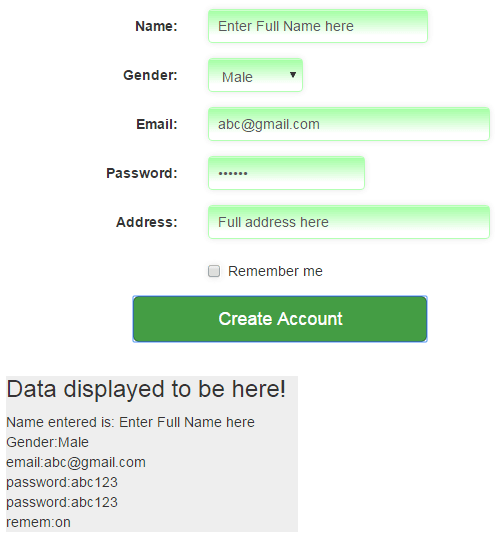
A jQuery ajax example with Bootstrap form and PHP
The following demo is a combination of Bootstrap form controls with jQuery ajax method. It will also use a simple PHP script.
As you fill the form fields in the Bootstrap form and press the Create Account button, the $.ajax method will be called on the click event of that button. In the ajax jQuery method, the post_ajax.php file is called along with sending form fields data. It will simply return the form data that will be displayed in a div element.
See the demo first:
See online demo and code
Let me go step by step to explain this Bootstrap form with $.ajax:
In the HTML page
Step 1:
The Bootstrap framework’s CSS is included in the head section along with the jQuery library.
Step 2:
A Bootstrap form is created by using the built-in Bootstrap classes.
<form class="form-horizontal" role="form">

<div class="form-group">

<label for="name1" class="col-sm-2 control-label">Name:</label>

<div class="col-sm-4">

<input type="text" class="form-control inputstl" id="name1" placeholder="Enter Your Full Name">

</div>

</div>

<div class="form-group">

<label for="gender1" class="col-sm-2 control-label">Gender:</label>

<div class="col-sm-2">

<select class="form-control inputstl" id="gender1">

<option>Male</option>

<option>Female</option>

</select>


</div>

</div>

<div class="form-group">

<label for="email1" class="col-sm-2 control-label">Email:</label>

<div class="col-sm-5">

<input type="email" class="form-control inputstl" id="email1" placeholder="Enter Email">

</div>

</div>

<div class="form-group">

<label for="password1" class="col-sm-2 control-label">Password:</label>

<div class="col-sm-3">

<input type="password" class="form-control inputstl" id="password1" placeholder="Password here">

</div>

</div>

<div class="form-group">

<label for="address1" class="col-sm-2 control-label">Address:</label>

<div class="col-sm-5">

<input type="text" class="form-control inputstl" id="address1" placeholder="Full Address">

</div>

</div>

<div class="form-group">

<div class="col-sm-offset-2 col-sm-10">

<div class="checkbox">

<label>

<input type="checkbox" class="inputstl" id="remem1"> Remember me

</label>

</div>

</div>

</div>

</form>
Step 3:
A Bootstrap button is placed to call the $.ajax method:
<div class="col-sm-offset-2 col-sm-4">

<button id="loaddata" class="btn btn-lg btn-block btn-success">Create Account</button>

</div>
Step 4:
Following jQuery code is used to call $.ajax method where the PHP file is called:
<script>

$(document).ready(function(){

$("#loaddata").click(function(){


txtname=$("#name1").val();

selgender=$("#gender1").val();

txtemail=$("#email1").val();

txtpass=$("#password1").val();

txtaddress=$("#address1").val();

txtremem=$("#remem1").val();

$.ajax({url:"post_ajax.php",data:{name:txtname, gender:selgender, email:txtemail, password:txtpass, address:txtaddress, remem:txtremem},success: function(ajaxresult){

$("#ajaxrequest").append(ajaxresult);

}});

});

});

</script>
In the post_ajax.php file, following code is written:
<?php

$ajax_name=$_REQUEST["name"];

$ajax_gender=$_REQUEST["gender"];

$ajax_email=$_REQUEST["email"];

$ajax_password=$_REQUEST["password"];

$ajax_address=$_REQUEST["address"];

$ajax_remem=$_REQUEST["remem"];


if( $ajax_name )


{


echo "Name entered is: ". $ajax_name ."<br>";

echo "Gender:" .$ajax_gender ."<br>";

echo "Email:" .$ajax_email ."<br>";

echo "Password:" .$ajax_password ."<br>";

echo "Address:" .$ajax_address ."<br>";

echo "Remember?" .$ajax_remem ."<br>";


}

?>
As you click the button, the $.ajax method will be called. In the url parameter, the post_ajax.php file is used.
In the data parameter, the form field’s data is sent to the server that will be picked up by that PHP file.
In the PHP file, I simply display the form data by using echo statement, after fetching it to PHP variables.
In other scenarios, you may want to save this data to the database to create an account and displaying the success message, as a response.
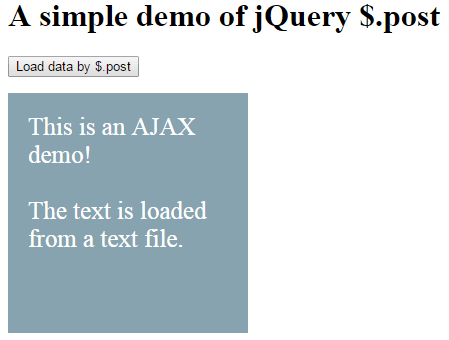
Using $.post method to pull data rather $.ajax
The $.ajax method of jQuery has a few high-level methods that use $.ajax underneath. These methods include $.post, $.get, $.load, etc. Generally, these high-level methods are easier to use.
The following is a replica of the first example where I pulled data in a div element. The only difference is, I have used the $.post method this time instead of $ajax.
Complete code
<!doctype html>
<html>
<head>
<script src="https://code.jquery.com/jquery-1.10.1.min.js">
</script>
<script>
$(document).ready(function(){
$("#ajaxbtn").click(function(){
$.post("ajaxtst.txt",function(ajaxresult){
$(".divdemo").append(ajaxresult);
});
});
});
</script>

<style>
.divdemo{
width:200px;
height: 200px;
background-color:#87A3AF;
color:#fff;
padding:20px;
font-size:25px;
}
</style>

</head>
<body>

<h1>A simple demo of jQuery $.post</h1>
<p><button id="ajaxbtn">Load data by $.post</button></p>
<div class="divdemo"></div>

</body>
</html>
Similarly, you can use the $.get method if you want to work with cached data. The $get also uses $.ajax underway. Where to use $.get and post are explained in their own chapters with demos.