
A brief about click method
The click method of jQuery can be used in any HTML element like div, paragraphs, span, hyperlink, etc. to accomplish some task as required.
The click is a mouse event that happens as you depress the mouse button. However, the pointer of the mouse must be inside of that element to make it happen.
In this tutorial of jQuery click event, I will show you how to use the click method in different elements. Also, as the click is a shorthand of jQuery .on (“click”, event_handler) I will show you how with examples.
The syntax to use click method
$(selector).click(function() {
//Perform some action;
});
A simple example of click
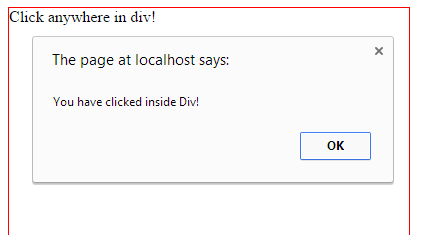
In this example, I will simply use a div element without much styles, simply a border line to let you know where it starts and end. As you click inside that div element, the event handler will throw an alert. Click on the link below to see how it works along with the code.
The code:
<!DOCTYPE html>
<head>
<script src="//code.jquery.com/jquery-1.10.2.js"></script>
<script>
$(document).ready(function(){
    $(".clickcls").click(function(){
    alert("You have clicked inside Div!");
    });
});
</script>

<style>
.clickcls{
width:400px;
height:400px;
border: 1px solid red;
}
</style>
</head>
<body>

<div class="clickcls">Click anywhere in div!</div>

</body>
</html>
First of all jQuery library is included inside the head section. After that, the div element is called by class name in the script section where click method is used. Finally, the event handler will deliver an alert as the mouse is clicked.
As mentioned, the click event occurs as the mouse is depressed or the button is released while the mouse pointer is inside that div element. If you click inside the div and drag outside of div (red border area) without releasing the mouse, the event will not occur.
In scenarios like these where you must perform some action as the mouse is clicked then you should use mousedown event of JavaScript.
Click example without shorthand
As mentioned in the above section that the $.click is the shorthand of jQuery .on(“click”, event_handler), the following example shows how. The same div element is used and the result will also be the same, as in the above example.
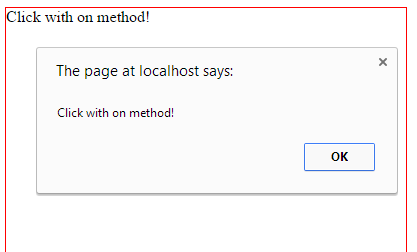
As you can see, the same is the output (except alert message). The following script is used in the demo:
<script>
$(document).ready(function(){
$(".clickcls").on("click",function(){
alert("Click with on method!");
});
});
</script>
However, one thing to be noticed is that the $.on method is quite wide in usage. You can use many events in the $.on method like dblclick, change, and others while it is also the replacement of other jQuery methods. To learn more about it go to its own chapter.
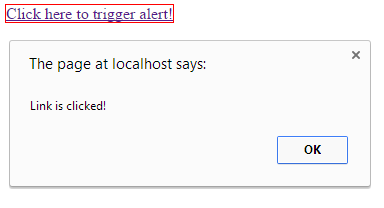
An example of $.click in a link
In the following example, the click method is attached to the link’s click event. Again as you click the link and remain inside the link area the alert will be shown, which is placed inside the event handler. See the example code below that you may just copy/paste and execute in your editor:
The code
<!DOCTYPE html>
<head>
<script src="//code.jquery.com/jquery-1.10.2.js"></script>
<script>
$(document).ready(function(){
    $("#clk_link").click(function(){
    alert("Link is clicked!");
    });
});
</script>

<style>
#clk_link{
border: 1px solid red;
}
</style>
</head>
<body>

<a href="#" id="clk_link">Click here to trigger alert!</a>


</body>
</html>
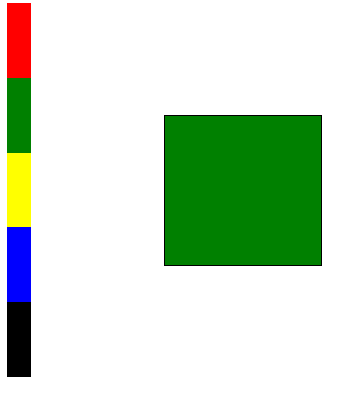
A click example with color div elements
This is a more visible example of click method where I have created five colored div elements. Each div has a different color – red, green, yellow, blue, and black. In front of these five div elements, a larger div is given with white color. As you click any of the colored div element, the color of the larger div will be changed to the one that you clicked.
Script, CSS and HTML
<!DOCTYPE html>
<head>
<script src="//code.jquery.com/jquery-1.10.2.js"></script>
<script>
$(document).ready(function(){
    $("#div1").click(function(){
    $("#chgcolor").css("background-color","red");
    });

    $("#div2").click(function(){
    $("#chgcolor").css("background-color","green");
    });

    $("#div3").click(function(){
    $("#chgcolor").css("background-color","yellow");
    });

    $("#div4").click(function(){
    $("#chgcolor").css("background-color","blue");
    });

    $("#div5").click(function(){
    $("#chgcolor").css("background-color","black");
    });
});
</script>

<style>
#div1{
width:30px;
height:50px;
background-color:red;
}
#div2{
width:30px;
height:50px;
background-color:green;
}
#div3{
width:30px;
height:50px;
background-color:yellow;
}
#div4{
width:30px;
height:50px;
background-color:blue;
}
#div5{
width:30px;
height:50px;
background-color:black;
}
#chgcolor{
width:200px;
height:200px;
background-color:white;
border:1px solid black;
margin-top:-250px;
margin-left:200px
}
</style>
</head>
<body>

<div id="div1"></div>
<div id="div2"></div>
<div id="div3"></div>
<div id="div4"></div>
<div id="div5"></div>

<div id="chgcolor"></div>


</body>
</html>
So what is done in the script section of the code? Each div is created with an ID for which the style is created in the style section. In the style section, each colored divs is given a color. Then in the jQuery section, I used click jQuery event of each div element. As you click on a specific div element the background color of the larger div will be changed by using the $.css method of jQuery. The .css method allows you to change CSS of any given element.
e.g. $(“#chgcolor”).css(“background-color”,”yellow”);
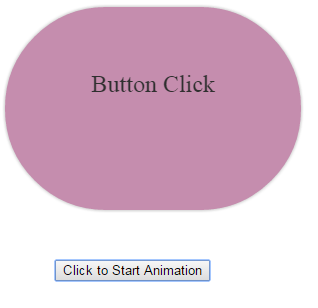
In the following example, an animation is created. The click handler is attached to the button’s click event. As you click on the button “Click to Start Animation” the animation will be started.
Code:
<!doctype html>
<html>
<head>
  <script src="//code.jquery.com/jquery-1.10.2.js"></script>
  <script src="//code.jquery.com/ui/1.11.2/jquery-ui.js"></script>
<script>
   $(document).ready(function() {

    $( "#runani" ).click(function() {
        animateex();
    });
  function animateex() {
      $( "#divanimation" ).animate({
        opacity: 0.6,
        width: "160",
        height: "110",
        backgroundColor:"#8000FF",
        color:"#fff",
        lineHeight: "75px",
        fontSize:"18px"
      },3000,animateback);
    }

  function animateback() {
      $( "#divanimation" ).animate({
        opacity: 1,
        width: "300px",
        height: "200px",
        backgroundColor:"#CD9C9C",
        color:"#000",
        lineHeight: "150px",
        fontSize:"25px"
      },3000,animateex);
    }

});

</script>
  <style>
#divanimation {
	padding: 8px;
    background:#CD9C9C;
	width: 300px;
    height:200px;
	box-shadow: 0 0 5px #aaa;
    font-size: 25px;
    text-align:center;
    border-radius: 200px;
    line-height: 150px;
}

button{
   margin: 50px;
}
  </style>
</head>
<body>

<div id="divanimation">Button Click</div>
<button id="runani">Click to Start Animation</button>

</body>
</html>
As you can see in the code of above example, when you click on the button, the click event triggers a function animateex that calls div element with the animate method and it starts animating with new CSS properties.
Once the animation is completed, the animate method calls a callback function animateex that will take the animation back to what it was initially. The process goes on that was basically started after you clicked the button. Also, note that this is color animation, so I have also included jQuery UI library. Color animation requires the Color plugin.
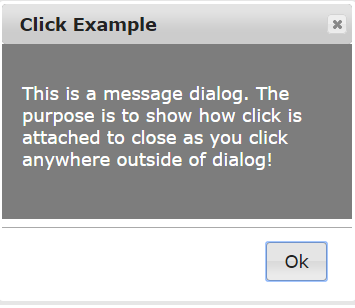
Using click method in a UI dialog example
The use of click method is quite wide in web pages. Until now we have seen using it in div, links, animation, buttons, etc.. In this example, I will use jQuery UI dialog widget. The dialog widget is the part of UI library by jQueryUI.
In the dialog example, I have created an alert (dialog box) with “OK” button. The dialog will be closed as you click anywhere outside of the dialog box.
Complete code for this example:
<!doctype html>
<html>
<head>
  <link rel="stylesheet" href="//code.jquery.com/ui/1.11.2/themes/smoothness/jquery-ui.css">
  <link rel="stylesheet" href="dialog-ui.css">
  <script src="//code.jquery.com/jquery-1.10.2.js"></script>
  <script src="//code.jquery.com/ui/1.11.2/jquery-ui.js"></script>
  <script>
  $(function() {
    $( "#j_dialog" ).dialog({
      autoOpen: true,
      modal: true,
      width: 350,
      height: 300,
      open: function() {
            jQuery('.ui-widget-overlay').click(function() {
                jQuery('#j_dialog').dialog('close');
            })
        },

      buttons: {
        Ok: function() {
          $( this ).dialog( "close" );
        }
        },
      show: {
        effect: "bounce",
        duration: 1500
      },
      hide: {
        effect: "fade",
        duration: 1000
      }

    });
   });
  $( ".selector" ).dialog({
  closeOnEscape: false
});
  </script>
</head>
<body>

<div id="j_dialog" title="Click Example">
  <p>This is a message dialog. The purpose is to show how click is attached to close as you click anywhere outside of dialog!</p>
</div>


</body>
</html>
So what is done in the code of this example? First of all, the jQuery and jQuery UI libraries are included. Then I created a dialog box with some options like width, height, modal, and others. After that, in the open option, I specified to close the dialog box as the mouse is clicked anywhere outside of the dialog box. Although the dialog will be closed if you click Ok or cross button, but this is not handled in this code. The others are built-in.
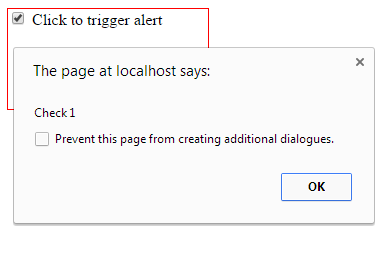
Click example with form element – checkbox
Now let us have a look at the form element example. The click event and method is used the same way as in other elements of HTML. In this example, as you click on the checkbox, an alert will be shown.
Code:
<!DOCTYPE html>
<head>
<script src="//code.jquery.com/jquery-1.10.2.js"></script>
<script>
$(document).ready(function(){
    $("#chk1").click(function(){
    alert($("#chk1").val())
    });
});
</script>

<style>
#clickcls{
width:200px;
height:100px;
border: 1px solid red;
}
</style>
</head>
<body>

<div id="clickcls">
<input type="checkbox" id="chk1" value="Check 1"/> Click to trigger alert
</div>

</body>
</html>
The alert is attached to click event of the checkbox. As you click on the checkbox, the code in jQuery will catch and trigger an alert with the value of the checkbox by using the $.val method.
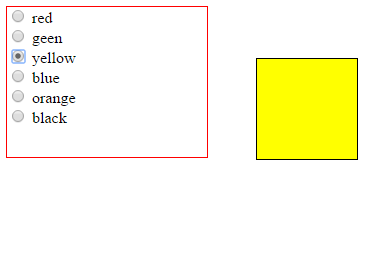
Similarly, you can use radio buttons, text boxes, and other form elements’ click event to perform some action. See the following example of multiple radio buttons.
In this example, multiple radio buttons are used that are related to the same group. The div contains six radio buttons that have the same name selColor i.e. you can select one among the six radio buttons. Each radio button is given a color value name like red, green etc.
As you select a radio button by the mouse the jQuery click triggers the method. In the event handler, the background color of another div will be changed to the selected radio button. Have a look at the demo by clicking the link or image below:
See online demo and code
So what is done in the script section is, in the click event handler of selColor radio group, as you click a radio the value of the selected radio is assigned to a variable in this line:
colorname= $(‘input:radio[name=selColor]:checked’).val();
In the next line of code, the $.css method is used to assign that value to the right div:
$(“#chgcolor”).css(“background-color”,colorname);
That’s it!