
The Checkbutton widget allows a user selecting one or more given options from the group of options.
For example, which programming languiages do you like?
- C#
- Python
- Java
- PHP
- Kotlin
- Go Lang
So, a user can select one or more languages from the toggle buttons.
In order to allow users to choose only one option from two or more, you may use the tkinter Radiobutton widget.
You may create Checkbutton by using this syntax:
w = Checkbutton ( master, option, … )
Go through the section below for examples of creating Checkbuttons with various available options in tkinter – a Python library.
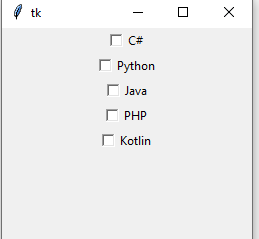
In the Python program below, we have created five Checkbuttons. For each check button, we set the text, onvalue, and offvalue options. Have a look at this simple example:
Code:
from tkinter import *


win = Tk()


#Setting window size containing check buttons

win.geometry("250x250")


#Creating five check buttons

chk1 = Checkbutton(win, text = "C#",  onvalue = 1, offvalue = 0)

chk2 = Checkbutton(win, text = "Python",  onvalue = 1, offvalue = 0)

chk3 = Checkbutton(win, text = "Java", onvalue = 1, offvalue = 0)

chk4 = Checkbutton(win, text = "PHP", onvalue = 1, offvalue = 0)

chk5 = Checkbutton(win, text = "Kotlin", onvalue = 1, offvalue = 0)


chk1.pack()

chk2.pack()

chk3.pack()

chk4.pack()

chk5.pack()


win.mainloop()
Output:
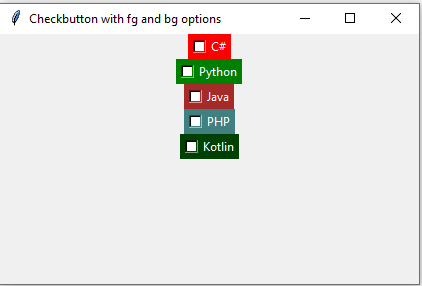
By using bg option of the Checkbutton widget, you may set the background color – behind the label and indicator.
Similarly, to set the text color of the Checkbutton, use the fg option.
See an example below:
Code:
from tkinter import *

win = Tk()

#Setting window size containing check buttons


win.geometry("250x250")

win.title("Checkbutton with fg and bg options")


#Creating five check buttons with active background and foreground

chk1 = Checkbutton(win, text = "C#",  onvalue = 1, offvalue = 0, bg = "red", fg = "white")

chk2 = Checkbutton(win, text = "Python",  onvalue = 1, offvalue = 0, bg = "green", fg = "white")

chk3 = Checkbutton(win, text = "Java", onvalue = 1, offvalue = 0, bg = "brown", fg = "white")

chk4 = Checkbutton(win, text = "PHP", onvalue = 1, offvalue = 0, bg = "#408080", fg = "white")

chk5 = Checkbutton(win, text = "Kotlin", onvalue = 1, offvalue = 0, bg = "#004000", fg = "white")


chk1.pack()

chk2.pack()

chk3.pack()

chk4.pack()

chk5.pack()


win.mainloop()
Output:
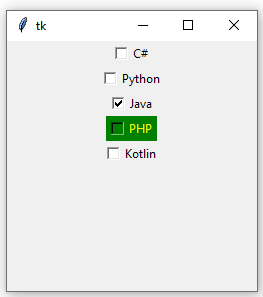
In this program, we set the active foreground and background colors of the check buttons. That means if you click/press the check button, the color of the checkbox’s text and background changes.
Click on any of the check buttons to see its impact:
Code:
from tkinter import *

win = Tk()


#Setting window size containing check buttons

win.geometry("250x250")

#Creating five check buttons with active background and foreground

chk1 = Checkbutton(win, text = "C#",  onvalue = 1, offvalue = 0, activebackground = "green", activeforeground = "yellow")

chk2 = Checkbutton(win, text = "Python",  onvalue = 1, offvalue = 0, activebackground = "green", activeforeground = "yellow")

chk3 = Checkbutton(win, text = "Java", onvalue = 1, offvalue = 0, activebackground = "green", activeforeground = "yellow")

chk4 = Checkbutton(win, text = "PHP", onvalue = 1, offvalue = 0, activebackground = "green", activeforeground = "yellow")

chk5 = Checkbutton(win, text = "Kotlin", onvalue = 1, offvalue = 0, activebackground = "green", activeforeground = "yellow")


chk1.pack()

chk2.pack()

chk3.pack()

chk4.pack()

chk5.pack()


win.mainloop()
Output:
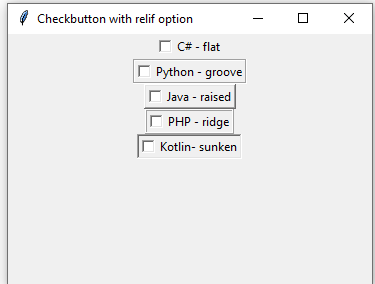
Using the relief option example
In order to stand out checkbutton differently, you may set the style by using the relief option.
The following are the possible values for the relief option:
- flat (default)
- groove
- raised
- ridge
- solid
- sunken
The example below uses a few of these values – you can its output in the image below:
Code:
from tkinter import *


win = Tk()

#Setting window size containing check buttons


win.geometry("250x250")

win.title("Checkbutton with relif option")


#Creating five check buttons

chk1 = Checkbutton(win, text = "C# - flat",  onvalue = 1, offvalue = 0, relief = "flat")

chk2 = Checkbutton(win, text = "Python - groove",  onvalue = 1, offvalue = 0, relief = "groove")

chk3 = Checkbutton(win, text = "Java - raised", onvalue = 1, offvalue = 0, relief = "raised")

chk4 = Checkbutton(win, text = "PHP - ridge", onvalue = 1, offvalue = 0, relief = "ridge")

chk5 = Checkbutton(win, text = "Kotlin- sunken", onvalue = 1, offvalue = 0, relief = "sunken")


chk1.pack()

chk2.pack()

chk3.pack()

chk4.pack()

chk5.pack()


win.mainloop()
Output:
How to get value of the checkbox
In real applications, you will need to get the values of the checkbox in order to process the information or do something.
For that, you need to use onvalue and offvalue options of the check button.
Besides, variables are declared and assigned as creating the checkbuttons.
Have a look at the program below where we have the same set of options as in the above examples.
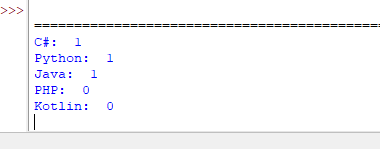
After selecting the check buttons, press the tkinter button “Display Values” and it will print in the console the value for each check button.
Code:
from tkinter import *


win = Tk()

#Setting window size containing check buttons


win.geometry("250x250")

win.title("Checkbutton with values")


def display_check():

   print("C#: ", var1.get())

   print("Python: ", var2.get())

   print("Java: ", var3.get())

   print("PHP: ", var4.get())

   print("Kotlin: ", var5.get())


# Five variables - one for each check button

var1 = IntVar()

var2 = IntVar()

var3 = IntVar()

var4 = IntVar()

var5 = IntVar()


#Creating five check buttons

chk1 = Checkbutton(win, text = "C#",  onvalue = 1, offvalue = 0, variable=var1)

chk2 = Checkbutton(win, text = "Python",  onvalue = 1, offvalue = 0, variable=var2)

chk3 = Checkbutton(win, text = "Java", onvalue = 1, offvalue = 0, variable=var3)

chk4 = Checkbutton(win, text = "PHP", onvalue = 1, offvalue = 0, variable=var4)

chk5 = Checkbutton(win, text = "Kotlin", onvalue = 1, offvalue = 0, variable=var5)


btn = Button(win,text = "Display Values", command = display_check)


chk1.pack()

chk2.pack()

chk3.pack()

chk4.pack()

chk5.pack()

btn.pack()


win.mainloop()
Sample:
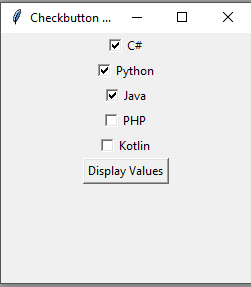
Output:
How did it work?
- A function is defined to display the value of each checkbutton, called display_check().
- Then we declared five empty int type variables
- As we created five check buttons, we set onvalue= 1 and offvalue=0 for each check button.
- We also used the variable option where we assigned the declared variable to each checkbutton.
- Finally, a button is created that will call display_check custom function – it prints the selected value of the check button in the console.
Note: Rather than 1/0 for the on and off values, you may set other values for the check buttons.