
The hovering effect
As you bring the mouse over an element, the hover event occurs. You may perform certain things by using jQuery as this occurs.
In this tutorial, I am using the “jQuery-hover-effects” plug-in, which is a light-weight, just 6Kb JS file for creating hover effects on elements.
Basically, this plug-in will show the hidden content as you bring the mouse over the specified element. The element can be an image, a text paragraph, or other sections of a web page. See the section below for demos and setting up guide for using this nice plug-in in your web projects.
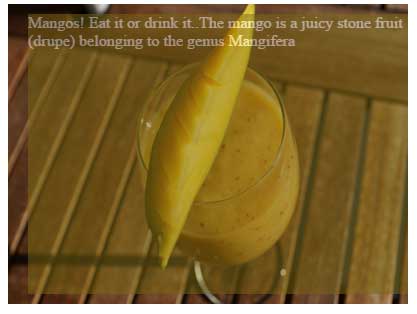
A demo of the hovering effect in an image
In this example, an image is used with the plug-in. As you bring the mouse over the image, the hidden content will be visible.
The hidden content is shown in an overlay for which properties are set in the <script> section. See the example and code on the demo page:

Online demo and code
So how is it done?
First of all, include the jQuery library above the </body> tag.
This is followed by referring to the plug-in file, hovereffect.js.
You can download this file from the package here or by View page source the demo page and open the hovereffect.js.js file and save it in your system.
In the markup section, create an element where you want a hovering effect; in the case of the demo, this is an image:
<img class="element" width="400" height="300" src="images/mango.jpg" alt="Mango">
Finally, place the code for calling the overlay:
<div class="overlay" style="display:none">Mangos! Eat it or drink it..The mango is a juicy stone fruit (drupe) belonging to the genus Mangifera</div>
The properties of the overlay: its background, height, width, direction, etc. are set in the <script> section:
  <script>

$(function() {

$(".element").hovereffect({

background_color: "#555",

font_color: "#fff",

duration: 500,

opacity: 0.7,

slidePath: ['left', 'bottomRight'],

overlayWidth: "300px",

overlayHeight: "100px"

});

});

</script>
Changing the default properties example
In this example, a few properties of the overlay are changed. The opacity value is kept 0.5 while background color, font-color are also changed.
Along with this, you can also change the direction of the overlay as the mouse is brought over the element. For the demo, I used right as the mouse is brought over and bottomLeft as the mouse is out of the image.
Use this script for this example:
<script>

$(function() {

$(".hoverdemo").hovereffect({

background_color: "#7A6812",

font_color: "#fff",

duration: 1000,

opacity: 0.5,

slidePath: ['right', 'bottomLeft'],

overlayWidth: "380px",

overlayHeight: "280px"

});

});

</script>
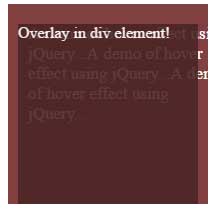
A demo of hover effect in a div element
In this example, I am using a div tag with dummy text to show that you may also use this plug-in with text elements like <div>, <P>, <span> etc. as well.
The overlay properties are also changed a bit while opacity is kept more than above examples.
See online demo and code
Following is the markup used in above example:
<div class="hoverdemo">A demo of hover effect using jQuery...A demo of hover effect using jQuery...A demo of hover effect using jQuery...</div>

<div class="overlay" style="display: none;" >Overlay in div element!</div>
This is the <script> part:
<script>

$(function() {

$(".hoverdemo").hovereffect({

background_color: "#4B2525",

font_color: "#fff",

duration: 800,

opacity: 0.9,

slidePath: ['bottom', 'topLeft'],

overlayWidth: "180px",

overlayHeight: "180px"

});

});

</script>
See the complete code on the demo page.
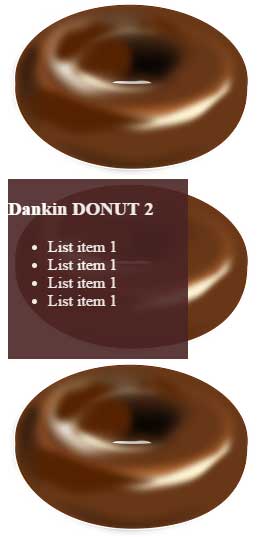
An example of adding list in overlay
You can use different pieces of content including images in the small overlay that is visible as the mouse is brought over the specified element.
In this example, I have used list items as you bring the mouse over a “product image”. This plug-in becomes useful in this kind of scenario as you may show information of products in different ways including list format.
See the example below:
See online demo and code
You can see, three product images are shown as the demo page loads. On each image, the heading is different while all are sharing the same script for showing the overlay.
That means you can show dynamic product listings along with DB-driven information in a list or some other format, along with images, etc. by using this nice jQuery plug-in.