
How to show / hide table columns
The simple and nice jQuery based plug-in, hide_columns, can be used for allowing the users to show or hide the HTML table columns in your website.
The integration process is quite simple for using this plug-in in any table. You just need to add the jQuery library along with JS file of the plug-in. (Find the link at the bottom for downloading the plug-in or download from the demo pages below).
If you simply want to enable the users to hide the columns, just initiate the plug-in in the <script> section. The plug-in will add a cross “button” in each column’s header.
If you want to display buttons to show the hidden columns then simply add a <div> with a specific class as shown in the demo below.
A demo of hide / show HTML table columns
In this demo, a few rows of a table in HTML are created by using plug-in style file. The table is assigned an ID which is called in the jQuery code section. Have a look at the demo:
See online demo and code
To set up this plug-in along with table style, follow these instructions:
Include the CSS file of the plug-in in the <head> section for the table style. It also defines the cross button style. If you want to use your own style, you may omit this.
In the <head> section, Bootstrap CSS is used for buttons:
<link rel=”stylesheet” href=”http://netdna.bootstrapcdn.com/bootstrap/3.3.6/css/bootstrap.min.css”>
<link rel=”stylesheet” href=”css/hide_cols/hide_cols.css”>
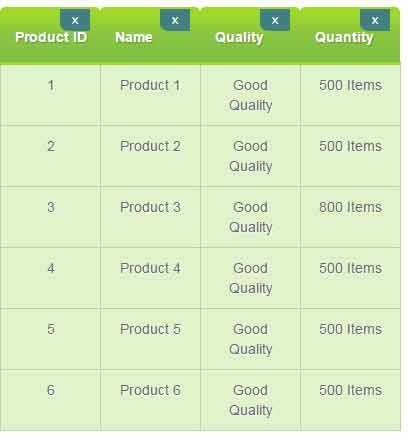
The markup contains the <table> HTML markup along with a div for buttons:
<div class="hide-cols">

<table class="demotbl" id="show-hide-cols">

  <tr>

      <th>Product ID</th>

      <th>Name</th>

      <th>Quality</th>

      <th>Quantity</th>

  </tr>

  <tr>

      <td>1</td>

      <td>Product 1</td>

      <td>Good Quality</td>

      <td>500 Items</td>

  </tr>

  <tr>

      <td>2</td>

      <td>Product 2</td>

      <td>Good Quality</td>

      <td>500 Items</td>

  </tr>

  <tr>

      <td>3</td>

      <td>Product 3</td>

      <td>Good Quality</td>

      <td>800 Items</td>

  </tr>

  <tr>

      <td>4</td>

      <td>Product 4</td>

      <td>Good Quality</td>

      <td>500 Items</td>

  </tr>

  <tr>

      <td>5</td>

      <td>Product 5</td>

      <td>Good Quality</td>

      <td>500 Items</td>

  </tr>

  <tr>

      <td>6</td>

      <td>Product 6</td>

      <td>Good Quality</td>

      <td>500 Items</td>

  </tr>


</table>


<div id="show"></div>

</div>
Just above the </body> closing tag, place the jQuery and hide_columns.js file which is followed by initiating the plug-in in <script> section:
<script src=”http://code.jquery.com/jquery-1.12.4.min.js”></script>
<script src=”js/hide_cols/hide_cols.js”></script>
<script>

$("#show-hide-cols").hideCols();

</script>
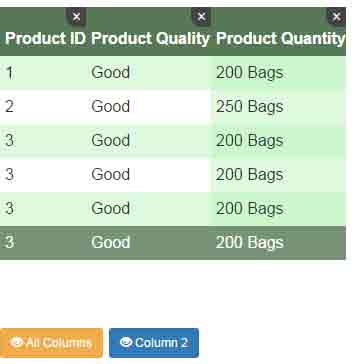
In above example, you saw buttons appear as you hide a column by pressing the cross button in each column. The button caption is general i.e. columns 1, column 2, column 3 etc.
In pro apps, you would want to use more descriptive captions according to the column names so that the user easily understands if he or she wants to display it back.
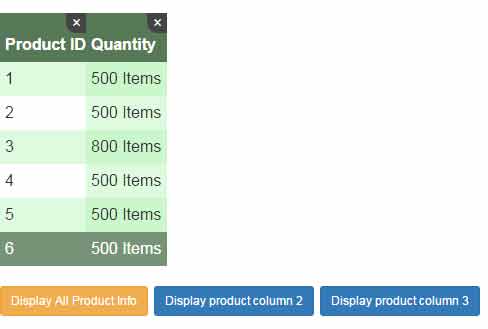
See the following demo, where unhideColumn option of the plug-in is used with the custom caption:
The markup remains the same as in the first example. Following is the script used:
<script>
$("#show-hide-cols").hideCols({
hideColumn: '×', // this creates the × character
unhideColumn: 'Display product column',
unhideAll: 'Display All Product Info'
});
</script>
Although, this is still limited or incomplete. I would prefer displaying the exact column names that are hidden as button captions. Hopefully, the developer of the plug-in will think about a solution about this in future updates.
A demo of show/hide columns with your custom CSS
In this example, the table is created with custom CSS rather than using plug-in’s CSS. So, the reference to the plug-in CSS is removed in the <head> section for this demo. You may also use your own button style rather than using the Bootstrap’s CSS. Have a look:
Complete code with CSS
<!DOCTYPE html>
<html>
<head>
<title>HTML table demo</title>
<link rel="stylesheet" href="https://netdna.bootstrapcdn.com/bootstrap/3.3.6/css/bootstrap.min.css">

<style>
/*Using CSS for table*/
.demotbl {
    border: 0px solid #69899F;
  }
.demotbl th{
    padding:15px;
    color:#fff;
    text-shadow:1px 1px 1px #568F23;
    border-bottom:3px solid #9ED929;
    background-color:#9DD929;
    background:-webkit-gradient(
        linear,
        left bottom,
        left top,
        color-stop(0.02, rgb(123,192,67)),
        color-stop(0.51, rgb(139,198,66)),
        color-stop(0.87, rgb(158,217,41))
        );
    background: -moz-linear-gradient(
        center bottom,
        rgb(123,192,67) 3%,
        rgb(139,198,66) 52%,
        rgb(158,217,41) 88%
        );
    -webkit-border-top-left-radius:5px;
    -webkit-border-top-right-radius:5px;
    -moz-border-radius:5px 5px 0px 0px;
    border-top-left-radius:5px;
    border-top-right-radius:5px;
  }
.demotbl td{
    width:100px;
    padding:10px;
    text-align:center;
    vertical-align: top;
    background-color:#DEF3CA;
    border: 1px solid #BED3AB;
    -moz-border-radius:2px;
    -webkit-border-radius:2px;
    border-radius:2px;
    color:#666;
    text-shadow:1px 1px 1px #fff;

  }
.hide-cols .closeWrap {
  width: 100%;
  height: 100%;
  position: relative;
  padding: 15px 0 5px;
}
.hide-cols .hide-col {
  background: #408080;
  -webkit-border-radius: 0 0 0 50%;
  -moz-border-radius: 0 0 0 50%;
  border-radius: 0 0 0 30%;
  width: 30px;
  height: 22px;
  line-height: 20px;
  color: #fff;
  border: 0 none;
  position: absolute;
  right: 10px;
  top: 2px;
  font-weight: normal;
  -webkit-transition: all 0.3s;
  -moz-transition: all 0.3s;
  -ms-transition: all 0.3s;
  -o-transition: all 0.3s;
  transition: all 0.3s;
  cursor: pointer;
}
</style>

</head>
<body>
<p>A table with column hide option</p>
<div class="hide-cols">
<table class="demotbl" id="show-hide-cols">
  <tr>
      <th>Product ID</th>
      <th>Name</th>
      <th>Quality</th>
      <th>Quantity</th>
  </tr>
  <tr>
      <td>1</td>
      <td>Product 1</td>
      <td>Good Quality</td>
      <td>500 Items</td>
  </tr>
  <tr>
      <td>2</td>
      <td>Product 2</td>
      <td>Good Quality</td>
      <td>500 Items</td>
  </tr>
  <tr>
      <td>3</td>
      <td>Product 3</td>
      <td>Good Quality</td>
      <td>800 Items</td>
  </tr>
  <tr>
      <td>4</td>
      <td>Product 4</td>
      <td>Good Quality</td>
      <td>500 Items</td>
  </tr>
  <tr>
      <td>5</td>
      <td>Product 5</td>
      <td>Good Quality</td>
      <td>500 Items</td>
  </tr>
  <tr>
      <td>6</td>
      <td>Product 6</td>
      <td>Good Quality</td>
      <td>500 Items</td>
  </tr>

</table>
<br /><br />
<div id="show"></div>
</div>
<script src="https://code.jquery.com/jquery-1.12.4.min.js"></script>
<script src="js/hide_cols/hide_cols.js"></script>
<script>
$("#show-hide-cols").hideCols({
    hideColumn: '×',
    unhideColumn: 'Display product column',
    unhideAll: 'Display All Product Info'

});
</script>
</body>
</html>
Credit: RayHyde