
Arrays in JavaScript
The array in JavaScript can be created by using var keyword followed by array name as shown below:
You can create JavaScript array with mixed data types as well, for example, array containing both numbers and strings:
You may also use new keyword to create array objects:
In that way, the elements are enclosed in parenthesis.
Just like in other programming languages, the array index of JavaScript also starts at 0.
In the above syntax, the elements with index are:
JSArr [0] = 1

JSArr [1] = 2

JSArr [2] = 3

JSArr [3] = “String”
As you have seen the basic syntax for creating arrays in JavaScript, I will show you its usage with different HTML elements. The demos include declaring, creating, and accessing arrays in JavaScript with its built-in functions/properties.
I will use different HTML elements like <div>, textbox, select dropdowns, and others. Let me start with the basic demos.
- 1. An example of creating and accessing array elements
- 2. A mixed array example with strings and numbers
- 3. Accessing a specific element example
- 4. A practicing example of using arrays – autocomplete
- 5. The arrays of JavaScript with HTML dropdowns
- 6. Creating a dynamic array demo
- 7. An example of Array push function
- 8. A demo of the array unshift method of JavaScript
- 9. A user selected dynamic array demo
- 10. An example of removing array elements by pop method
- 11. Remove array element by shift method
- 12. Summary of JavaScript Arrays Tutorial
An example of creating and accessing array elements
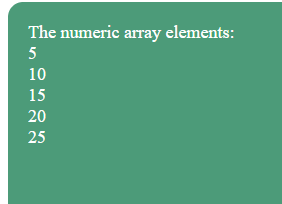
In this example, I will create a simple array of 5 numbers. After that, a for loop is used to iterate through that array with the array length property to display the array elements in a div element of HTML.
See the code and output which is followed by a little description:
JS and markup:
<!DOCTYPE html>
<html>
<style>
#div_demo {
  background: #4C9B79;
  height: 220px;
  width:40%;
  border-radius: 15px;
  padding:20px;
  font-size:18px;
  color:#fff;
}
</style>
<head>

</head>
<body>
<div id="div_demo"></div>


<script type="text/javascript">

var Arrnum = [5,10,15,20,25];
var num;
var displayArray = "The numeric array elements: <BR>";

for (num=0; num < Arrnum.length; num++){
    displayArray += Arrnum[num] + "<BR>";
    }
    document.getElementById("div_demo").innerHTML = displayArray;


</script>
</body>

</html>
Output:
Let me go through the steps to explain, how this demo worked:
First, an array of five numbers is created in the <script> section just above </body> tag:
var Arrnum = [5,10,15,20,25];
A num variable is declared which is used in the for loop. While a string variable displayArray is declared to hold array elements and finally displaying in <div>.
After declaration, a for loop is used to iterate through array elements where I specified the JavaScript array length property:
for (num=0; num < Arrnum.length; num++){
The Arrnum.length will specify the total length or number of elements in the array. Also, note the loop is started from 0 because JS array index starts at 0.
After for loop, I used the document.getElementById function with innerHTML to print the array elements in a div element.
For better presentation, I used some CSS for the div with text-color and font size properties, which is placed in the <head> section of web page.
A mixed array example with strings and numbers
As mentioned earlier, JavaScript supports mixed arrays. That means you can create an array with numbers and strings or other objects.
The following example shows how:
<!DOCTYPE html>
<html>
<style>
#div_demo {
  background: #428BCA;
  height: 220px;
  width:40%;
  border-radius: 15px;
  padding:20px;
  font-size:22px;
  color:#fff;
}
</style>
<head>

</head>
<body>
<div id="div_demo"></div>


<script type="text/javascript">

var ArrMixed = [1, "A ", 2, "Mixed ",3,"Array."];
var num;
var displayArray = "The Mixed array elements: <BR><BR>";

for (num=0; num < ArrMixed.length; num++){
    displayArray += ArrMixed[num] + "<BR>";
    }
    document.getElementById("div_demo").innerHTML = displayArray;


</script>
</body>

</html>
Output:
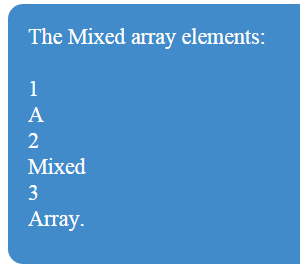
In the example, the same JS for loop is used to display the mixed array elements:
var ArrMixed = [1, "A ", 2, "Mixed ",3,"Array."];
The array elements are displayed in the HTML div tag.
Accessing a specific element example
You may access specific array elements by using the index numbers.
In this demo, I am using the same array as created in the above example. After that, I will print only string elements in that array.
JS and markup:
<!DOCTYPE html>
<html>
<style>
#div_demo {
  background: #428BCA;
  height: 220px;
  width:40%;
  border-radius: 15px;
  padding:20px;
  font-size:22px;
  color:#fff;
}
</style>
<head>

</head>
<body>
<div id="div_demo"></div>


<script type="text/javascript">

var ArrMixed = [1, "A ", 2, "Mixed ",3,"Array."];

    displayArray = "The String elements are: <BR><BR>" + ArrMixed[1] + ArrMixed[3] + ArrMixed[5];
    document.getElementById("div_demo").innerHTML = displayArray;

</script>
</body>

</html>
Output:
The String elements are:
A Mixed Array.
You can see in the demo page code section, no for loop is used this time for iteration of the array elements. Instead, specific array elements are accessed by using brackets as follows:
var ArrMixed = [1, "A ", 2, "Mixed ",3,"Array."];

displayArray = "The String elements are: <BR><BR>" + ArrMixed[1] + ArrMixed[3] + ArrMixed[5];

document.getElementById("div_demo").innerHTML = displayArray;
As such, the array index starts at 0, so “A” although is in the second position in the array, the index for “A” is 1. That is:
ArrMixed[1] = “A”

ArrMixed[3] = "Mixed "

ArrMixed[5] = ,"Array."
A practicing example of using arrays – autocomplete
Enough basic examples to understand what is JavaScript array. How to declare, initialize, or access by specific element or whole array by using a for loop, etc.?
Now let me move to a practical example that can be utilized in a pro website with different components.
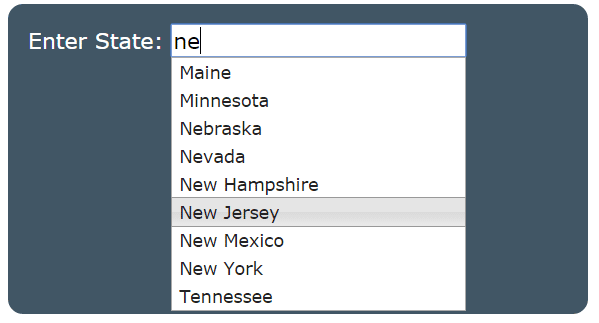
I am starting with an auto-complete textbox example. You might have seen a textbox where you enter one or more letters and it will show a suggested list based on those entered letters.
If not, have a look at this example below that uses a JS array of US State names. Just enter a letter or two (copy/paste the complete code below) and see how it will show suggestions based on entered letters for US state names:
The example is a combination of JavaScript, jQuery, and jQuery UI. It uses the jQuery UI autocomplete plug-in that requires a source for suggested words based on user-entered letters.
Regarding our topic of JavaScript array, look at the <script> section under <head> tag where a function containing an array USStates is used.
var USStates = [

"Alabama",

"Alaska",

"Arizona",

"Arkansas",

….];
After creating an array with US state names, a jQuery line is used to initiate the autocomplete plugin:
$( "#USstate" ).autocomplete({

source: USStates

});
I don’t mean to understand that code of jQuery, (if you have no idea about jQuery). Just consider the line:
source: USStates
Where the USStates is a JavaScript array.
Also, I used some CSS for better presentation only. The markup section is using that plugin in a div element:
<div class="ui-widget div_demo">

<span>Enter State: </span><input type="text" id="USstate">

</div>
If you are interested in learning more about the auto-complete jQuery UI plugin go to this link.
Complete code for this example:
<!doctype html>
<html>
<head>

  <link rel="stylesheet" href="//code.jquery.com/ui/1.11.2/themes/smoothness/jquery-ui.css">
  <script src="//code.jquery.com/jquery-1.10.2.js"></script>
  <script src="//code.jquery.com/ui/1.11.2/jquery-ui.js"></script>

  <script>
  $(function() {
    var USStates = [
      "Alabama",
      "Alaska",
      "Arizona",
      "Arkansas",
      "California",
      "Colorado",
      "Delaware",
      "Florida",
      "Georgia",
      "Hawaii",
      "Idaho",
      "Illinois",
      "Indiana",
      "Kansas",
      "Kentucky",
      "Louisiana",
      "Maine",
      "Maryland",
      "Massachusetts",
      "Michigan",
      "Minnesota",
      "Mississippi",
      "Missouri",
      "Montana",
      "Nebraska",
      "Nevada",
      "New Hampshire",
      "New Jersey",
      "New Mexico",
      "New York",
      "North Carolina",
      "North Dakota",
      "Ohio",
      "Oklahoma",
      "Oregon",
      "Pennsylvania",
      "Rhode Island",
      "South Carolina",
      "South Dakota",
      "Tennessee",
      "Texas",
      "Utah",
      "Vermont",
      "Virginia",
      "Washington",
      "West Virginia",
      "Wisconsin",
      "Wyoming"
    ];
    $( "#USstate" ).autocomplete({
      source: USStates
    });
  });
  </script>
 <style>
.div_demo {
  background: #415665;
  height: 270px;
  width:40%;
  border-radius: 15px;
  padding:20px;
  font-size:22px;
  color:#fff;
}
</style>


</head>
<body>

<div class="ui-widget div_demo">
  <span>Enter State: </span><input type="text" id="USstate">
</div>


</body>
</html>
The arrays of JavaScript with HTML dropdowns
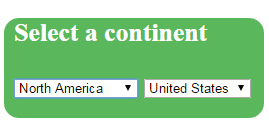
To demonstrate arrays in JavaScript, this demo uses two select dropdowns.
- The first one, “Select Continent” is given the hard-coded values. As you select a continent from this dropdown, a JavaScript function is called at the onChange event of this dropdown.
- The other dropdown, “Countries”, will be filled with countries related to the selected continent.
In the function, three JS arrays are used, one for each continent. See the demo online first, followed by a little description:
Online demo and code
The first dropdown is using the following code:
<select id="continent" onChange="contFunction()">

<option>Select Continent</option>

<option value="EU">Europe</option>

<option value="Asia">Asia</option>

<option value="NAmerica">North America</option>

</select>
You can see that the onChange event is called the contFunction of JavaScript. Inside the contFunction function, the selected value from this dropdown is assigned to a variable.
On that basis, the array of related countries will be selected. The following are the arrays:
var arrEU = ["England","Germany","France", "Ireland","Poland","Italy"];

var arrAsia = ["China","South Korea","Singapore","Pakistan","India"];

var arrNAmerica = ["United States","Mexico"];
After that, an if statement is used with the for loop to create the <options> for another dropdown to populate it with related countries.
document.getElementById('countries').innerHTML = "";

if (selectedArr == "EU"){


for (i=0 ; i<arrEU.length ; i++){

var seloptions = document.createElement('option');

seloptions.innerHTML = arrEU[i];

seloptions.value = arrEU[i];

countries.appendChild(seloptions);

}

}

else if (selectedArr == "Asia"){

for (i=0 ; i<arrAsia.length ; i++){

var seloptions = document.createElement('option');

seloptions.innerHTML = arrAsia[i];

seloptions.value = arrAsia[i];

countries.appendChild(seloptions);

}

}

else {

for (i=0 ; i<arrNAmerica.length ; i++){

var seloptions = document.createElement('option');

seloptions.innerHTML = arrNAmerica[i];

seloptions.value = arrNAmerica[i];

countries.appendChild(seloptions);

}

}
The statement above if statement is to make sure the dropdown is emptied before filling it with new options.
In certain scenarios, you may need to fill a dropdown based on the other dropdown’s selection. You can use your own approach for that, to filter a single array or use separate arrays. The demo is aimed at explaining the use of JavaScript array with HTML dropdowns only.
You may also need to get array elements from a database or some text file if you are not sure how many array elements are there.
In the following demos, I am going to show you using a few useful array functions to create dynamic arrays, removing array elements, etc.
Creating a dynamic array demo
The dynamic array is created by declaring an array with no elements at the start. Then a simple for loop is used to create the array elements.
For the demo, I am creating five array elements. Along with creating an array, the values are also assigned by using another variable which value is incremented with each loop.
JS code with HTML
<!doctype html>
<html>
<head>

<style>
#arr_demo {
  background: #415665;
  height: 270px;
  width:40%;
  border-radius: 15px;
  padding:20px;
  font-size:22px;
  color:#fff;
}
</style>


</head>
<body>
<p id="arr_demo"></p>

<script>
    var dynarray = [];
    var j= 10; // Used to give values to array elements
    var num;
    var displayArray = "The Dynamic array elements <BR><BR>";

    //Creating a Dynamic array
    for (var i = 0; i < 5; i++) {
      dynarray[i] = [j];
      j = j + 10;
    }
    //Displaying the dynamic array in a Div element
    for (num=0; num < dynarray.length; num++){
     displayArray += dynarray[num] + "<BR>";
     }
    document.getElementById("arr_demo").innerHTML = displayArray;

</script>

</body>
</html>
Output:
20
30
40
50
So first up, an empty array is created with a few other variables to be used in for loop and to display array elements:
var dynarray = [];

var j= 10; // Used to give values to array elements

var num;

var displayArray = "The Dynamic array elements <BR><BR>";
After that, a for loop is to create the array elements along with assigning values to each element is used:
//Creating a Dynamic array

for (var i = 0; i < 5; i++) {

dynarray[i] = [j];

j = j + 10;

}
Finally, I displayed the array elements in an HTML paragraph tag:
//Displaying the dynamic array in a Div element

for (num=0; num < dynarray.length; num++){

displayArray += dynarray[num] + "<BR>";

}

document.getElementById("arr_demo").innerHTML = displayArray;
The output will be same as in above example.
For that, you can either start the loop ahead of existing elements e.g.
Or use the array push function as shown in next demo.
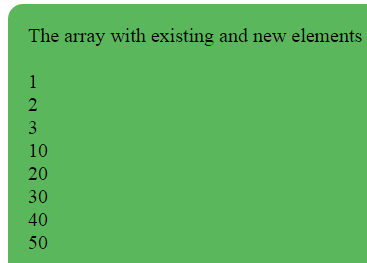
An example of Array push function
The following is almost the same example as above except I will add new elements (that are dynamic), to an array that already contains three elements.
The way for loop is used in the above example would have replaced the existing items with new elements.
Code and output:
<!doctype html>
<html>
<head>

<style>
#arr_demo {
  background: #415665;
  height: 270px;
  width:40%;
  border-radius: 15px;
  padding:20px;
  font-size:22px;
  color:#fff;
}
</style>


</head>
<body>
<p id="arr_demo"></p>

<script>
    var dynarray = [1,2,3];
    var j= 10; // Used to give values to array elements
    var num;
    var displayArray = "The array with existing and new elements <BR><BR>";

    //Creating a Dynamic array
    for (var i = 0; i < 5; i++) {
      dynarray.push(j);
      j = j + 10;
    }
    //Displaying the dynamic array in a Div element
    for (num=0; num < dynarray.length; num++){
     displayArray += dynarray[num] + "<BR>";
     }
    document.getElementById("arr_demo").innerHTML = displayArray;

</script>

</body>
</html>
Output:
In the code section, you can see two differences. First, the array declaration with elements:
The second is, using array push method to add new elements inside the first for loop:
Where the variable j represents the value of new elements.
The complete for loop is:
//Creating a Dynamic array

for (var i = 0; i < 5; i++) {

dynarray.push(j);

j = j + 10;

}
In the output section, you can see arrays are added at the end of existing elements.
A demo of the array unshift method of JavaScript
In the demo, I just replaced the push with unshift method.
Code:
<!doctype html>
<html>
<head>

<style>
#arr_demo {
  background: #5BB75B;
  height: 270px;
  width:40%;
  border-radius: 15px;
  padding:20px;
  font-size:20px;
  color:#000;
}
</style>


</head>
<body>
<p id="arr_demo"></p>

<script>
    var dynarray = [1,2,3];
    var j= 10; // Used to give values to array elements
    var num;
    var displayArray = "The array unshift method <BR><BR>";

    //Creating a Dynamic array
    for (var i = 0; i < 5; i++) {
      dynarray.unshift(j);
      j = j + 10;
    }
    //Displaying the dynamic array in a Div element
    for (num=0; num < dynarray.length; num++){
     displayArray += dynarray[num] + "<BR>";
     }
    document.getElementById("arr_demo").innerHTML = displayArray;

</script>

</body>
</html>
Output:
The array unshift method
50
40
30
20
10
1
2
3
You can see that new array elements are displayed at the beginning.
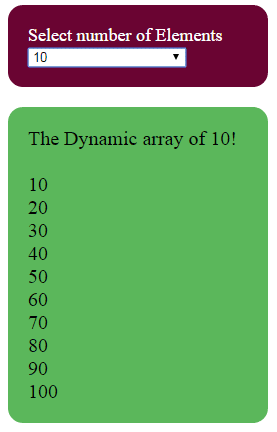
A user selected dynamic array demo
In the above dynamic array example, I used a for loop with a specific number to create arrays (in empty or by array push or unshift methods). In this demo, a user is asked to select the number of array items to create by using a select dropdown.
As you select a dropdown value, the lower div will show the array elements created. In the backward, a JS function is called where that selected number is taken to create array elements.
See the demo online:
Online demo and code
You can see the complete JS code that contains the function to create array elements as well as markup for div and paragraph in the demo page code section.
The select tag is created with the following function call:
<select id="dynarrayelements" onChange="dynFunction()">
Following is the dynFunction code:
<script>

function dynFunction() {

var dynarray = [];

var createDynArr = (document.getElementById("dynarrayelements").value);

var j= 10; // Used to give values to array elements

var num;

var displayArray = "The Dynamic array of " +createDynArr + "! <BR><BR>";


//Creating a Dynamic array

for (var i = 0; i < createDynArr; i++) {

//dynarray.unshift(j);

dynarray[i] = [j];

j = j + 10;

}

//Displaying the dynamic array in a Div element

for (num=0; num < dynarray.length; num++){

displayArray += dynarray[num] + "<BR>";

}

document.getElementById("arr_demo").innerHTML = displayArray;

}

</script>
The demo shows creating up to 200 array elements, that you can select from the dropdown.
An example of removing array elements by pop method
Code and output:
<!DOCTYPE html>
<html>
<style>
#div_demo {
  background: #4C9B79;
  height: auto;
  width:250px;
  border-radius: 15px;
  padding:20px;
  font-size:18px;
  color:#fff;
}
</style>
<head>

</head>
<body>
<div id="div_demo"></div>


<script type="text/javascript">

var Arrnum = [5,10,15,20,25];
var num;
var displayArray = "Array Initially <BR>";
//Array before using the pop method
for (num=0; num < Arrnum.length; num++){
    displayArray += Arrnum[num] + "<BR>";
    }
    displayArray += "<BR>Array after pop method: <BR>";
    //document.getElementById("div_demo").innerHTML = displayArray;

Arrnum.pop();

//Array after using the pop method
for (num=0; num < Arrnum.length; num++){
    displayArray += Arrnum[num] + "<BR>";
    }
    document.getElementById("div_demo").innerHTML = displayArray;

</script>
</body>

</html>
Output:
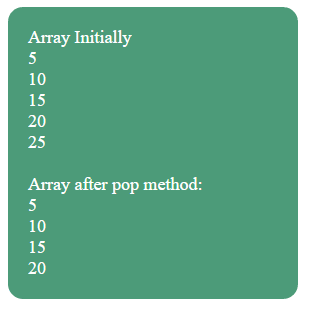
You can see an array element is removed from the last of an existing array.
You can remove elements from the beginning by using the shift method. See the demo below.
Remove array element by shift method
See the following demo of removing an element from the beginning by using the shift method of JavaScript:
<!DOCTYPE html>
<html>
<style>
#div_demo {
  background: #4C9B79;
  height: auto;
  width:250px;
  border-radius: 15px;
  padding:20px;
  font-size:18px;
  color:#fff;
}
</style>
<head>

</head>
<body>
<div id="div_demo"></div>


<script type="text/javascript">

var Arrnum = [5,10,15,20,25];
var num;
var displayArray = "Array Initially <BR>";
//Array before using the pop method
for (num=0; num < Arrnum.length; num++){
    displayArray += Arrnum[num] + "<BR>";
    }

Arrnum.shift();
displayArray += "<BR>Array after shift method: <BR>";
//Array after using the shift method
for (num=0; num < Arrnum.length; num++){
    displayArray += Arrnum[num] + "<BR>";
    }
    document.getElementById("div_demo").innerHTML = displayArray;

</script>
</body>

</html>
Output:
5
10
15
20
25
10
15
20
25
You can see in the demo that the first element is removed from the array.
Summary of JavaScript Arrays Tutorial
Creating Arrays:
- Arrays are declared using
varkeyword followed by the array name and enclosed in square brackets. - You can create arrays with various data types, including numbers, strings, and even other objects.
- The
newkeyword can also be used to create an array object, with elements enclosed in parentheses.
2. Array Indexing:
- JavaScript arrays use zero-based indexing, meaning the first element has an index of 0.
- You can access specific elements by their index using square brackets.
3. Looping through Arrays:
- The
forloop is commonly used to iterate through an array’s elements. - You can access the element’s value and index within the loop.
- The
lengthproperty of an array gives the total number of elements.
4. Mixed Arrays:
- JavaScript arrays can contain elements of different data types.
- This allows for flexibility in storing and manipulating data.
5. Accessing Specific Elements:
- You can access specific elements using their index.
- For example,
ArrMixed[1]would access the second element in theArrMixedarray.
6. Practical Examples:
- The tutorial provides examples of using arrays in real-world scenarios, such as autocomplete and dropdown menus.
- These examples demonstrate how arrays can be used to store and manage data dynamically.
7. Advanced Functions:
- The tutorial introduces some advanced array functions like
push,unshift,pop, andshift. - These functions allow you to add, remove, and manipulate elements within the array.
- The tutorial also mentions using arrays with HTML elements to create interactive web pages.