
Purpose of push and unshift methods in JavaScript
In certain scenarios, you need to add elements in existing arrays in JavaScript. The push and unshift methods enable us to do that.
Both these methods, push and JS unshift allow to addition of new elements; then what is the difference?
- The only difference is the JavaScript push method adds elements at the end of an existing array. Whereas the unshift method adds new elements at the beginning of the array.
- Both methods return the length of the specified array, after adding new elements.
To further clarify the methods working, see the following examples.
An example of push method of JavaScript
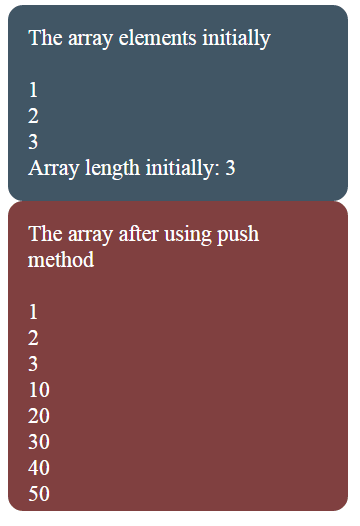
To explain the JavaScript push method, I have created an array of three elements initially.
After that, the array push method is used to add five more elements to that array.
The array is displayed before and after executing the push method in the <div> tag.
JS Code with HTML and a little CSS:
<!doctype html>
<html>
<head>

<style>
#arr_before {
  background: #415665;
  height: auto;
  width:300px;
  border-radius: 15px;
  padding:20px;
  font-size:22px;
  color:#fff;
}
#arr_after {
  background: #804040;
  height: 270px;
  width:300px;
  border-radius: 15px;
  padding:20px;
  font-size:22px;
  color:#fff;
}

</style>


</head>
<body>
<div id="arr_before"></div>
<div id="arr_after"></div>

<script>
    var dynarray = [1,2,3];
    var i;
    var j= 10; // Used to give values to array elements
    var num;
    var initialArray = "The array elements initially <BR><BR>";

    for (num=0; num < dynarray.length; num++){
     initialArray += dynarray[num] + "<BR>";
     }
    initialArray += "Array length initially: " + dynarray.length;
    document.getElementById("arr_before").innerHTML = initialArray;


    var afterArray = "The array after using push method<BR><BR>";
    //Creating new array elements
    for (var i = 0; i < 5; i++) {
      dynarray.push(j);
      j = j + 10;
    }
    //Displaying the dynamic array in a Div element
    for (num=0; num < dynarray.length; num++){
     afterArray += dynarray[num] + "<BR>";
     }

    afterArray += "Array length after push method: " + dynarray.length;
    document.getElementById("arr_after").innerHTML = afterArray;

</script>

</body>
</html>
Output:
The following is done in the demo:
- First of all, an array is created with three elements: var dynarray = [1,2,3];
- The array elements are displayed by using a for loop where the array length property is used in the condition part of the loop.
- After that, the array push method is used to add new elements.
- The array push is used in another for loop with a variable that is incremented by 10 in each iteration.
- The current value of the variable is added as a new element in that array:
    //Creating new array elements

for (var i = 0; i < 5; i++) {

dynarray.push(j);

j = j + 10;

}
Finally, another for loop is used to display the array with newly added elements. You can see, it displayed the initial as well as newly added elements in that div.
An example of using the return value of push method
To demonstrate this, I am modifying the above example a bit where in the last loop I will use a variable that gets the returned value after using the push method.
This variable is used in place of the length property to specify the condition part of the for loop.
See the code and output:
<body>
<div id="arr_before"></div>
<div id="arr_after"></div>

<script>
    var dynarray = [1,2,3];
    var i;
    var j= 10; // Used to give values to array elements
    var num;
    var initialArray = "The array elements initially <BR><BR>";

    for (num=0; num < dynarray.length; num++){
     initialArray += dynarray[num] + "<BR>";
     }
    initialArray += "Array length initially: " + dynarray.length;
    document.getElementById("arr_before").innerHTML = initialArray;


    var afterArray = "The array after using push method with returned value<BR><BR>";
    //Adding new array elements


    //Displaying the dynamic array in a Div element
    var returnvalue = dynarray.push(10,15);
    for (num=0; num < returnvalue; num++){
     afterArray += dynarray[num] + "<BR>";
     }

    afterArray += "Array length after push method: " + dynarray.length;
    document.getElementById("arr_after").innerHTML = afterArray;

</script>

</body>
Output:
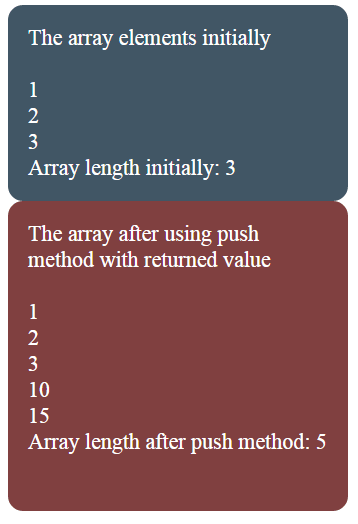
Notice this piece of code:
//Adding new array elements with return value

var returnvalue = dynarray.push(10,15);

//Displaying the dynamic array in a Div element

for (num=0; num < returnvalue; num++){

afterArray += dynarray[num] + "<BR>";

}
A variable is defined and assigned it the return value of the push method. The same variable is used in the for loop to set the condition which is the length of the array.
An example of using array push with user selected value
- In this example, the array push method is executed each time when you click the button (after running this code).
- The new element value is taken from the HTML select dropdown (selected by the user) and assigned to a JS variable as you click the button.
- After that, the array push method is used to append the new element to an existing array which is created with three elements initially.
- The array after adding the new element is shown in the div tag.
Complete code:
<!doctype html>
<html>
<head>

<style>
#arr_before {
  background: #415665;
  height: auto;
  width:300px;
  border-radius: 15px;
  padding:20px;
  font-size:22px;
  color:#fff;
}
#arr_after {
  background: #804040;
  height: 270px;
  width:300px;
  border-radius: 15px;
  padding:20px;
  font-size:22px;
  color:#fff;
}
.pcls{
  background: #804040;
  height: auto;
  width:300px;
  border-radius: 15px;
  padding:20px;
  font-size:18px;
  color:#fff;
}
.btncls{
    background-color:#4B4FC5;
    border: #2e6da4;
  	font-family: Arial, Geneva, Arial, Helvetica,  sans-serif;
    font-size: 15px;
    color: #FFFFFF;
    letter-spacing: 1px;
    padding: 8px 12px;
    font-size: 14px;
    font-weight: normal;

    border-radius: 4px;
    line-height: 1.5;
    text-decoration:none;
}
</style>


</head>
<body>
<p class="pcls"><label>Select an element to add in Array: </label><select id="arr_index">
    <option value="0">0</option>
    <option value="1">1</option>
    <option value="2">2</option>
    <option value="3">3</option>
    <option value="4">4</option>
    <option value="5">5</option>
    <option value="6">6</option>
</select></p>
<p><button class="btncls" onclick="addelement()">Add new element by push method</button></p>
<div id="arr_before"></div>
<div id="arr_after"></div>

<script>
    var dynarray = [1,2,3];
    var i;
    var j= 10; // Used to give values to array elements
    var num;
    var initialArray = "The array elements initially <BR><BR>";

    for (num=0; num < dynarray.length; num++){
     initialArray += dynarray[num] + "<BR>";
     }
    initialArray += "Array length initially: " + dynarray.length;
    document.getElementById("arr_before").innerHTML = initialArray;


function addelement(){
    var add_element = document.getElementById("arr_index").value;

    var afterArray = "The array after using push with user selected value<BR><BR>";
    //Adding new array elements with return value
    var returnvalue = dynarray.push(add_element);

    //Displaying the dynamic array in a Div element

    for (num=0; num < returnvalue; num++){
     afterArray += dynarray[num] + "<BR>";
     }

    afterArray += "New length of array: " + dynarray.length;
    document.getElementById("arr_after").innerHTML = afterArray;

}

</script>

</body>
</html>
Sample Output as I selected 6:
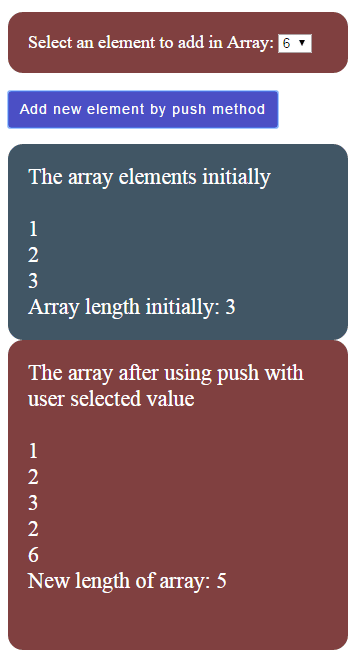
This is how the array was created and displayed initially:
var dynarray = [1,2,3];

var i;

var j= 10; // Used to give values to array elements

var num;

var initialArray = "The array elements initially <BR><BR>";


for (num=0; num < dynarray.length; num++){

initialArray += dynarray[num] + "<BR>";

}

initialArray += "Array length initially: " + dynarray.length;

document.getElementById("arr_before").innerHTML = initialArray;
The following JS function is executed each time the button is clicked, which adds new elements by the push method:
function addelement(){

var add_element = document.getElementById("arr_index").value;


var afterArray = "The array after using push with user selected value<BR><BR>";

//Adding new array elements with return value

var returnvalue = dynarray.push(add_element);


//Displaying the dynamic array in a Div element


for (num=0; num < returnvalue; num++){

afterArray += dynarray[num] + "<BR>";

}


afterArray += "New length of array: " + dynarray.length;

document.getElementById("arr_after").innerHTML = afterArray;


}
Adding array elements at the user’s action can be quite useful for certain situations where you may use string arrays as well.
An example of using the JavaScript unshift method
In the above examples, you saw the new elements were added at the last of an existing array.
See the following example:
<!doctype html>
<html>
<head>

<style>
#arr_before {
  background: #415665;
  height: auto;
  width:300px;
  border-radius: 15px;
  padding:20px;
  font-size:22px;
  color:#fff;
}
#arr_after {
  background: #804040;
  height: 270px;
  width:300px;
  border-radius: 15px;
  padding:20px;
  font-size:22px;
  color:#fff;
}

</style>


</head>
<body>
<div id="arr_before"></div>
<div id="arr_after"></div>

<script>
    var dynarray = [1,2,3];
    var i;
    var j= 10; // Used to give values to array elements
    var num;
    var initialArray = "The array elements initially <BR><BR>";

    for (num=0; num < dynarray.length; num++){
     initialArray += dynarray[num] + "<BR>";
     }
    initialArray += "Array length initially: " + dynarray.length;
    document.getElementById("arr_before").innerHTML = initialArray;


    var afterArray = 'The array after using "unshift" method<BR><BR>';
    //Creating new array elements
    for (var i = 0; i < 5; i++) {
      dynarray.unshift(j);
      j = j + 10;
    }
    //Displaying the dynamic array in a Div element
    for (num=0; num < dynarray.length; num++){
     afterArray += dynarray[num] + "<BR>";
     }

    afterArray += "Array length after unshift method: " + dynarray.length;
    document.getElementById("arr_after").innerHTML = afterArray;

</script>

</body>
</html>
Output:
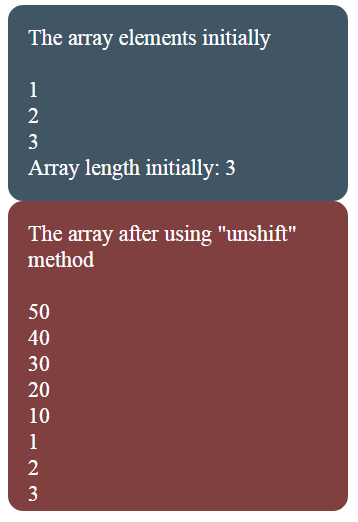
This is just a copy of the first example of using the push method where the push method is replaced by unshift method.
However, have you noticed the order of newly added elements?
The loop for adding new elements ends at 50, which becomes the first array element in that array. While the initial array elements became the last.
This is how the unshift method was used in the example:
//Creating new array elements

for (var i = 0; i < 5; i++) {

dynarray.unshift(j);

j = j + 10;

}