
The prompt alert
The prompt alerts are those where you ask users to enter something before proceeding. The JavaScript prompt alert can be created by using:
prompt("Please enter your email to proceed!", "Email here");
The prompt keyword is followed by the text which is shown as a message and text in the textbox which is also visible to take the user input.
The above prompt JavaScript alert is quite simple and takes a browser’s default style. In many scenarios, this is desired to match the prompt dialogue design to the theme of the website.
I will show you creating simple prompt alerts as well as creating beautiful JavaScript plug-ins based alerts in this tutorial. You can change the look and feel of these alerts quite easily.
Let me start with a basic prompt alert by using the prompt keyword.
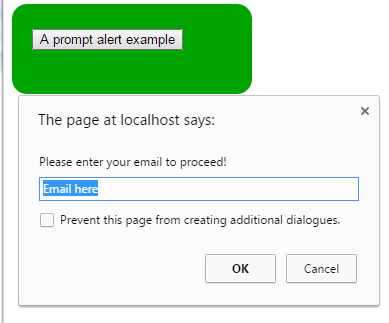
A basic prompt alert example
In this example, a simple prompt alert is created where a user is asked to enter the email address. If user enters the email and presses Ok, a simple alert will be shown with entered email address:
HTML and JS:
<!DOCTYPE html>
<html>
<head>

<style>
.divclass {
  background: #00A400;
  height: 50px;
  width:200px;
  border-radius: 15px;
  padding:20px;
  font-size:22px;
  color:#fff;
}
</style>

</head>
<body>
<div class="divclass">
<button onclick="promptalert()">A prompt alert example</button>
</div>

<script type="text/javascript">
function promptalert(){
var promval = prompt("Please enter your email to proceed!", "Email here");

if (promval != null) {
    alert("You entered following email address: " + promval);
}
else {
    alert ("You did not choose to proceed!");
}
}

</script>

</body>
</html>
Output:
Instead of showing the alert, you can perform some action like saving the email address or retrieving information from the database based on that email etc.
The promptalert JS function is called at the click event of the button.
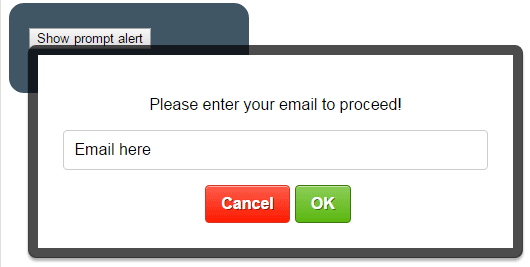
A demo to create fancy prompt alert by using alertify.js plug-in
As mentioned earlier, you can create fancy and beautiful looking prompt alerts by using third party plug-ins to match the design of your website. One of the plug-ins that I am going to show you is alertify.js.
First, have a look at an example of this plug-in which is followed by how to set up and customizing its look and feel.
Online demo and code
After including the dependency files in the <head> section, following code is used in the <script> part just above the </body> tag:
<script>

function promalert(){

// A prompt dialog example

alertify.prompt("Please enter your email to proceed!", function (e, useremail) {


if (e) {

alertify.alert("You entered following email address:" + useremail);

} else {

alertify.alert("Operation Cancelled!");

}

}, "Email here");

}

</script>
You can see, the alert is initiated by using alertify.prompt which is followed by text to be displayed. If a user presses the OK button it will display a simple alert by using alertify.alert.
Setting up alertify.js plug-in
The plug-in requires a few dependency files in the <head> section:
<script src=”alert/dist/alertify.min.js”></script>
<link rel=”stylesheet” href=”alert/dist/alertify.core.css” />
<link rel=”stylesheet” href=”alert/dist/alertify.default.css” id=”toggleCSS” />
You may get these from the GitHub website. Or download by viewing the “view source” in the demo page by opening these files and save it to your system
Among those files, alertify.default.css is the one that deals with the look of alert. If you want to change the look according to the theme of your website, then either modify this file or use your own with similar classes. See a demo below, how you can do it.
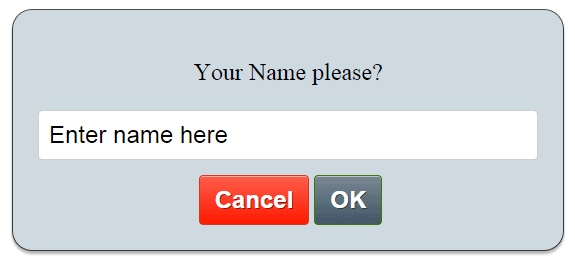
A demo to change the JavaScript based prompt alert (alertify.js)
For this demo, I am simply copying the alertify.default.css and renaming it to alertify.custom.css. You also need to change the name in the head section as well.
<link rel=”stylesheet” href=”alert/dist/alertify.custom.css” id=”toggleCSS” />
See a demo where I changed a few CSS properties to modify the look of the prompt dialog.
HTML, CSS, and JS:
<!DOCTYPE html>
<html>
<head>

    <script src="alert/dist/alertify.min.js"></script>
	<link rel="stylesheet" href="alert/dist/alertify.core.css" />
	<link rel="stylesheet" href="alert/dist/alertify.custom.css" id="toggleCSS" />

<style>
.divclass {
  background: #415665;
  height: 50px;
  width:200px;
  border-radius: 15px;
  padding:20px;
  font-size:22px;
  color:#fff;
}
</style>
</head>
<body>
<div class="divclass">
<button onclick="promalert()">Show prompt alert</button>
</div>
<script>
function promalert(){
// A prompt dialog example
alertify.prompt("Your Name please?", function (e, useremail) {

    if (e) {
        alertify.alert("You entered: </BR>" + useremail);
    } else {
        alertify.alert("You cancelled the task!");
    }
}, "Enter name here");
}
</script>
</body>
</html>
You can see, the background color of the main area in the alert is changed. Also, the button’s font-size and font-family are also changed.
To accomplish that, open the alertify.custom.css file. The .alertify class specifies the background-color and font related properties along with border-radius.
Similarly, you may change the Ok and Cancel button properties by modifying its class properties.
You may also change the text of OK or Cancel buttons to Yes/No or as per need by modifying the alertify.min.js or alertify.js file (whichever you include in your project).
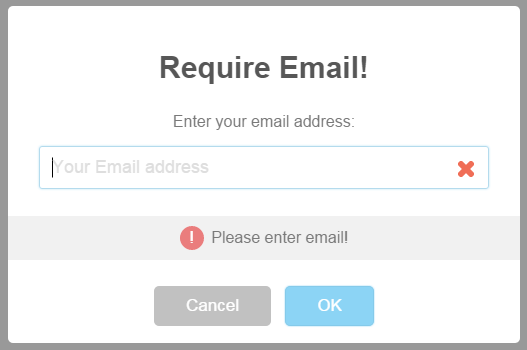
A demo of prompt JavaScript alert by using SweetAlert plug-in
There is another nice plug-in to create different types of alerts including prompt which is also based at JavaScript.
In this demo, I will show you how you can use this to create a prompt alert by using SweetAlert plug-in.
Online demo and code
The following code is used in the <script> section (you can see complete code in the demo page):
<script>

function promalert(){

swal({   title: "Require Email!",

text: "Enter your email address:",

type: "input",

showCancelButton: true,

closeOnConfirm: false,

animation: "slide-from-top",

inputPlaceholder: "Your Email address" },


function(inputValue){

if (inputValue === false)

return false;

if (inputValue === "") {

swal.showInputError("Please enter email!");

return false

}

swal("Action Saved!", "You entered following email: " + inputValue, "success"); });

}

</script>
The alert is imitated as the promalert function is called at the click event of the button.
It used the swal keyword to trigger that alert, which is short-word for Sweet Alert.
The dependency files are included in the <head> section that you can download by “view source” the demo page and finding those links OR visit the GitHub website for this plug-in, which guide is written here (at the bottom part).