
The TouchSlider plug-in for sliding content
The TouchSlider is a JS based plug-in that enables smooth sliding of the content. The TouchSlider is a responsive slider that also supports mobile/tablet as well.
This simple to use slider supports mouse drag and wheel, touch screen etc.
You can create a slider with different sized content and full-screen mode support as well.
See the following demos along with setting up steps for using this slider in your web project.
A demo of sliding different sized content boxes
In this demo, a simple slider is created by using the <li> tags. Along with slider, four buttons are given to stop, pause and move slides next and previous.
This is how the slider looks along with code:

See online demo and code
You can amend the CSS to change the properties of content boxes. The slider auto-moves by default while you may also use the buttons to stop the sliding. Similarly, press the play button to slide again. You can also use Next/Previous buttons for moving the slide.
If you want to add more sliding elements, just add another div with <li>, e.g:
<ul id='slider'>

<li style='display:block'><div>1</div></li>

<li><div>2</div></li>

<li><div>3</div></li>

<li><div>4</div></li>

<li><div>5</div></li>

<li><div>6</div></li>

</ul>
Get the complete code in the demo page.
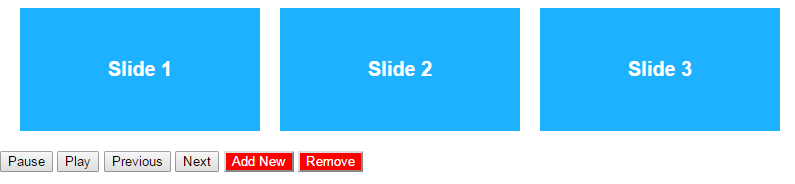
A demo of full-width slider with add and remove option
In this demo, a full-width slider is created with options to add and remove slide elements on the go. Along with next/prev buttons, you can also see Add and Remove buttons.
Clicking the add button will add a new slide item at the end of the slider. While Remove button will delete from the beginning.
Apart from that, the following properties are set in the <script> section for sliding:
- Duration : 500; (0.5 seconds)
- Interval : 1000;
- Mousewheel : false (will not move with the mouse wheel).
- Mouse : true (drags with the mouse)
See the demo online:
See online demo and code
See and change this line in the <script> section for modifying the slider properties:
var t11=new TouchSlider('slider1',{duration:500, interval:1000, direction:0, autoplay:true, align:'left', mousewheel:false, mouse:true, fullsize:false});
A full-size slider demo
Using about the same properties and options as in above example, except, the fullsize:true. That means the sliding elements will span the full available width (each item).
For the demo, a few other properties are changed a bit like duration, interval etc.

See online demo and code
Notice this line of code in the script section:
var t11=new TouchSlider('slider1',{duration:1000, interval:1200, direction:0, autoplay:true, align:'left', mousewheel:false, mouse:true, fullsize:true});
You can see, the fullsize is set as true.
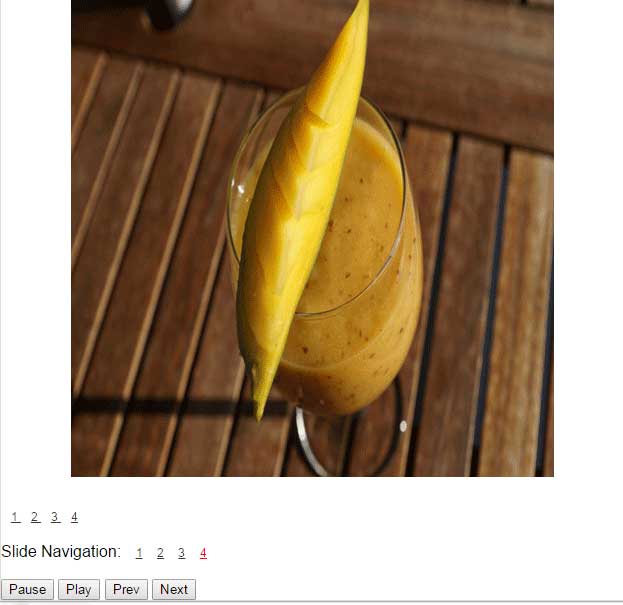
In this example, four images are used in the slider. One image will be visible at a time. Just like above example, the navigation links are also given. You may also set the speed and interval of sliding. See a demo online:
See online demo and code
In this example, the fullsize value is kept true. As you can see, only the single image is visible at a time. If you make this value false, it will display multiple images at a time. See an example below.
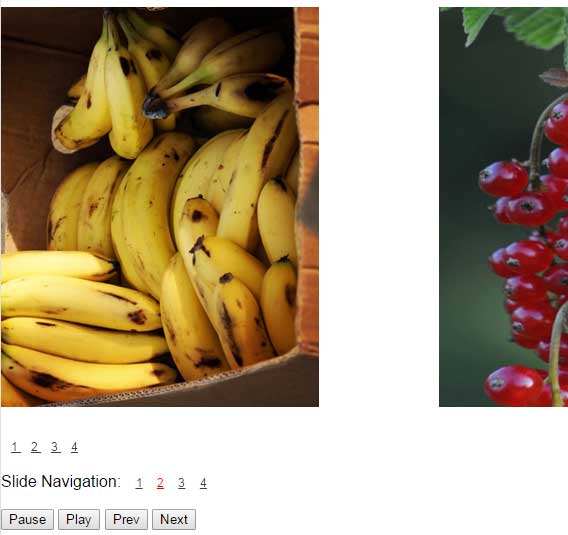
A demo of showing multiple images
If the screen is larger, then setting the fullsize:false may show multiple images at a time. See the following demo online:
See online demo and code
I have also written a guide for multiple images sliding by using Bootstrap carousel here.
Setting up TouchSlider
This is quite simple. Download the package from GitHub website. Just copy/paste the touchslider.js and style.css from src folder to your desired location.
Refer these files in the <body> section for optimization. For example:
<link href=’css/style-slider.css’ rel=’stylesheet’/>
<script src=”js/touchslider.js”></script>
That’s it!