In this tutorial, we’ll teach you how to create and validate forms in React.
Building forms is an integral part of web development. Whatever website you’ll visit, you are most likely to come up with a login form in it. Unlike other JavaScript frameworks and libraries like VueJS, jQuery, and AngularJS that come with some out-of-the-box techniques for form validations, we have to perform all kinds of complications ourselves amidst validating forms in a React.
The complication which we have to deal with while validating forms are:
- How to retrieve values from forms entered by a user.
- Handling the form state.
- How to restrict the user to enter only correct input in the form.
- Display the validation message in case if something went wrong.
In HTML, form elements such as <input>, <textarea> and <select> maintain their own state and get updated based on input entered by the user.
Whereas in React, these form input elements are separately placed in the state property of the react component and can only be updated with an aid of the setState() method.
Controlled Component and Uncontrolled Component
Controlled input or controlled component are those input form element whose value is entirely governed by the React itself.
In contrast to that uncontrolled components are entirely governed by the DOM. We will use ref to retrieve input values entered by the users and perform an operation on this data.
Even though uncontrolled inputs are the easiest way to implement form inputs, but they are not viable for building real-world react-driven applications.
In all the code examples, we’ll use controlled inputs and I hope you’ll understand the importance of them by the end of this tutorial.
To deepen our understanding of this concept, let’s open index.js. Thereafter, we’ll create a Student component and extends it from the React.Component.
Inside our component, let’s create a state object, incorporate a property known as ID and initialize it with an empty string:
classStudentComponent extends React.Component{

  constructor(props){

    super(props);

    this.state = {

      ID:''

  };

}
Now let’s implement a render method inside this component.
- Within the render method, we’ll place a form tag and in this form tag, we’ll place an input tag whose type is text.
- Incorporate an event handler onChange and call a function from the input tag.
<form>

    <p>

        <label>Student Enrollment ID : <input type="text" name="ID"  value={this.state.ID}  onChange={this.changeHandler} ></input></label>

    </p>

</form>
In the function changeHandler, we’ve saved inputted value in our state object using the setState method. We can retrieve the ID value inputted by a user with an aid of e.target.value:
changeHandler = e => {

    this.setState({

      ID:e.target.value

    });

}
Now we’ll define another function and name it onCreateStudent and display the student ID value on the console within this function:
onCreateStudent=()=>{

    console.log(this.state.ID);

  }
In order to execute the code, let’s place a button inside our render method. This function is automatically invoked when you click this button:
<button onClick={this.onCreateStudent}> Add New student </button>
Now let’s call this Student component and render this element to our root container.
- Save all these changes and head over to the browser and you’ll experience the input element is displayed on our web page. In order to dry run your react code, enter some text in this textbox, click on the button and you can view your inserted input in the console window of the browser by using Developer tools.
- Now re-navigate to your favorite code editor, this time we want to add more input tags in our react component. We’ll add inputs for the name, rollno, and gender.
- For the sake of storing all these inputs in our state object, we need to add a new student object to our state and incorporate these id, name, rollno, and gender as a property to our newly-created object.
this.state = {

      student:{

      ID:'',

      Name:'',

      Rollno:'',

      Gender:'',


      }

  };
In order to make our form input tags work properly, we must have to change the input element’s value attribute to make sure it points to an id property of a student object.
Now, we’ll add separate input elements for an ID, Name, Rollno, Gender, Faculty, Address, and Father’s Occupation.
<p>

    <label>Student’s ID : <input type="text" name="ID" value={this.state.student.Id}

                                                                onChange={this.changeHandler} ></input>

                </label>

</p>

<p>

                <label>Student’s Name : <input type="text" name="Name"

                                 value={this.state.student.Name}

                                onChange={this.changeHandler}></input>

                </label>

</p>

<p>

                <label>Student’s Rollno : <input type="number" name="Rollno"

                            value={this.state.student.Rollno}

                            onChange={this.changeHandler}></input>

                </label>

</p>

<p>

                <label>Student’s Gender : <input type="text" name="Gender"

                                                                                                                value={this.state.student.Gender}

                            onChange={this.changeHandler}></input>

                </label>

</p>

<p>

                <label>Student’s Faculty : <input type="text" name="Faculty"

                                                                                                                value={this.state.student.Faculty}

                            onChange={this.changeHandler}></input>

                </label>

</p>

<p>

                <label>Student’s Address : <input type="text" name="Address"

                                                                                                                value={this.state.student.Address}

                            onChange={this.changeHandler}></input>

                </label>

</p>


<p>

                <label>Student’s Father’s Occupation : <input type="text" name="Father’s Occupation"

                                                                                                                value={this.state.student.Father’s Occupation}

                            onChange={this.changeHandler}></input>

                </label>

</p>
It is quite evident from this code, we are calling onchangeHandler() function using onChange event hander in this code example quite a lot of times. Simply speaking, it is not viable to create a separate function for each input element.
In order to make this function works properly, we must have to handle the onChange events for each input and update the state object each time using setState:
Now let’s retrieve the input element name using this command:
const name = event.target.name;
On the flip side, we can retrieve the user-entered input element value with an aid of the following command:
const value = event.target.value;
Now we can call a setState method and pass a student object to it. We can retrieve all the previous property values of student objects using the spread operator.
We must add a new property to our student object. In the following code example, the name of this property will be the input element name and it holds the value of the respective input element. This is how the code will look like:
this.setState({

      student:{

        ...this.state.student,

        [name]: value

      }

    });
Whenever a user attempts to modify any input elements, we are incumbent to update our state object using the setState() method.
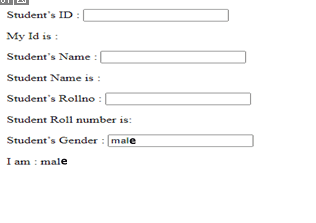
Write all this code in your favorite code editor and navigate to the browser to see how the output looks. Enter the detail into the form and click the create student button, you’ll see all the student detail will be displayed in your browser’s console.
Code Snippet:
import React from "react";

import ReactDOM from "react-dom";


class MyForm extends React.Component {

  constructor(props) {

    super(props);

    this.state = {

      ID: "",

      Name: "",

      Rollno: "",

      Gender: "",

    };

  }

  changeHandler = (e) => {

    const name = e.target.name;

    const value = e.target.value;

    this.setState({

      ...this.state,

      [name]: value,

    });

  };


  render() {

    return (

      <form>

        <p>

          <label>

            Student’s ID :{" "}

            <input

              type="text"

              name="ID"

              value={this.state.ID}

              onChange={this.changeHandler}

            ></input>

          </label>

          <p>My Id is :{this.state.ID}</p>

        </p>

        <p>

          <label>

            Student’s Name :{" "}

            <input

              type="text"

              name="Name"

              value={this.state.Name}

              onChange={this.changeHandler}

            ></input>

          </label>

        </p>

        <p>Student Name is :{this.state.Name}</p>

        <p>

          <label>

            Student’s Rollno :{" "}

            <input

              type="number"

              name="Rollno"

              value={this.state.Rollno}

              onChange={this.changeHandler}

            ></input>

          </label>

        </p>

        <p>Student Roll number is:{this.state.Rollno}</p>

        <p>

          <label>

            Student’s Gender :{" "}

            <input

              type="text"

              name="Gender"

              value={this.state.Gender}

              onChange={this.changeHandler}

            ></input>

          </label>

        </p>

        <p>I am : {this.state.Gender}</p>

      </form>

    );

  }

}


ReactDOM.render(<MyForm />, document.getElementById("root"));
The output: