In this tutorial, we’ll teach you how to manage state in React. How to create it and how can we harness it in our react application. In order to understand react states, you must be familiar with React propos and components. How to create and render them. If you don’t know these concepts, then you don’t need to worry you can view my previous tutorial in which I’ve taught about them.
Nowadays, all the application UIs are highly dynamic and they change in real-time. Any modification we did with the component class or we incorporate the additional features into our pre-defined component then this change automatically gets updated to the browser UI. Herein the real irony lies. You might know that React props are only read-only then the question arises how can we resolve this problem?
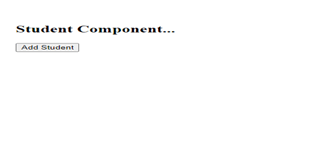
In order to grasp this concept, let’s first open our code editor and create a student class component in it. Then head over to the file index.js herein we’ll implement our render method. From this component, return a div tag that displays a text student component alongside we’ll also place a button with the text Add Student beneath this text.
Add a function called addStudent() to our student class component wherein we’ll display an alert message. In order to invoke this function, we use the onClick event handler within our button tag. Save all these changes and let’s navigate to the browser to see how the output would look:
An example of React State
import React from "react";

import ReactDOM from "react-dom";

//import App from "./App";


class Student extends React.Component {

  addStudent = () => {

    alert("Clicked on addStudent Method");

  };

  render() {

    return (

      <div>

        <h2>Student Component...</h2>

        <button onClick={this.addStudent}>Add Student</button>

      </div>

    );

  }

}


const element1 = <Student></Student>;

ReactDOM.render(element1, document.getElementById("root"));
Output:
Click on the addStudent button and we’ll see an alert message is displayed. Now let’s suppose we want to add one more functionality to our component which detects how many times someone clicks to a button. In order to get this job done, let’s introduce a count variable in our Student component and initialize it with 0. In an addStudent() function, this count variable value is incremented by one and gets displayed via an alert message.
count=0;

addStudent = () => {

this.count=this.count+1;

alert(this.count);

alert('Clicked on addStudent Method');

    }
Let’s save all these changes and navigate to the browser. Click on the button quite a few times to see whether the count variable increased by each click or not. Now let’s delete all the alert messages we’ll teach you a more productive approach of displaying all the alert messages in one simple paragraph.
Save all this code and navigate to the browser, you’ll see count variable isn’t get incremented all the times when the addStudent() button is clicked. Herein the real problem arises. Whenever we attempt to modify the count variable value, then this change isn’t rendered to the component UI.
Now we’ll make an attempt to resolve this issue in an efficient manner. In order to cope with this problem, React comes with a by-default solution known as ‘State’ that updates the React component’s value as a result of user interaction. On the flip side, the React state() object meticulously adhered to the React pre-defined rules.
Even though sometimes State and props are often used interchangeably, but in reality, they are totally different. The state is a private and completely governed by the React component. Data within a state can be modified over time.
While using state() in your React programming, it is pertinent to know that the state is a user-defined Javascript object.
By incorporating a local state to a class, we can transfer data from props onto a state that needs to be updated. To put that in perspective, let’s first create a state object in our Student component, add count variable in it and initialize it with 0.
In our code example, when we click the add a new Student button, addStudent() method is automatically invoked. Then this function should update the count variable value and render it to the component UI.
setState() method updates the React component each time and re-render it to the application UI when the user interacts with the application UI. Now let’s pass an object to a setState() method which contains a count variable and increment the variable by one. In the render() method, let’s display the value of count variable value we’ve just created with an aid of state object that we’ve just created.
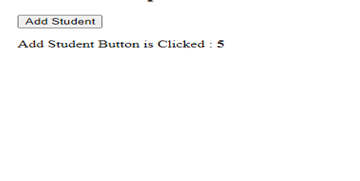
Save all these changes and navigate to the browser and we’ll experience that the count variable is increment every time when the addStudent() button is clicked.
Code Example:
import React from "react";

import ReactDOM from "react-dom";

//import App from "./App";


class Student extends React.Component {

  state = { count: 0 };

  addStudent = () => {

    this.setState({ count: this.state.count + 1 });

  };

  render() {

    return (

      <div>

        <h2>Student Component...</h2>

        <button onClick={this.addStudent}>Add Student</button>

        <p>

          <label>

            Add Student Button is Clicked : <b>{this.state.count}</b>

          </label>

        </p>

      </div>

    );

  }

}


const element1 = <Student></Student>;

ReactDOM.render(element1, document.getElementById("root"));
Output: