The tkinter is a standard Python interface for developing GUI-based applications in Python.
You may use tkinter for creating different GUI components like buttons, frames, labels, scrollbars, radio buttons, etc.
In this tutorial, we will show you creating buttons using tkinter.
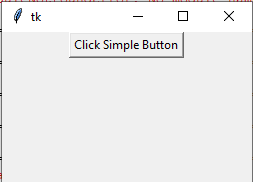
In this program, we have created a simple button by using tkinter library. See the program below with a little details that how it worked.
Python program:
#Example of button using tkinter

from tkinter import *


top = Tk()


#Setting window size containing button

top.geometry("250x150")

#Specify button options

btn = Button(top,text = "Click Simple Button")


btn.pack()

top.mainloop()
Output:
How did it work?
- First of all, the tkinter library is imported (if you are using Python 3.x). For 2.x you need to use Tkinter (i.e. T in capital).
- We created a Tk object and specified the window that contains the button.
- Then we specified the button option. In that case, we provided caption/text for the button.
In the following example, we used almost the same code as above except we added an action (command) as the button is clicked.
Python code:
#Example of button using tkinter

from tkinter import *

top = Tk()

#Setting window size containing button

top.geometry("250x250")

#Specify button options including close command

btn = Button(top,text = "Click to Close", command = top.destroy)

btn.pack()


top.mainloop()
After executing the above program, as you click on the button, it will close.
The Relief option is used to set the border style of the buttons. The following values can be used for the Relief option:
- SUNKEN
- RAISED
- FLAT
- GROOVE
- RIDGE
See the Python program below with all these values and output:
#Example of buttons with different borders

from tkinter import *

import tkinter


top = Tk()

top.geometry("200x300")


#Creating button with different borders

BtnRAISED = Button(top, text ="RAISED Button", relief=RAISED )

BtnSUNKEN = Button(top, text ="SUNKEN Button", relief=SUNKEN )

BtnFLAT = Button(top, text ="FLAT Button", relief=FLAT )

BtnGROOVE = Button(top, text ="GROOVE Button", relief=GROOVE )

BtnRIDGE = Button(top, text ="RIDGE Button", relief=RIDGE )


BtnRAISED.pack()

BtnSUNKEN.pack()

BtnFLAT.pack()

BtnGROOVE.pack()

BtnRIDGE.pack()


top.mainloop()
Output:

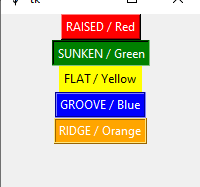
In this example, we will set the background and foreground colors of the buttons.
The bg option is used to set the background color of the button in a normal state.
The fg sets the foreground color i.e. text color of the button.
For example, bg = “Red” and fg = “White”.
See the example below where we will set the colors of the above example’s created buttons by using these two options.
Python program:
#Example of buttons with foreground and background colors

from tkinter import *

import tkinter


top = Tk()

top.geometry("200x300")


#Creating button with different borders, foreground and background colors

BtnRAISED = Button(top, text ="RAISED / Red", relief=RAISED, bg = "red", fg = "white" )

BtnSUNKEN = Button(top, text ="SUNKEN / Green", relief=SUNKEN, bg = "green", fg = "white" )

BtnFLAT = Button(top, text ="FLAT / Yellow", relief=FLAT, bg = "yellow" )

BtnGROOVE = Button(top, text ="GROOVE / Blue", relief=GROOVE, bg = "blue" , fg = "white" )

BtnRIDGE = Button(top, text ="RIDGE / Orange", relief=RIDGE, bg = "orange", fg = "white" )


BtnRAISED.pack()

BtnSUNKEN.pack()

BtnFLAT.pack()

BtnGROOVE.pack()

BtnRIDGE.pack()


top.mainloop()
Output:
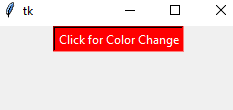
Setting the background/foreground colors on mouse click
Similarly, you may set the button background and foreground color on mouse click. For that, you may use the following two options:
- activebackground (for button background color)
- activeforeground (for button text/caption)
The following example shows how:
#Example of button active colors

from tkinter import *

top = Tk()


#Setting window size containing button

top.geometry("250x150")


#Specify button options / active foreground and background colors

btn = Button(top,text = "Click for Color Change", activeforeground = "white", activebackground = "red")


btn.pack()

top.mainloop()
Output:
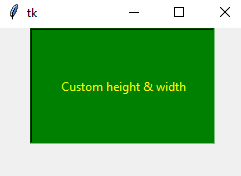
By using height and width options, you may set the button size as using tkinter library.
The following example creates a button bigger than the above examples – both for height and width.
Code:
#Example of button height and width

from tkinter import *

top = Tk()

#Setting window size containing button

top.geometry("250x150")


#Specify button options / height and width

btn = Button(top,text = "Custom height & width", height = "7", width = "25", activeforeground = "yellow", activebackground = "green")


btn.pack()


top.mainloop()
Output:
Display a message box by using command option example
The following example shows some action as the button is clicked.
For that, we will use the command option of the button widget and call a function.
Inside the function, msgbox(), we will display a message box with simple text.
So, click the button to call the function and display the message box.
Code:
#Example of button command / message box

from tkinter import *

from tkinter import messagebox


top = Tk()


#Setting window size containing button

top.geometry("250x150")


#Function to call as button is clicked/pressed

def msgbox():

    messagebox.showinfo("Welcome", "This is tkinter tutorial!")


#Specify button option / command with a function call

btn = Button(top,text = "Display message box", command = msgbox)


btn.pack()

top.mainloop()
Output:
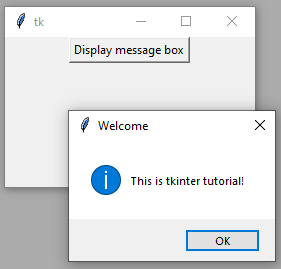
Note that, you have to import messagebox from tkinter in order to work with this example.
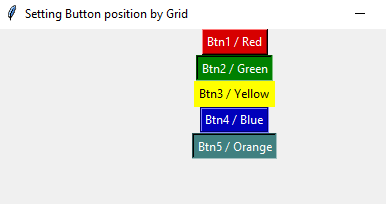
In this example, the background (bg), foreground (fg), activebackground, and activeforeground colors are set by using the color code rather than color names. For example, #034232.
Besides, we also set the title of the window containing the button unlike the above examples with the default “tk” title. Have a look:
Code:
#Example of buttons with foreground and background color codes

from tkinter import *

import tkinter


btn_colors = Tk()

btn_colors.title("Setting Button position by Grid")

btn_colors.geometry("200x300")


#Creating button with different colors by codes

BtnRAISED = Button(btn_colors, text ="Btn1 / Red", relief=RAISED, bg = "#D70000", fg = "#FFFFFF", activeforeground = "#FFFFFF", activebackground = "#FFA8A8" )

BtnSUNKEN = Button(btn_colors, text ="Btn2 / Green", relief=SUNKEN, bg = "#008000", fg = "#FFFFFF", activeforeground = "#FFFFFF", activebackground = "#804040" )

BtnFLAT = Button(btn_colors, text ="Btn3 / Yellow", relief=FLAT, bg = "#FFFF00", activeforeground = "#000000", activebackground = "#00FFFF" )

BtnGROOVE = Button(btn_colors, text ="Btn4 / Blue", relief=GROOVE, bg = "#0000BB" , fg = "#FFFFFF", activeforeground = "#FFFFFF", activebackground = "#800080" )

BtnRIDGE = Button(btn_colors, text ="Btn5 / Orange", relief=RIDGE, bg = "#FF8000", fg = "#FFFFFF", activeforeground = "#FFFFFF", activebackground = "#408080" )


BtnRAISED.pack()

BtnSUNKEN.pack()

BtnFLAT.pack()

BtnGROOVE.pack()

BtnRIDGE.pack()


btn_colors.mainloop()
Output:
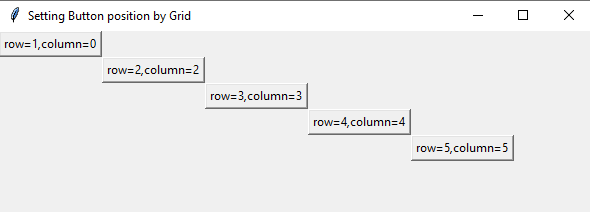
The following ways can be used to set the position of the button:
- pack (to display button in the center as in all the above examples)
- grid (specify row and column)
- place (specify x & y positions to display button).
The example below shows the usage of these ways.
By grid option
Code:
from tkinter import *

pos_grid=Tk()

pos_grid.title("Setting Button position by Grid")

pos_grid.geometry("450x375")


button1=Button(pos_grid, text="row=1,column=0")

button1.grid(row=1,column=0)

button2=Button(pos_grid, text="row=2,column=2")

button2.grid(row=2,column=2)


button3=Button(pos_grid, text="row=3,column=3")

button3.grid(row=3,column=3)


button4=Button(pos_grid, text="row=4,column=4")

button4.grid(row=4,column=4)


button5=Button(pos_grid, text="row=5,column=5")

button5.grid(row=5,column=5)


pos_grid.mainloop()
Output:
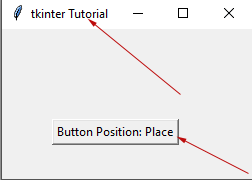
By place option
Code:
#Example of button positioning

from tkinter import *

pos = Tk()

pos.title("tkinter Tutorial")


#Setting window size containing button

pos.geometry("250x150")


#Specify button position by place

btn = Button(pos,text = "Button Position: Place").place(x=50, y=90)


pos.mainloop()
Output: