Creating Menus in Python Applications by tkinter library
In this tutorial, we will show you how to create menus in the Python applications by tkitner library.
First, the examples will explain how to add a menu. Then we will add menu items as a user pulls/clicks on the menu.
Later, we will also show how to add sub menus inside the main menu.
Actions as you click on the menu item will also be covered in the examples below.
w = Menu(top, options)
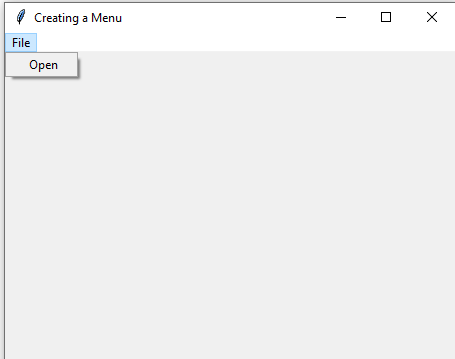
Let us start with a simple example of creating a main menu with a single item.
We will create “File” main menu and then it will contain one item “Open”.
As you open and click on the Open menu item, it closes the window.
Have a look at the code and output:
import tkinter as tk

from tkinter import Menu


# window with a menu bar

win = tk.Tk()

win.geometry("450x350")

win.title('Creating a Menu')


# create a menubar

main_menu = Menu(win)


filemenu = Menu(main_menu, tearoff=0)


# Add title of the main menu

main_menu.add_cascade(

    label="File",

    menu=filemenu

)


# Adding first menu item

filemenu.add_command(

    label='Open',

    command=win.destroy

)


win.config(menu=main_menu)

win.mainloop()
Output:
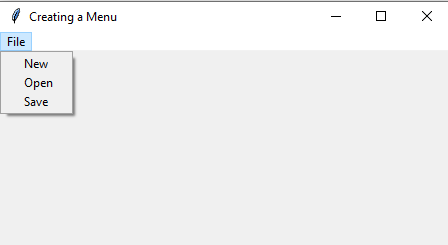
Let us move ahead and add three items to the “File” menu:
- New
- Open
- Save
Code:
import tkinter as tk

from tkinter import Menu


# window with a menu bar

win = tk.Tk()

win.geometry("450x350")

win.title('Creating a Menu')


# create a menubar

main_menu = Menu(win)


filemenu = Menu(main_menu, tearoff=0)


# Add title of the main menu

main_menu.add_cascade(

    label="File",

    menu=filemenu

)


#Adding menu items to the File menu

filemenu.add_command(label="New")

filemenu.add_command(label="Open")

filemenu.add_command(label="Save")


win.config(menu=main_menu)

win.mainloop()
Output:
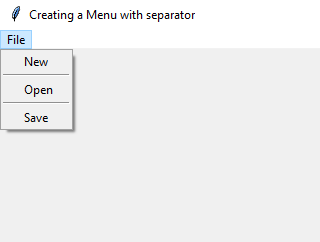
We will add a separator between each menu item (New, Open, and Save) for the demo only.
To add a separator, use the add_separator() method of the menu widget.
All items simply close the window as you click on any:
Code:
import tkinter as tk

from tkinter import Menu


# window with a menu bar

win = tk.Tk()

win.geometry("450x350")

win.title('Creating a Menu with separator')


# create a menubar

main_menu = Menu(win)


filemenu = Menu(main_menu, tearoff=0)


# Add title of the main menu

main_menu.add_cascade(

    label="File",

    menu=filemenu

)


#Adding menu items to the File menu

filemenu.add_command(label="New", command=win.destroy)

filemenu.add_separator()

filemenu.add_command(label="Open", command=win.destroy)

filemenu.add_separator()


filemenu.add_command(label="Save", command=win.destroy)


win.config(menu=main_menu)

win.mainloop()
Output:
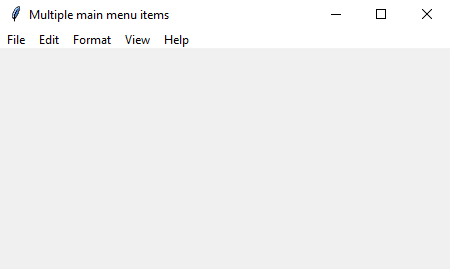
Now we will create more main menus like File in the above examples.
In the program below, we have
- File
- Edit
- Format
- View
- Help
These are the main items. Upon clicking on any will open its own menu. But first only the main menus:
Program:
import tkinter as tk

from tkinter import Menu


# window with a menu bar

win = tk.Tk()

win.geometry("450x350")

win.title('Multiple main menu items')


# create a menubar

main_menu = Menu(win)


filemenu = Menu(main_menu, tearoff=0)

editmenu = Menu(main_menu, tearoff=0)

formatmenu = Menu(main_menu, tearoff=0)

viewmenu = Menu(main_menu, tearoff=0)

helpmenu = Menu(main_menu, tearoff=0)


# Add File Menu

main_menu.add_cascade(

    label="File",

    menu=filemenu

)

# Add Edit Menu

main_menu.add_cascade(

    label="Edit",

    menu=editmenu

)

# Add Format Menu

main_menu.add_cascade(

    label="Format",

    menu=formatmenu

)

# Add View Menu

main_menu.add_cascade(

    label="View",

    menu=viewmenu

)

# Add Help Menu

main_menu.add_cascade(

    label="Help",

    menu=helpmenu

)


win.config(menu=main_menu)

win.mainloop()
Output:
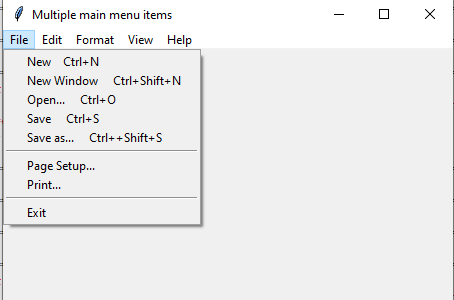
In this example, we will add menu items for each main menu.
Python program:
import tkinter as tk

from tkinter import Menu


# window with a menu bar

win = tk.Tk()

win.geometry("450x350")

win.title('Multiple main menu items')


# create a menubar

main_menu = Menu(win)


filemenu = Menu(main_menu, tearoff=0)

filemenu.add_command(label="New    Ctrl+N" )

filemenu.add_command(label="New Window     Ctrl+Shift+N" )

filemenu.add_command(label="Open...     Ctrl+O" )

filemenu.add_command(label="Save     Ctrl+S")

filemenu.add_command(label="Save as...     Ctrl++Shift+S")


filemenu.add_separator()

filemenu.add_command(label="Page Setup...")

filemenu.add_command(label="Print...")


filemenu.add_separator()


filemenu.add_command(label="Exit", command=win.destroy)


#Creating Edit Menu Items


editmenu = Menu(main_menu, tearoff=0)

editmenu.add_command(label="Undo" )

editmenu.add_separator()


editmenu.add_command(label="Cut" )

editmenu.add_command(label="Copy" )

editmenu.add_command(label="Paste" )

editmenu.add_command(label="Delete" )


#Creating Format Menu Items


formatmenu = Menu(main_menu, tearoff=0)

formatmenu.add_command(label="Word Wrap" )

formatmenu.add_command(label="Font..." )


#Creating View Menu Items


viewmenu = Menu(main_menu, tearoff=0)

viewmenu.add_command(label="Zoom" )

viewmenu.add_command(label="Status Bar" )


#Creating Help Menu Items


helpmenu = Menu(main_menu, tearoff=0)

helpmenu.add_command(label="View Help" )

helpmenu.add_command(label="Send Feedback" )


# Add File Menu

main_menu.add_cascade(

    label="File",

    menu=filemenu

)

# Add Edit Menu

main_menu.add_cascade(

    label="Edit",

    menu=editmenu

)

# Add Format Menu

main_menu.add_cascade(

    label="Format",

    menu=formatmenu

)

# Add View Menu

main_menu.add_cascade(

    label="View",

    menu=viewmenu

)

# Add Help Menu

main_menu.add_cascade(

    label="Help",

    menu=helpmenu

)


win.config(menu=main_menu)

win.mainloop()
Output:
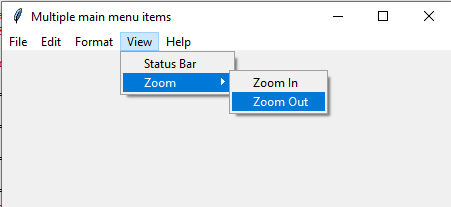
If your menu is supposed to be multi-level i.e. sub-menu then you can do this easily by using tkinter menu widget.
For example, in our above menu, we want to add the “Zoom In” and “Zoom Out” sum menu items to the “Zoom” menu item. This is how we can do this:
Code:
import tkinter as tk

from tkinter import Menu


# window with a menu bar

win = tk.Tk()

win.geometry("450x350")

win.title('Multiple main menu items')


# create a menubar

main_menu = Menu(win)


filemenu = Menu(main_menu, tearoff=0)

filemenu.add_command(label="New    Ctrl+N" )

filemenu.add_command(label="New Window     Ctrl+Shift+N" )

filemenu.add_command(label="Open...     Ctrl+O" )

filemenu.add_command(label="Save     Ctrl+S")

filemenu.add_command(label="Save as...     Ctrl++Shift+S")


filemenu.add_separator()

filemenu.add_command(label="Page Setup...")

filemenu.add_command(label="Print...")


filemenu.add_separator()


filemenu.add_command(label="Exit", command=win.destroy)


#Creating Edit Menu Items


editmenu = Menu(main_menu, tearoff=0)

editmenu.add_command(label="Undo" )

editmenu.add_separator()


editmenu.add_command(label="Cut" )

editmenu.add_command(label="Copy" )

editmenu.add_command(label="Paste" )

editmenu.add_command(label="Delete" )


#Creating Format Menu Items


formatmenu = Menu(main_menu, tearoff=0)

formatmenu.add_command(label="Word Wrap" )

formatmenu.add_command(label="Font..." )


#Creating View Menu Items

viewmenu = Menu(main_menu, tearoff=0)

#viewmenu.add_command(label="Zoom" )


viewmenu.add_command(label="Status Bar" )


#Sub menu for Zoom menu item

sub_zoom = Menu(main_menu, tearoff=0)

sub_zoom.add_command(label='Zoom In')

sub_zoom.add_command(label='Zoom Out')


#Add sub menu for zoom item

viewmenu.add_cascade(

    label="Zoom",

    menu=sub_zoom

)

#Creating Help Menu Items


helpmenu = Menu(main_menu, tearoff=0)

helpmenu.add_command(label="View Help" )

helpmenu.add_command(label="Send Feedback" )


# Add File Menu

main_menu.add_cascade(

    label="File",

    menu=filemenu

)

# Add Edit Menu

main_menu.add_cascade(

    label="Edit",

    menu=editmenu

)

# Add Format Menu

main_menu.add_cascade(

    label="Format",

    menu=formatmenu

)

# Add View Menu

main_menu.add_cascade(

    label="View",

    menu=viewmenu

)


# Add Help Menu

main_menu.add_cascade(

    label="Help",

    menu=helpmenu

)


win.config(menu=main_menu)

win.mainloop()
Output:
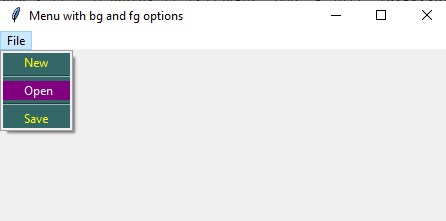
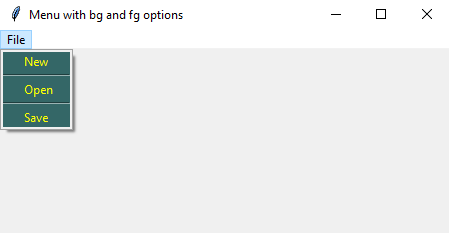
The menu widget has options to give background and foreground colors to the menu.
- By using bg option, you may specify the background color.
- The fg option is used to color the text of the menu items.
See the example below where we added both options. In fg, we provided the color name and in the bg option we used the Hex value of the color:
Code:
import tkinter as tk

from tkinter import Menu

def closewin():

   filewin = Toplevel(root)

   button = Button(filewin, text="Do nothing button")

   button.pack()


# window with a menu bar

win = tk.Tk()

win.geometry("450x350")

win.title('Menu with bg and fg options')


# create a menubar

main_menu = Menu(win)


#Here we specify the file menu bg and fg colors

filemenu = Menu(main_menu, tearoff=0, bg="#346767", fg = "yellow")


# Add title of the main menu

main_menu.add_cascade(

    label="File",

    menu=filemenu

)


#Adding menu items to the File menu

filemenu.add_command(label="New", command=win.destroy)

filemenu.add_separator()

filemenu.add_command(label="Open", command=win.destroy)

filemenu.add_separator()


filemenu.add_command(label="Save", command=win.destroy)


win.config(menu=main_menu)

win.mainloop()
Output:
To stand out a menu item from others when the mouse hovers over that item, use the following two options of the menu widget:
- activebackground – to set the background color as mouse hovers
- activeforeground – set the text color
See an example below where we set these options for all three menu items.
Code:
import tkinter as tk

from tkinter import Menu


def closewin():

   filewin = Toplevel(root)

   button = Button(filewin, text="Do nothing button")

   button.pack()


# window with a menu bar

win = tk.Tk()

win.geometry("450x350")

win.title('Menu with bg and fg options')


# create a menubar

main_menu = Menu(win)


#Here we specify the file menu bg and fg colors

filemenu = Menu(main_menu, tearoff=0, bg="#346767", fg = "yellow")


# Add title of the main menu

main_menu.add_cascade(

    label="File",

    menu=filemenu

)


#Adding menu items to the File menu

filemenu.add_command(label="New", command=win.destroy, activebackground="#800080", activeforeground="white")

filemenu.add_separator()

filemenu.add_command(label="Open", command=win.destroy, activebackground="#800080", activeforeground="white")

filemenu.add_separator()


filemenu.add_command(label="Save", command=win.destroy, activebackground="#800080", activeforeground="white")


win.config(menu=main_menu)

win.mainloop()
Output: