Just like zebras that have distinctive black and white stripe coats, you may create tables in your web pages where one row is distinctive from the other row.
The simple way of creating a striped table is using the nth-child() selector where you may provide different colors (and other CSS properties) for the even or odd rows.
In this tutorial, I am going to show you examples of creating zebra-striped tables by using custom CSS, Bootstrap CSS, and Material CSS.
Starting with the basic – Simple CSS striped table
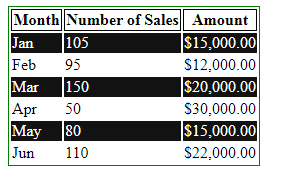
First, let us go through how a stripped table is created by using simple CSS. I only used a table border and a few basic properties for presentation. See how the nth-child() selector is used for creating striped rows:

The CSS:
<style>

table {

  border: 1px solid #008000;

}


tr:nth-child(odd) {

  background-color: #121212;

  color:#fff;

}


th{

    background-color: #fff;

    color:#000;

    border: 1px solid #000;

}

</style>
The demo of a striped table by Bootstrap 4 CSS
The Bootstrap framework has built-in classes for styling the HTML tables beautifully.
By simply including the table class along with the striped table class, you may create a striped table easily by using Bootstrap CSS.
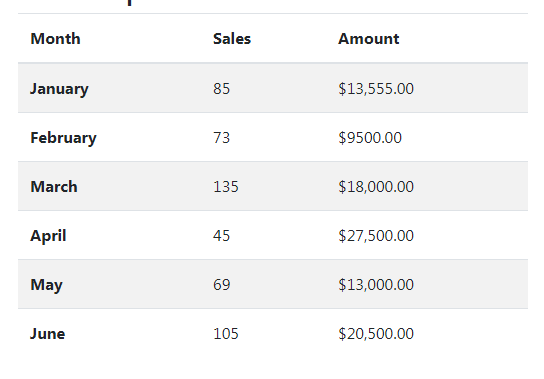
First, have a look at the online demo and I will explain how it is created:

The code:
<!DOCTYPE html>

<html>

<head>

<link rel="stylesheet" href="https://maxcdn.bootstrapcdn.com/bootstrap/4.0.0-beta.3/css/bootstrap.min.css" integrity="sha384-Zug+QiDoJOrZ5t4lssLdxGhVrurbmBWopoEl+M6BdEfwnCJZtKxi1KgxUyJq13dy" crossorigin="anonymous">


</head>

<body>

<div class="container">

  <h3>A Demo of Striped Table using Bootstrap 4</h2>


<table class="table table-striped">

  <thead>

    <tr>

      <th>Month</th>

      <th>Sales</th>

      <th>Amount</th>

    </tr>

  </thead>

  <tbody>

    <tr>

      <th scope="row">January</th>

      <td>85</td>

      <td>$13,555.00</td>

    </tr>

    <tr>

      <th scope="row">February</th>

      <td>73</td>

      <td>$9500.00</td>

    </tr>

    <tr>

      <th scope="row">March</th>

      <td>135</td>

      <td>$18,000.00</td>

    </tr>

    <tr>

      <th scope="row">April</th>

      <td>45</td>

      <td>$27,500.00</td>

    </tr>

    <tr>

      <th scope="row">May</th>

      <td>69</td>

      <td>$13,000.00</td>

    </tr>

    <tr>

      <th scope="row">June</th>

      <td>105</td>

      <td>$20,500.00</td>

    </tr>

  </tbody>

</table>


</div>

</body>

</html>
If you are unfamiliar with the usage of the Bootstrap framework then note that the reference to the Bootstrap 4 CSS file is given in the head section.
Secondly, notice the table tag used:
You can see we used two classes in the table tag. The .table-striped class is the one that specifies the table style as striped.
It gives a grayish look to every other row in the table.
The example of Bootstrap 4 striped table without CSS file reference
Well, what if I like the Bootstrap-styled striped table, but, the reference to its CSS file contains the style for all other components?
You might ask yourself, why increase the CSS file size when you only want the CSS style for the striped table?
The answer is that you may extract the table and striped table classes from the Bootstrap CSS file and include that code under the style section or your own external CSS file.
The demo below gives almost the same output as in the above example, however, notice I did not include the Bootstrap CSS reference.
Moreover, the code for the .table and .table-striped classes is used in the style section. Have a look:
See online demo and code
For your convenience, here is the CSS code of both classes:
.table class code:
It’s quite big, please see the demo page for all classes (including responsive and other related styles).
.table-striped class code:
.table-striped tbody tr:nth-of-type(odd) {

  background-color: rgba(0, 0, 0, 0.05);

}
The example of a striped table by Materialize CSS
Similarly, you may use the Materialize framework for creating striped tables without much effort.
You need to include the materialize CSS file (use the minified version) and just like Bootstrap, refer to the required classes in the table tag. See an example of a simple striped table below:
Complete code:
<!DOCTYPE html>

<html>

 <head>

  <link rel="stylesheet" href="https://cdnjs.cloudflare.com/ajax/libs/materialize/1.0.0-alpha.4/css/materialize.min.css">


 </head>


<body class = "container">

<table class="striped">

<thead>

  <tr>

      <th>Pro ID</th>

      <th>Pro Name</th>

      <th>Pro Quanity</th>

  </tr>

</thead>


<tbody>

  <tr>

    <td>P1</td>

    <td>Mango</td>

    <td>1 Ton</td>

  </tr>

  <tr>

    <td>P2</td>

    <td>Apple</td>

    <td>333 Kgs</td>

  </tr>

  <tr>

    <td>P3</td>

    <td>Oranges</td>

    <td>455 Kgs</td>

  </tr>

  <tr>

    <td>P4</td>

    <td>Strawberries</td>

    <td>15 Kgs</td>

  </tr>

</tbody>

</table>

</body>

</html>
Particularly, notice the table tag:
Yes, it only has given the .striped class while other table styles are taken care of by the framework itself.
An example of changing the stripe color
This example shows using a different color for each alternate row:
The code:
<!DOCTYPE html>
<html>
 <head>
  <link rel="stylesheet" href="https://cdnjs.cloudflare.com/ajax/libs/materialize/1.0.0-alpha.4/css/materialize.min.css">
<style>

table.striped > tbody > tr:nth-child(odd) {
  background-color: rgba(170, 213, 213, 0.5);
}

</style>
 </head>

<body class = "container">
<table class="striped">
<thead>
  <tr>
      <th>Product ID</th>
      <th>Product Name</th>
      <th>Product Quanity</th>
  </tr>
</thead>

<tbody>
  <tr>
    <td>P-001</td>
    <td>Mango</td>
    <td>105 Dozen</td>
  </tr>
  <tr>
    <td>P-002</td>
    <td>Apple</td>
    <td>35 Kgs</td>
  </tr>
  <tr>
    <td>P-001</td>
    <td>Oranges</td>
    <td>55 Kgs</td>
  </tr>
  <tr>
    <td>P-004</td>
    <td>Strawberries</td>
    <td>15 Kgs</td>
  </tr>
</tbody>
</table>
</body>
</html>
The Materialize Table tutorial covers other aspects and demos in detail.
