
Purpose of Git Push command
In its simplest definition, the Git push command can be taken as uploading the content to the remote repository.
After adding a feature, making changes or other tasks in the local repository, you may use the push command for uploading these changes to the remote repository (e.g. GitHub) so other team members can see it and may update their project accordingly.
A simple example of using the push command can be:
Where origin is the remote repository name (the default name). You may replace it with your repository name that was assigned at the time of creation of the repository.
This is followed by providing the branch name. I used master which you may replace with your branch name.
By using a single push command, you may upload one or all branches by using –all flag. For example:
In the next section, we will go through a simple example of creating a local branch, adding files, and then using the push command to upload the content on the set remote repository.
I will also explain how to use push with –force flag if a simple push command fails for some reason and why you should avoid this – so keep reading.
An example of using git push command
Rather than using the push command straight, the beginners may want to see changing the local repository and then pushing content to the remote repository – with the snapshots.
So, first of all, let us create a remote and local repository. The remote repo is on GitHub website with the name push-tst. Similarly, a local repository is created in a directory named push-test. This is empty at this stage.
I started the terminal (Git Bash) by right-clicking inside the directory and ran the following command:
This is followed by setting the remote repository path as follows:
Please change it as per your repository path (as this may be removed later).
I named it as origin, the default for this example.
This is followed by running the git pull command for synchronizing the local repo with remote:
This command downloads the remote repository branch “master” into our local repo.

Next, I created three text files in the local repository. This is followed by running the git add command under the master branch:
$ git add tst1.txt
$ git add tst2.txt
$ git add tst2.txt
This command should add three created files into the Git index to commit and then push to the remote repository.
After adding three files, I performed a single commit:
This resulted in the following output in terminal:
[master 8aac6ed] Work Done - 1

 3 files changed, 3 insertions(+)

 create mode 100644 tst1.txt

 create mode 100644 tst2.txt

 create mode 100644 tst3.txt
After the successful commit, we are good to perform a push to the remote repository, so that all these files are available online (to other team members). In reality, those will be code files, images, or any other meaningful objects.
Note: The git push -u command is equivalent to -set-upstream. The -u flag is used to set the origin as the upstream remote in your git config. As you push a branch successfully or up to date, it adds upstream reference.As you push the local branch with git push -u option, that local branch is linked with the remote branch automatically. The advantage is that you may use git pull without any arguments.
Running the push command
As our remote repository name is origin and branch is master, so this would be the command to upload content from the local master branch:
The result is:
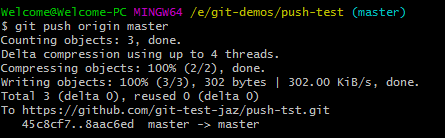
You can see, the terminal shows three files along with our remote URL (repository).
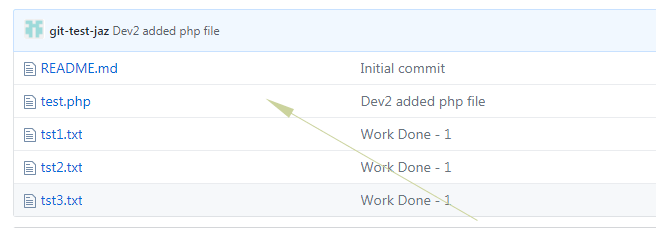
If we refresh the remote repository, this should display the files with the commit message as shown below:

As we performed single commit for all three added files, so each file is showing the same commit message online.
Pushing multiple branches example
For demonstrating that, I am creating three branches on top of the master branch in the local repository. This is followed by pushing to the online repo.
Creating branches locally:
$ git branch br-1
$ git branch br-2
$ git branch br-3
The local repository should contain four branches including the master branch.
Suppose, we have done with this and now want to push all these branches by a single command.
Running push all command
$ git push origin --all
The result in terminal:
Total 0 (delta 0), reused 0 (delta 0)

To https://github.com/git-test-jaz/push-tst.git

 * [new branch]      br-1 -> br-1

 * [new branch]      br-2 -> br-2

 * [new branch]      br-3 -> br-3
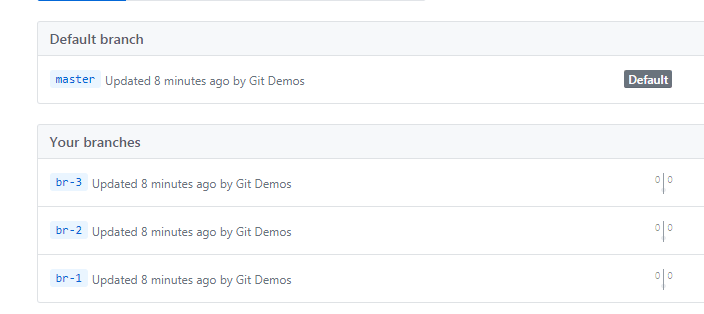
If you refresh the online repository, this shows four branches as below:
Using force push example
The reason is that you might find errors or Git refuses to push your changes made locally while using the simple push command.
This could be due to conflicts with your local and online repo.
For example, in a team environment, a teammate has added a new file or made some changes in the online repository while your local repo is behind that point.
In that case, if you want to push your local repo with new changes by simple push command then it will raise an error.
Under this situation, if you run the pull command with a force flag. For example,
$ git push origin master --force
Then, Git will update the online repository by your local repo. The work done by other teammates may be lost. So, one has to be very careful and you must be sure to use the force flag in the push command.
The example of force push
Anyway, I will show you an example of –force option where an issue is occurring as I simply running the push command.
- For example, I will call the above developer dev1 and another developer is working on the same repository as dev2.
- The dev2 pulls the remote repository from the same point where dev1 uploaded in the above example. That is, it contains three text files in the master branch.
- After downloading, the dev2 added a test.php file for some feature and after completing the task decided to upload on the master branch:
The developer makes the commit and pushes the changes to the remote repository:
The result
[master 42884b4] Dev2 added php file

1 file changed, 3 insertions(+)

create mode 100644 test.php
This is followed by a push command:
The push command went smoothly and updated the remote repository as shown below:
At the same time, the dev1 worked on another file – say text file four (tst4.txt). He added the file and run the commit command locally:
$ git add tst4.txt
$ git commit -m “Added text file 4”
Now, as a file is ready to upload, he runs the simple push command:
And the result is:

The Git rejected the push command as some other is working on the same repository.
Running the git push –force command
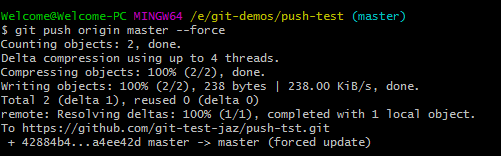
The dev1 decided to run the push command with –force flag:
$ git push origin master --force
The result in the terminal is a success:
However, as you look at the online repository, the following is the result:
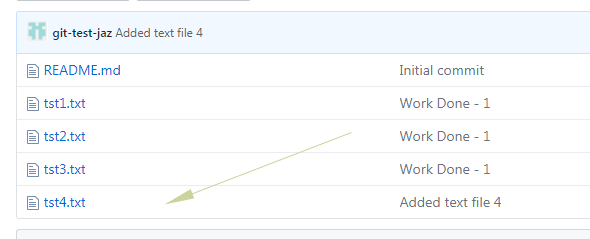
You can see, the tst4.txt is added while the commit of dev2 is gone. That means the remote repository is updated by the local repository of the dev1.
The example of using other remote name and branch
Until now, we have been using the origin as the repository name and master as the branch name.
In certain scenarios, you may be required to use some other repo name and branch in the push command.
In this example, we will look at how to push changes on some other branches and with different repository names.
The target command for this example is:
Where demo1 is the same remote repository on Github that I used in the above examples and feature-br is a branch based on the master branch.
For that, I have created another local directory and started Git Bash there. In the Git terminal, run the following commands:
Initialized Git:
Adding a repo with the name of demo1:
So, this is where the name of the repository is set if other than the origin.
Pulling the online repository content
After successfully downloading all content by pull command, create a local branch based on the master branch:
This command is the shorthand for creating and checking out a branch i.e.
$ git branch feature-br
$ git checkout feature-br
After creating a branch, I added a feature file “footer.php” for demo only:
Committing the file into that feature-br branch:
Finally, to the point of executing our target command;
This results in creating a new remote branch and a commit ahead of the master branch:
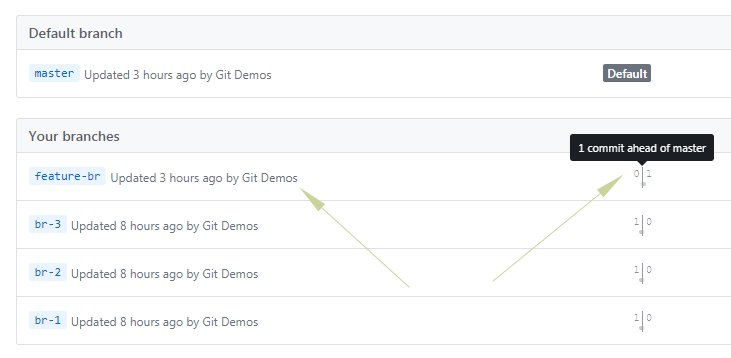
If this branch is clicked, this should display the footer.php file along with other files in the master branch.