Purpose of jQuery $.post method
The $.post method is a shorthand of $.ajax method which is used to load data by an HTTP request.
The $.post method is simpler to use where the data source is specified as follows:
$.post( url [, data_to_send ] [, success ] [, dataType ] )
In the url parameter, the data source from where data will be pulled is specified. This can be a text file, a PHP file etc. The PHP file may contain a script to connect and retrieve data from a database like MySQL.
You may also send data along with the request, for example, user ID and password etc. The success part is where a callback function executes if the request is successful. There you also get the returned data that can be displayed in different web page elements like div, HTML table, lists, dropdowns etc.
I will show you demos of using jQuery post method in HTML div and table elements. The HTML table will be filled by using database data while for div I will use the text file.
A demo of $.post jQuery method with HTML div
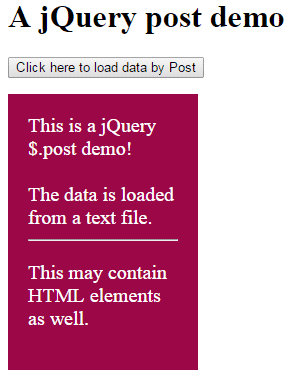
In the demo, a div is created with a little CSS for presentation. As you click on the button “Click here to load data by Post”, the post method will load data from the specified text file.
See the demo and code online by clicking the image or link below:

Online demo and code
In the markup section, the following div and button are created:
<p><button id="postbtn">Click here to load data by Post</button></p>

<div class="divpost"></div>
Following is the jQuery code used in the <script> section:
<script>

$(document).ready(function(){

$("#postbtn").click(function(){


$.post("posttst.txt",function(postresult){

$(".divpost").append(postresult);

});


});

});

</script>
You can see, on the click event of button, the post method is called:
$.post("posttst.txt",function(postresult){
The posttst.txt file is placed at the same location where demo source file is located.
The next line of code will display the loaded text to the specified div:
$(".divpost").append(postresult);
An ajax post example with HTML table
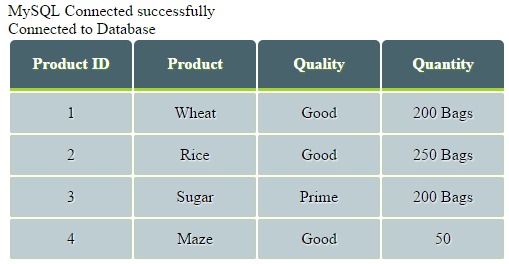
In this demo, as the web page loads, the specified fetchdb.php file is called which is specified in the URL parameter of the $.post method.
The PHP file will connect to MySQL database server and its specified database. After that, an SQL query is used to retrieve data from tbl_products table. The table data is then displayed in an HTML table.
See the output below first which is followed by a little description:

Markup:
<!doctype html>
<html>
<head>
<script src="https://code.jquery.com/jquery-1.10.1.min.js">
</script>
<script>
$(document).ready(function(){
    $.post("fetchdb.php",function(postresult){
    $("body").append(postresult);
    });
});

</script>

<style>
.demotbl {
    border: 0px solid #69899F;
  }
.demotbl th{
    padding:15px;
    color:#fff;
    text-shadow:1px 1px 1px #568F23;
    border-bottom:3px solid #9ED929;
    background-color:#49636D;
    background:-webkit-gradient(
        linear,
        left bottom,
        left top,
        color-stop(0.02, rgb(73,99,109)),
        color-stop(0.51, rgb(73,99,109)),
        color-stop(0.87, rgb(73,99,109))
        );
    background: -moz-linear-gradient(
        center bottom,
        rgb(73,99,109) 3%,
        rgb(73,99,109) 52%,
        rgb(73,99,109) 88%
        );
    -webkit-border-top-left-radius:5px;
    -webkit-border-top-right-radius:5px;
    -moz-border-radius:5px 5px 0px 0px;
    border-top-left-radius:5px;
    border-top-right-radius:5px;
  }
.demotbl td{
    width:100px;
    padding:10px;
    text-align:center;
    vertical-align: top;
    background-color:#BDCDD2;
    border: 1px solid #BED3AB;
    -moz-border-radius:2px;
    -webkit-border-radius:2px;
    border-radius:2px;
    color:#000;
    text-shadow:1px 1px 1px #fff;

  }
</style>

</head>
<body>

<h3>A jQuery post demo with MySQL DB and PHP</h3>


</body>
</html>
PHP code:
<  ?php
//remove space in PHP tag
$dbhostname = 'localhost';

$dbusername = 'username';

$dbpassword = 'password';

$conn = mysql_connect($dbhostname, $dbusername, $dbpassword);

if(! $conn )

{

  die('Could not connect: ' . mysql_error());

}

echo 'MySQL Connected successfully'."<BR>";

mysql_select_db("DBName") or die(mysql_error());

echo "Connected to Database"."<BR>";

$emp_salary = 7000;

$emp_id = 3;

$sql_statemanet = "select * from tbl_products";

$rec_select = mysql_query( $sql_statemanet);

if(! $rec_select )

{

  die('Could not retrieve data: ' . mysql_error());

}

//Displaying fetched records to HTML table

echo "<table class='demotbl'>";

echo "<tr> <th>Product ID</th> <th>Product </th> <th>Quality </th> <th>Quantity </th></tr>";

// Using mysql_fetch_array() to get the next row until end of table rows

while($row = mysql_fetch_array( $rec_select )) {

                // Print out the contents of each row into a table

                echo "<tr><td>";

                echo $row['Product_ID'];

                echo "</td><td>";

                echo $row['Product_Name'];

                echo "</td><td>";

                echo $row['Product_Quality'];

                echo "</td><td>";

                echo $row['Product_Quantity'];

                echo "</td></tr>";

}

mysql_close($conn);

?>
In the script section, the $.post method is called as the demo page loads rather click event of the button, this time.
<script>

$(document).ready(function(){

$.post("fetchdb.php",function(postresult){

$("body").append(postresult);

});

});

</script>
There, you can see the fetchdb.php file is specified (you can see its code in the demo page). If the request was successful, the returned data in the postresult parameter will be displayed in the body of the web page, by using the $.append method of jQuery.
In the fetchdb.php file, the script is written to connect to the database server. You have to change the user id, password, database name, and table name according to your database specification.
After that, an HTML table is created in that file with a class name:
echo "<table class='demotbl'>";
That CSS class is created in the calling file, where I used the jQuery post method. So it will take the CSS properties to display table data.
In the end, the database connection is also closed.
