
The responsive auto-expend plug-in
As more and more users are coming from mobile or smart devices to your websites, it is becoming necessary to make your site mobile-friendly not only for SEO purpose but for even better user experience.
If your website has long paragraphs of text, it may add good experience if textual information is expanded by clicking “more” or some other related text while using mobile whereas the same information is presented in long paragraphs in bigger screens of desktop or laptops.
In this tutorial, a jQuery plug-in is used that you may deploy in WordPress or simple website where depending on the screen size the text information is presented completely or compacts in small devices. The plug-in is available to download from the Github website (credit: inaveedahmed).
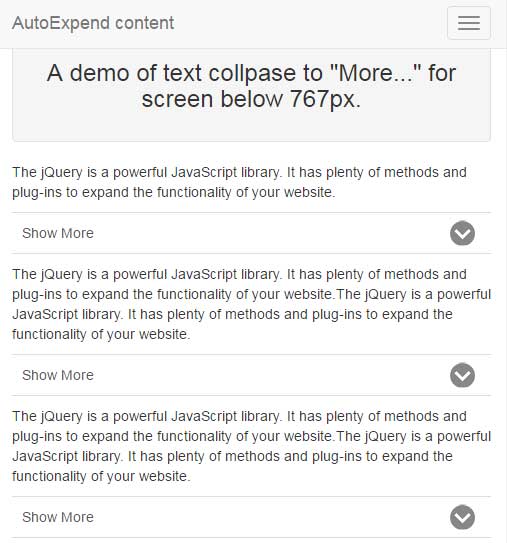
A demo of using AutoExpend with Bootstrap framework
In this example, a responsive navigation bar is created by using the Bootstrap framework. This is followed by the long block of text paragraphs. In bigger desktop screen, the textual information is presented normally without the more button to expand it. If you are looking at it from the smart phone or smaller desktop screen, the paragraphs’ text will collapse. Click on “Show More” link to expand the text:
See online demo and code
For setting up this plugin, you need to include the jQuery and plug-in’s JS files. You may either use the CDN link or host at your own:
<script type=”text/javascript” src=”https://cdnjs.cloudflare.com/ajax/libs/jquery/2.1.3/jquery.min.js”></script>
<script type=”text/javascript” src=”https://rawgit.com/inaveedahmed/narround/master/ina.autoexpand.js”></script>
The Bootstrap’s files are included as demos is using its classes for the navigation bar. You do not necessarily require it.
The next step is to imitate the plug-in in the jQuery code:
        $(document).ready(function(f){

            $('.content').collaps();

        });
The .content class is used in the main div containing textual information that you want to collapse / expand.
 <div class="row">

            <div class="col-lg-12 content">

                <p>The jQuery is a powerful JavaScript library. It has plenty of methods and plug-ins to expand the functionality of your website.</p>

                <span id="more-10"></span>

                <p>The jQuery is a powerful JavaScript library. It has plenty of methods and plug-ins to expand the functionality of your website.The jQuery is a powerful JavaScript library. </p>
A demo of displaying other text than “Show more”
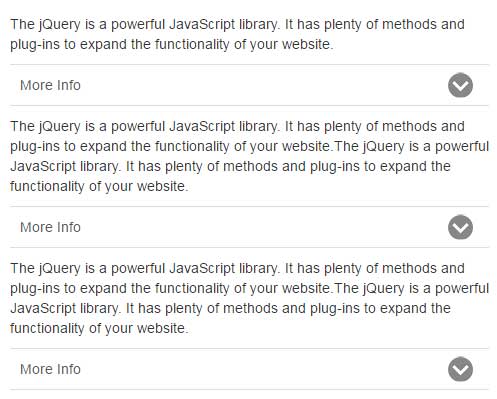
You may want using some other text than the default “Show More”. For example, “More information, “More info”, “More” and so on.
In order to change this text to expand or collapse the information, you need to change this in the plug-in JS file.
For that, open the “ina.autoexpand.js” file and find this text: “Show More”. Simply replace this to the one you want to display. See the following demo where I changed “Show More” to “More Info”.
See online demo and code
You can see, the markup remains the same as used in the first example. Only, the reference to the JS file of plug-in is changed in the <head> section:
<script type="text/javascript" src="js/autoexpand/ina.autoexpand.js"></script>
In the JS file, I changed the following:
var style ="."+settings.clousureClass+"{padding:10px;border-left:5px solid #ddd;margin:0 10px;display:none}."+settings.moreClass+"{display:block;font-size:100%;padding:10px;border-top:1px solid #ddd;border-bottom:1px solid #ddd;font-family:arial;color:#555;position:relative;cursor:pointer; margin:10px 0;}."+settings.moreClass+".active{border-bottom:0 solid #ddd}."+settings.moreClass+":before{content:'More Info'}."+settings.moreClass+":after{width:25px;height:25px;background-repeat:no-repeat;background-image:url(data:image/png;base64,iVBORw0KGgoAAAANSUhEUgAAADIAAAAyCAYAAAAeP4ixAAAAGXRFWHRTb2Z0d2FyZQBBZG9iZSBJbWFnZVJlYWR5ccllPAAACYxJREFUeNrMmnlM1dkVxy8/nuKugKCoo+KOGxi3mkoVxA20dUEik5iZ0LGTtOnUZBqbaZtpm5lM2th0pp0mTWNMJ52/1BYl7oqgCDYKyqIIlYKKuCuLioKK9nxuvOTN8/3exkPnJjcP3u/+7j3fs3zPufe+kHv37inXFhoaqh48eKDa2trUo0ePVEdHh+rZs6dqbGxUvXv3Vn369FFPnjxRvDt8+HA9/saNG6q9vT25tbV10uPHj9+SzwT5P0Lm6MGc8v6zXr16PQgLCyvr169fvfTaiIiIfPm+NSQkRN2/f18NGDBAORwOPTfr8inj1cCBA/WnZVkqPDxcy+PaHMrP9uLFCz0pncUvXrz4g5aWljW3bt36roAf++zZMz0O4RCqRw+NQz18+FC9fJb8/PlzDV7A3I6MjDwmgh6Jjo7+hwDpYH4A8OlPc/gDgMUHDRqE5sOqqqp+fPny5febmpomoiEsJRrXANw13gW8c5N5ouvq6jLknYz+/ft/fP369a+nTJnypQC7CWh57jOQEG+uJS6i0KBoTt25c0c1NDS8W11d/Wlzc/NwBDPC+6tB12bcSQA9njRp0u9iY2P/YL7H5VjHk2t5BCK+rsH07dtXiebjioqKtkgspAEAC3RV+FeEEYVgBQCJ4kqmTZu2eeTIkfm4JyCQy28g4vdaUPy8pKRkdWlpafbTp0/RWFAs4A2Q8QSxzqakpKQ/AwTF4hnugFh28YAp0byA2FRYWJjN5JjYPO/Oxvx4ATKUlZV9cfTo0b8TMygRcO7aK0AYiNtAeXl5eb85ceLE5wQ4k3Y3AFcwuNTgwYNVRUXFj3JycrbzP3K5A2O5swQvHDx4cNOZM2d+i0/iXq8ThLM8eALudOnSpYxdu3Z9RQxhLVd5LAaajh8Kt6uCgoLv5+fnfy4J642BcAUTFRWlJE7f2bdv3y/wGOT6huywksngIJX88JZYI+dNWsKOACRpqlOnTv2+uLh4LrIaVqVbBBFshNAwRW5u7tcI3x302lXLUCZBQKLofZIGQiiVkB0MlnmI6SQm1km2XoA17NjhTTZkgjklp0WePHlyi2E2MFhYgocUhEK1W3loV2Z8W8AQu8JkH4rSYyACMFiUAAT56dOnf3b37t2B7hjB2U+ZiN4dYM38yORpfliVMRIvf+x0LarSK1euqAsXLnyMz9mBACwvM55YIrsGE4wBAb1SWbAOa9rFC/mktrb27fPnz0cS9BamuXr1aqqUKhEAsQPBxPQNGzaoFStWqNu3b2tNBAMMc6CYa9euqfnz56uNGzdq95GtgQZlZxXkqa+v/wkJW8eIvPCOnYYBQQFJz8zMVHFxcWrevHlq6dKlSsruLlvGWOLmzZsqOTlZLV68WNNsVlaWzup2YMy+SBSaoa24fv1669y5c1/Ig/6uLzhbgonj4+M7n40fP16DkCSl84+d5nwBIVpVCxYsUOnp6Z3PYKPp06dTa2kios5ydXuMIJu7aEni20NXrVqVWFNT8wF5w7WBFNRYYurUqa88nzhxov4sLy/XeccfMMadsAQgMjIyXhkDmJkzZ7IHUkJEmmZd5yA+xHLllqCcQeS7a2T7YcOGKdm12QqUlpamOy7APL64mQGBay5cuNAtCNMomZCB7O2uMY88i7fENDF2ixNElZWVavfu3R4FI158JQBnEMTEmjVrPM4thSK1n44Xu6AX15tuSRAn2C3M94CRcl7t3bvXK5jU1FSPBOAc2IsWLfIKQgpESibNYJ5yinjCkNAlS5Z8KKYZSuDYUS+0TBwgoIkLd23cuHG2BOAc2LjT2rVrPYLYv3+/OnTokIqJifFYvL48FGkNFc28L4vH2CUfs/VFMCkLdFKU7aftWHcE4BzYgFi3bp1HEFgfEEOGDPGpApf5W7CIVyDGMoCBDiEBTwQwYcIEDeDs2bPKJFkTE94sQUwcPnzYqyVcLNLiEB8LoeTwRp3mXGvEiBHq2LFjepHVq1fbjhcF6Xf27NmjXSolJcXjeANC9uedp5e+bCMYg5IdQm+NUKcrR3t6iYVkB6kDDbbyRACcxmBBXwPbHxCGfkX2NoeY/ry8lOzviSP+ix/z/8qVK23He8oRroFNvvAHBA26l3fuW5L66wPZreFa+PGRI0dUTk5OwLUWgS07Pp8D27WRhCVFVFhSBpR7C3RPlhk6dKgOzp07d/o9BzFx4MCBgEE4Je5iSzJmoVil0a5M8YcAEMwfECawAwVhPEPCo8SSJNYmLnKSCjfQQwFnAvBWATgHdiAx4dwoGKXkvyx57QxFI+7xb3N+FCgYZwKAcrsjsF3LHdhQ1txNYWlBveIaX4WHh7fZVZjBIoCuBrYr7ZJsRfa/NDU1KYJdxcbGUlr8iV1gV3Z7rgSwY8eOzmfZ2dlBCWxjDfLTqFGjjsrm6xLzOczx45w5cz6TneIvsYrrzVKgBFBUVKQrV2Lo+PHjfic7T9agzZo16+e4lT4JonwAnSzSOmPGjM3Nzc0qEDp2RwC4GUFtqthggGBeXEk86F9xcXFl/A0wi+0sVuCLuXPnbpEF/wewYIChcWzDniYY9yomwKUk6UhMTNxojqe0RcwpPAM4Kk1KSsoEnK/bVl8WD9b5F95DHIuMb0t8NHOrbLYJFjFCN6fbs2fPLhG0P2Xb2hVKDnZD2TCsbB+2SSW9AytAVEZ+y81GXi1fvvyvCQkJ27jF/TacyKNMTlFGjx79H9kKvGeurp2VrBOi6TRMB/r09PT3xo4dux0wb9oSXNgK+5VmZmZ+D/cnns2FrOlub3UNUgIpLy9vm9ByFgHL/uN1Wcjs8Tmck3goXLZsWYrUhe3OSv8GYDstYBkCSbanP4yPj/+1udV6HTHDGqyHDGPGjNmalpaWKOzXrjO4DZt6/eWDCSrZc6cUFBT8Tb4fBzF0h3XMIQVrS1JuEQV+IPv/f5pTUPMTEr9/VMPE0DBgJNByRRuT6+rqPq2pqdnMPp+sGox7RmcAaBzhpX8kCrvOOjx3d6Trs0VgBnMXggVwLTTCD2mqqqo+amhoWC/Pw17uCfx2OxTAGnQElWS8f/LkyZ/JZxHxiWzmzt/8FiUgi7jzW5KQLPRfCbx3a2trfyWLZUklkCr0+B0sBzXqIo7rMFnY+DRCI4C5kUJZjBEWqpCeGxUVtVVKjmoOQaBaTxc97prDXxcwFI3AoqVrUrh9IsJ9UllZOVUEnCNjponFEuTvKBG8t4wLfWnl59Lbpd8RwavFwiVixVIpLosRnjmxPkk5kET8fwEGAHgbMihsDKrVAAAAAElFTkSuQmCC);background-size:cover;position:absolute;right:16px;font-size:200%;top:50%;line-height:0;cursor:pointer;content:'';transition:all .3s ease-out;transform:translate(0,-12.5px)}."+settings.moreClass+".active:after{transform:rotate(-180deg) translate(0,12.5px)}@media screen and (min-width:767px){."+settings.moreClass+"{display:none}."+settings.clousureClass+"{padding:initial;border-left:0 solid #ddd;margin:initial;display:initial}}";
In that long code, you only need to change the “More Info” to one you want.
Changing other styles of “More” text
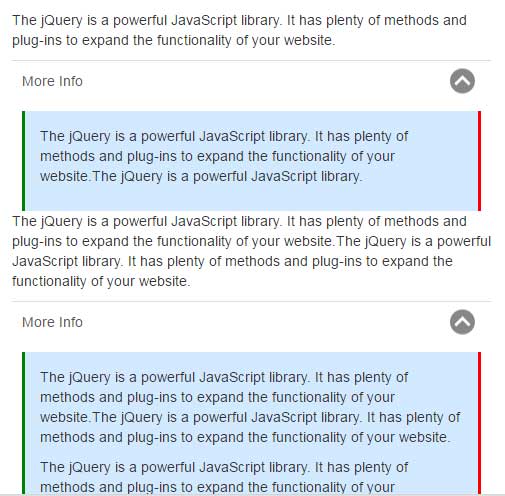
Similarly, you may change the style of “Show more” text as per need or to match the style of your website. For that, simply change or add the CSS properties for the “Show More” section as shown in the example below:
See online demo and code
You can see the light blue background color of “More info” content along with different borders for left and right. No markup is changed in this demo as well while JS file’s following section is modified:
var style ="."+settings.clousureClass+"{padding:15px;border-left:3px solid green;border-right:3px solid red;background-color:#D2E9FF;margin:0 10px;display:none}."+settings.moreClass+"{display:block;font-size:100%;padding:10px;border-top:1px solid #ddd;border-bottom:1px solid #ddd;font-family:arial;color:#555;position:relative;cursor:pointer; margin:10px 0;}."+settings.moreClass+".active{border-bottom:0 solid #ddd}."+settings.moreClass+":before{content:'More Info'}."+settings.moreClass+":after{width:25px;height:25px;background-repeat:no-repeat;background-image:url(}}";

        $("<style type='text/css'>"+ style +"</style>").appendTo("head");
Similarly, you may change the images for showing collapsed or expanded content.