
Create ripple effect by using jQuery on click and tap
In this tutorial, I will show you demos of creating the material design-inspired ripple effect by using a jQuery plug-in. The plug-in name is rippleria that you may download from the Github website here.
By using this plug-in, you may create a ripple effect in different elements like buttons, images, etc. Keep reading the section below for live demos, code, and how to set up this plug-in to be used on your website.
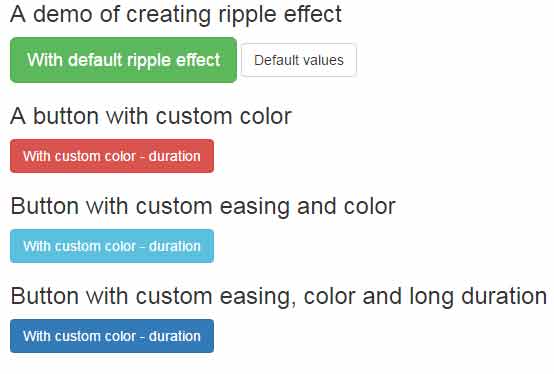
For creating the ripple effect in buttons, you may simply use the data attribute data-rippleria in a button tag and it will create the ripple effect with default values.
You may also use other data attributes like data-rippleria-color for ripple color, data-rippleria-duration, and data-rippleria-easing with custom values. Have a look at both types in the demo:
Online demo and code
The markup:
<div class="container">

<h3>A demo of creating ripple effect</h3>

<button data-rippleria class="btn btn-success btn-lg">With default ripple effect</button>

<button data-rippleria class="btn btn-default">Default values</button>

<h3>A button with custom color</h3>

<button data-rippleria

data-rippleria-color="rgba(255,255,0,.65)"

class="btn btn-danger">With custom color - duration</button>


<h3>Button with custom easing and color</h3>

<button data-rippleria

data-rippleria-color="rgba(0,111,0,.55)"

data-rippleria-easing="ease-in-out"

class="btn btn-info">With custom color - duration</button>


<h3>Button with custom easing, color and long duration</h3>

<button data-rippleria

data-rippleria-color="rgba(255,128,255,.45)"

data-rippleria-easing="ease-in-out"

data-rippleria-duration="2000"

class="btn btn-primary">With custom color - duration</button>
</div>
You just need to include the dependency files as shown in the code section of the demo page.
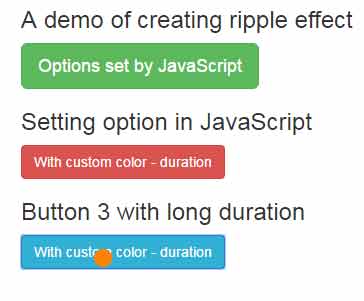
In the above demo, the ripple effect is created by using the data attributes. You may also use the jQuery code to specify the options of ripple effect including color, duration, easing effect, etc. Have a look at the output:
The script:
<script>

$('#btn-ripple1').rippleria({

  duration: 750,

  easing: 'linear',

  color: "#FFFF00",

  detectBrightness: true

});

$('#btn-ripple2').rippleria({

  duration: 1500,

  easing: 'linear',

  color: "#0000FF",

  detectBrightness: true

});

$('#btn-ripple3').rippleria({

  duration: 2000,

  easing: 'ease-in-out',

  color: "#FF8000"

});

</script>
The markup:
<div class="container">

<h3>A demo of creating ripple effect</h3>

<button id="btn-ripple1" class="btn btn-success btn-lg">Options set by JavaScript</button>

<h3>Setting option in JavaScript</h3>

<button id="btn-ripple2" class="btn btn-danger">With custom color - duration</button>


<h3>Button 3 with long duration</h3>

<button id="btn-ripple3" class="btn btn-info">With custom color - duration</button>

</div>
A demo of creating a ripple effect in image
You may also create the ripple effect in images by using this plug-in. Click on the image after opening the demo page to see it. Click again and again to see various colors:

Markup and script:
<!DOCTYPE html>
<html>
    <head>
    <link rel="stylesheet" href="css/rippleria/jquery.rippleria.min.css">
    </head>
 <body>

<div class="text-center">
    <a style="display: inline-block;" id="ripple-image" href="#">
        <img src="https://www.jquery-az.com/jquery/images/strawberries-2.jpg" alt="image">
    </a>
</div>

    <script src="//code.jquery.com/jquery-2.1.4.min.js"></script>
    <script src="js/rippleria/jquery.rippleria.min.js"></script>

<script>
    $('#ripple-image').rippleria({
        duration: 1200,
        easing: 'ease-in-out',
        color: '#DFDF00'
    });

    $('#ripple-image').click(function(e) {
        e.preventDefault();

        var randInt = function (min, max) {
        var rand = min + Math.random() * (max - min)
        rand = Math.round(rand);
        return rand;
    };

    $(this).rippleria('changeColor',
            'rgba('+randInt(0,200)+','+randInt(0,200)+','+randInt(0,200)+',0.'+randInt(3,5));
    });
</script>

</body>
</html>
An example of table
You may also create a ripple effect in an HTML table by using this plug-in. For the demo, I have created an HTML table with Bootstrap based classes.
Click on any row to display the riffle effect that spreads across the table.
The code
<!DOCTYPE html>
<html>
    <head>
    <link rel="stylesheet" href="css/rippleria/jquery.rippleria.min.css">
    <link rel="stylesheet" href="https://maxcdn.bootstrapcdn.com/bootstrap/3.3.6/css/bootstrap.min.css">
    </head>
 <body>
<div class="container ">
<table class="table table-bordered table-striped table-hover" id="tbl-ripple">
  <tr>
      <th>Product ID</th>
      <th>Product Name</th>
      <th>Product Quality</th>
      <th>Product Quantity</th>
  </tr>
  <tr class="info">
      <td>1</td>
      <td>Wheat</td>
      <td>Good</td>
      <td>200 Bags</td>
  </tr>
  <tr class="danger">
      <td>2</td>
      <td>Rice</td>
      <td>Good</td>
      <td>250 Bags</td>
  <tr class="warning">
      <td>3</td>
      <td>Sugar</td>
      <td>Good</td>
      <td>200 Bags</td>
  </tr>
  <tr class="active">
      <td>3</td>
      <td>Sugar</td>
      <td>Good</td>
      <td>200 Bags</td>
  </tr>
  <tr class="success">
      <td>3</td>
      <td>Sugar</td>
      <td>Good</td>
      <td>200 Bags</td>
  </tr>
</table>
    <script src="//code.jquery.com/jquery-2.1.4.min.js"></script>
    <script src="js/rippleria/jquery.rippleria.min.js"></script>

<script>
$('#tbl-ripple').rippleria({
  duration: 750,
  easing: 'linear',
  color: "#FCDCE1",
  detectBrightness: true
});
</script>


</body>
</html>
This is just a rough presentation. You may refine it and use it beautifully. The purpose is to show how this ripple effect can be used in any element. Try it in links, form fields, etc.