
The maps component in web pages
The maps component can be used for various purposes in a website. For example, showing the map in the contact us page for guiding the users or customers to the office or business location. Similarly, you may have a component in a website to let users search different locations.
The plug-in shared in this tutorial can be used for contact us purpose or you may use it for showing different locations.
The map can be loaded in a particular section e.g. a div element or you may show it as an overlay. You may also program it to take the value from the user in an address box. Upon entering the location, as he / she enter the search button, the plug-in may load the searched location in a section of the same page or in an overlay window.
Have a look at the following section where I will show you different demos of using this nice jQuery Google maps plug-in.
A demo of displaying map in a div element
Basically, this plug-in implement Google maps in your website. As using this plug-in, you need to give an address and use a few options and it will generate Google map for that address and display it in the specified element.
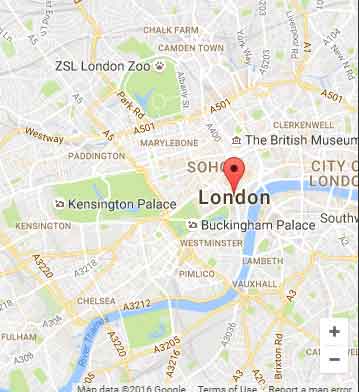
In this example, the Google map is shown in a div element as the demo page loads. The address is specified in the data-sm_address data attribute. Click on the button or image below for loading the demo page:
See online demo and code
The markup:
<h3>A demo of loading map as page loads</h3>

<div id="load-map" class="google-map-container" data-sm_address="London, UK"></div>
A little custom CSS for container:
.google-map-container {

width:60%;

height:350px;

border:1px solid #408080;

}
The jQuery code:
$(document).ready( function() {
  $('#load-map').simpleMap({
     autoLoad: true,

      mapSetup: {

      zoom: 14

    }

   });

 });
Get the complete code from the demo page.
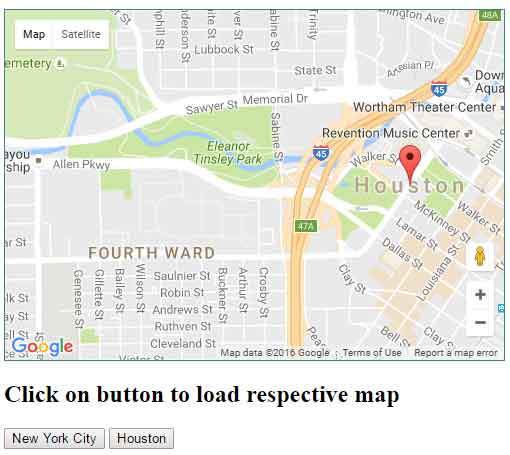
In this example, a few buttons are used with pre-defined addresses. As you click any button, the respective location will open in the same container:
See online demo and code
The markup used for this example:
<h3>Default map as web page loads</h3>

<div id="load-map" class="google-map-container" data-sm_address="London, UK"></div>

<h2>Click on button to load respetive map</h2>

<button class="button-load-map" data-sm_address="New Your city, USA">New Your city</button>

<button class="button-load-map" data-sm_address="Houston, Texas">Houston</button>
The jQuery:
$(document).ready( function() {
        $('#load-map').simpleMap({

         autoLoad: true,

         mapSetup: {

         zoom: 15

        }

     });

   $('.button-load-map').simpleMap({

        mapElementId: "load-map",

        mapSetup: {

        zoom: 15,

        streetViewControl: true,

        panControl:true

       }

      });


  });
You can see, the locations are specified in the data-sm_address data attribute in each button. As you click the button the map opens in the same container as the default. This is set in the options using jQuery code. The mapElementId option is used to set the container. If you want to open this in some other container, specify a different element there.
You may also see a few other options like zoom, streetViewControl and panControl are also set.
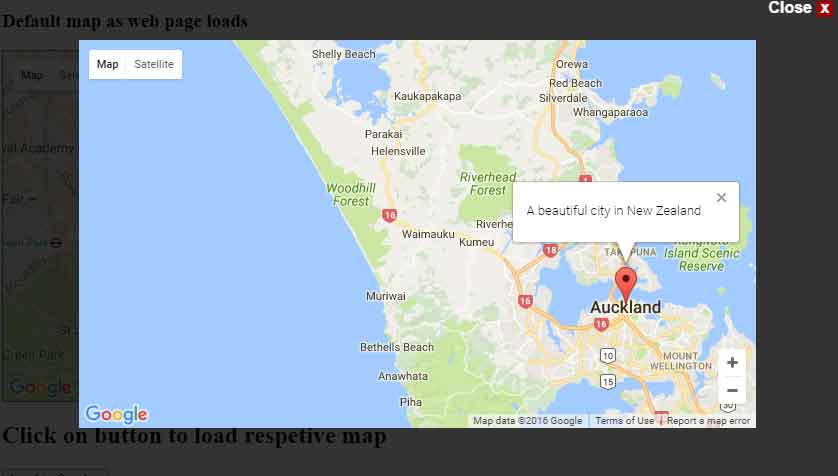
A demo of opening map in an overlay
In this demo, rather than opening the map in a container, the map is opened in an overlay. Click on the button to open the map:
See online demo and code
The markup:
<h3>Default map as web page loads</h3>

<div id="load-map" class="google-map-container" data-sm_address="London, UK"></div>

<h2>Click on button to load respetive map</h2>

<button class="btn btn-warning" id="an-overlay-demo" data-sm_address="Auckland, New Zealand">Load in Overlay</button>
The overlay is done by using the useOverlay option as true. You can also see, the HTML is used for a caption as map loaded.
Setting up jQuery maps plug-in
For setting up this plug-in, first of all, download it from the Github website here. You need to include the JS and CSS files after unzipping the downloaded package.
In the documentation, you may see additional information and demos.