
- 1. CSS display and visibility properties
- 2. Syntax of CSS visibility
- 3. Syntax of display
- 4. A display example to show/hide menu – div, li, and links
- 5. A menu demo with visibility property
- 6. A CSS visibility and display example with an HTML table
- 7. A table with CSS display property
- 8. Using display for inline elements
CSS display and visibility properties
The display and visibility properties are used to show or hide HTML elements in web pages. If both are used to hide or show elements then what is the difference between the two?
To understand that, see the figure below where I have used three div elements.
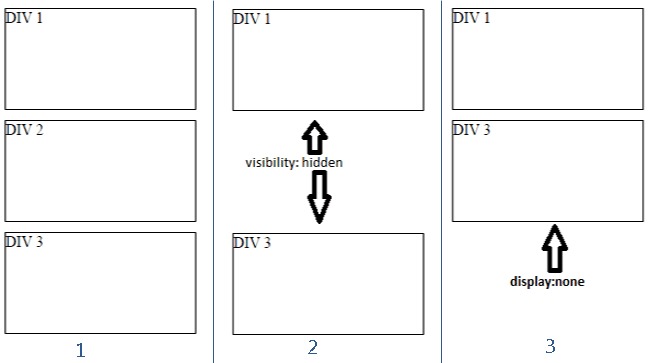
Three div elements are used which are shown in section 1 (from the left side). Initially, all div elements are shown without using the display or visibility properties.
Figure 1 code
<!DOCTYPE html>
<html>
<head>

<style>
.div1 {
    border:solid 1px;
    height:100px;
    width:15%;
    margin:10px;
}
.div2 {
    border:solid 1px;
    height:100px;
    width:15%;
    margin:10px;
}
.div3{
    border:solid 1px;
    height:100px;
    width:15%;
    margin:10px;
}
</style>

</head>
<body>
<div class="div1">DIV 1</div>
<div class="div2">DIV 2</div>
<div class="div3">DIV 3</div>
</body>
</html>
The second part, above section 2 in the figure shows only DIV 1 and DIV 3. The DIV 2 is given the visibility: hidden value, however, you can see the space of DIV 2 is still occupied.
Figure 2 code
<!DOCTYPE html>
<html>
<head>

<style>
.div1 {
    border:solid 1px;
    height:100px;
    width:15%;
    margin:10px;
}
.div2 {
    border:solid 1px;
    height:100px;
    width:15%;
    margin:10px;
    visibility: hidden;
}
.div3{
    border:solid 1px;
    height:100px;
    width:15%;
    margin:10px;
}
</style>

</head>
<body>
<div class="div1">DIV 1</div>
<div class="div2">DIV 2</div>
<div class="div3">DIV 3</div>
</body>
</html>
The third part, above section 3 is also showing only DIV 1 and DIV 3 while DIV 2 is hidden by using the display: none property. You can see the difference; the DIV 3 is moved up and DIV 2 is not occupying any space.
Figure 3 code
<!DOCTYPE html>
<html>
<head>

<style>
.div1 {
    border:solid 1px;
    height:100px;
    width:15%;
    margin:10px;
}
.div2 {
    border:solid 1px;
    height:100px;
    width:15%;
    margin:10px;
    display: none
}
.div3{
    border:solid 1px;
    height:100px;
    width:15%;
    margin:10px;
}
</style>

</head>
<body>
<div class="div1">DIV 1</div>
<div class="div2">DIV 2</div>
<div class="div3">DIV 3</div>
</body>
</html>
Syntax of CSS visibility
This is how you can use the CSS visibility property:
visibility: hidden;
The default value of the visibility CSS property is visible. You can also use:
visibility: collapse;
This is used in the HTML table, an example of which is shown in the later part of this tutorial.
Syntax of display
The syntax to use the display property is:
display: none;
This will hide the element where this property is used. Like I used in the DIV 2 element in the intro section.
The display CSS property is also used to change the behavior of the inline or block elements e.g.
display: inline;
This will change the behavior of a block element to an inline element. For example, div is a block element. By using the display: inline for div element, it will behave like an inline element.
display: block;
Using the block value makes the opposite. For example, the span is an inline element. It will behave like a block element if the block value is used in display property.
The examples are shown below.
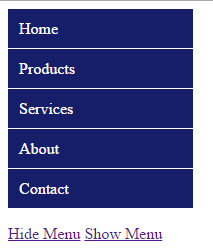
In this demo, I have used a div element that contains an unordered list <ul>, list items, and hyperlinks. The links act as the menu items.
Apart from other CSS properties, that are many to design this menu, the display property is not used initially, which means the menu will be visible.
Two links are given after the menu: hide menu / show menu. As you click on the hide menu link, the jQuery code will be used on the click event of that link to add: display: none property to the parent div.
Code:
<!DOCTYPE html>
<html>
<head>
<script src="//code.jquery.com/jquery-1.10.2.js"></script>

<script>
$(document).ready(function(){
$(".hide_menu").click(function(){
    $('#menu_div').css("display","none");
});

$(".show_menu").click(function(){
    $('#menu_div').css("display","initial");
});
});
</script>


<style>
.men_ex{
    border-radius:5px;
}
.men_ex ul {
    margin: 0;
    padding: 0;
    width:185px;
    list-style-type: none;

}

.men_ex ul li a {
    text-decoration: none;
    color: #fff;
    padding: 10.5px 11px;
    background-color: #161D69;
    display:block;
    border-bottom:solid 1px #fff;
}

.men_ex ul li a:visited {
    color: white;
}

.men_ex ul li a:hover, .men_ex ul li .current {
    color: #000;
    background-color: #9CA3EB;
}

.show_hide{
   position:fixed;
   margin: 30px 30px;
}
</style>
</head>

<body>
<div class="men_ex" id="menu_div">
<ul>
<li><a href="#">Home</a></li>
<li><a href="#">Products</a></li>
<li><a href="#">Services</a></li>
<li><a href="#">About</a></li>
<li><a href="#">Contact</a></li>
</ul>
</div>
<p>
<a href="#" class="hide_menu">Hide Menu</a>
<a href="#" class="show_menu">Show Menu</a>
</p>
<p>
Demo text will move up as <br /> you click the hide menu <br />and will move back as you click show menu link<br /> <b>as using the display property </b>.
</p>
</body>
</html>
As such, the parent div contains the menu, which is the combination of ul, li, and <a> elements. By using display: none, the div will be hidden and so the whole menu as well. As the menu disappears, the links will move up, occupying the space of the menu because CSS display property does not occupy the element space after display: none is used.
If you click the show menu link after that, the jQuery query code will add the display: initial value. This will make the menu visible again and links will move down.
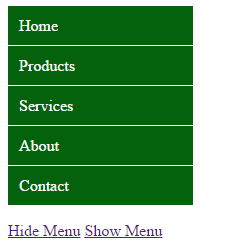
I will use the same example as above, but this time using the CSS visibility property to show and hide the menu. The difference is just the jQuery part, where I will use the:
visibility: hidden
as you click on the “hide menu” link while visibility: visible as you click the “show menu” link.
Code:
<!DOCTYPE html>
<html>
<head>
<script src="//code.jquery.com/jquery-1.10.2.js"></script>

<script>
$(document).ready(function(){
$(".hide_menu").click(function(){
    $('#menu_div').css("visibility","hidden");
});

$(".show_menu").click(function(){
    $('#menu_div').css("visibility","visible");
});
});
</script>


<style>
.men_ex{
    border-radius:5px;
}
.men_ex ul {
    margin: 0;
    padding: 0;
    width:185px;
    list-style-type: none;

}

.men_ex ul li a {
    text-decoration: none;
    color: #fff;
    padding: 10.5px 11px;
    background-color: #04620C;
    display:block;
    border-bottom:solid 1px #fff;
}

.men_ex ul li a:visited {
    color: white;
}

.men_ex ul li a:hover, .men_ex ul li .current {
    color: #000;
    background-color: #ADFCB4;
}

.show_hide{
   position:fixed;
   margin: 30px 30px;
}
</style>
</head>

<body>
<div class="men_ex" id="menu_div">
<ul>
<li><a href="#">Home</a></li>
<li><a href="#">Products</a></li>
<li><a href="#">Services</a></li>
<li><a href="#">About</a></li>
<li><a href="#">Contact</a></li>
</ul>
</div>
<p>
<a href="#" class="hide_menu">Hide Menu</a>
<a href="#" class="show_menu">Show Menu</a>
</p>
<p>
Demo text will move up as <br /> you click the hide menu <br />and will move back as you click show menu link<br /> <b>as using the visibility property </b>.
</p>
</body>
</html>
You can see the difference, here again, as you click on the hide menu link, the menu will disappear just like the display property. However, the links and paragraph text will stay at its place and will not move up.
A CSS visibility and display example with an HTML table
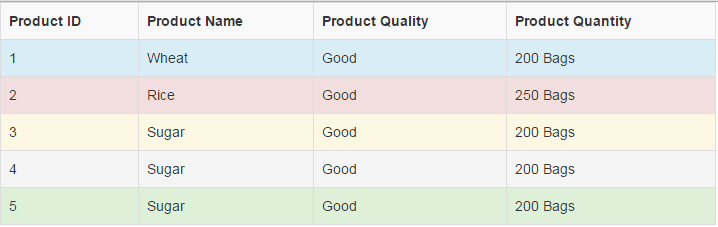
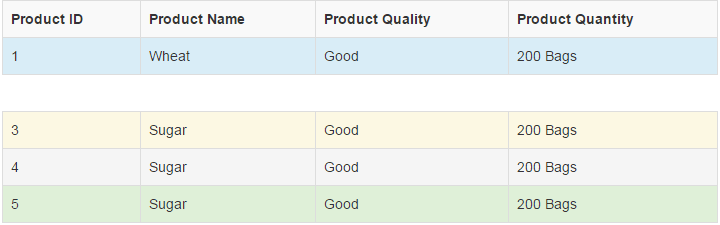
In the following example, an HTML table is created with the Bootstrap framework. The table contains five rows initially that are displayed. The initial table look is as follows:
Markup and CSS:
<!DOCTYPE html>
<html>
<head>
<meta name="viewport" content="width=device-width, initial-scale=1.0"/>
    <link rel="stylesheet" href="https://maxcdn.bootstrapcdn.com/bootstrap/3.3.5/css/bootstrap.min.css" integrity="sha512-dTfge/zgoMYpP7QbHy4gWMEGsbsdZeCXz7irItjcC3sPUFtf0kuFbDz/ixG7ArTxmDjLXDmezHubeNikyKGVyQ==" crossorigin="anonymous">
    <meta name="viewport" content="width=device-width, initial-scale=1.0">

</head>
<body>
<div class="container ">
<table class="table table-bordered table-striped table-hover">
  <tr>
      <th>Product ID</th>
      <th>Product Name</th>
      <th>Product Quality</th>
      <th>Product Quantity</th>
  </tr>
  <tr class="info">
      <td>1</td>
      <td>Wheat</td>
      <td>Good</td>
      <td>200 Bags</td>
  </tr>
  <tr class="danger">
      <td>2</td>
      <td>Rice</td>
      <td>Good</td>
      <td>250 Bags</td>
  <tr class="warning">
      <td>3</td>
      <td>Sugar</td>
      <td>Good</td>
      <td>200 Bags</td>
  </tr>
  <tr class="active">
      <td>4</td>
      <td>Sugar</td>
      <td>Good</td>
      <td>200 Bags</td>
  </tr>
  <tr class="success">
      <td>5</td>
      <td>Sugar</td>
      <td>Good</td>
      <td>200 Bags</td>
  </tr>
</table>
</div><br /><br />

</body>
</html>
The table rows are using different bootstrap classes to style it e.g. danger, active, warning etc. You can see the table rows are numbered from 1 to 5 (the first column from left).
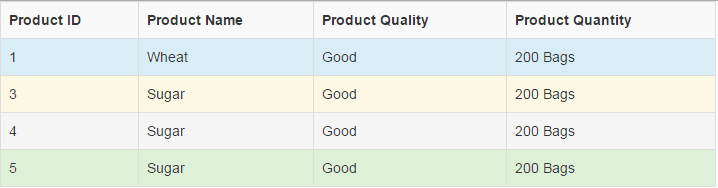
Now, first I will use the visibility property on the second row to hide it. This will be used as follows:
visibility: collapse;
As such, the collapse value is also used for table elements. It is used to remove a row while table structure does not effect. See the figure below and demo online by clicking the link below:
Markup:
<table class="table table-bordered table-striped table-hover">
  <tr>
      <th>Product ID</th>
      <th>Product Name</th>
      <th>Product Quality</th>
      <th>Product Quantity</th>
  </tr>
  <tr class="info">
      <td>1</td>
      <td>Wheat</td>
      <td>Good</td>
      <td>200 Bags</td>
  </tr>
  <tr class="danger" style="visibility: collapse;">
      <td>2</td>
      <td>Rice</td>
      <td>Good</td>
      <td>250 Bags</td>
  <tr class="warning">
      <td>3</td>
      <td>Sugar</td>
      <td>Good</td>
      <td>200 Bags</td>
  </tr>
  <tr class="active">
      <td>4</td>
      <td>Sugar</td>
      <td>Good</td>
      <td>200 Bags</td>
  </tr>
  <tr class="success">
      <td>5</td>
      <td>Sugar</td>
      <td>Good</td>
      <td>200 Bags</td>
  </tr>
</table>
You can see the second row is not visible; however, the table structure remains the same.
Note that, if you use the collapse value for any other elements, it will be rendered as hidden value.
A table with CSS display property
Now, the same example as above except I will use the display property to hide the row in the Bootstrap designed table.
You can see that the second row has disappeared while the third row is moved upward to occupy the space of the second row.
This <tr> where we used display propery:
  </tr>
  <tr class="danger" style="display: none;">
      <td>2</td>
      <td>Rice</td>
      <td>Good</td>
      <td>250 Bags</td>
  <tr class="warning">
      <td>3</td>
      <td>Sugar</td>
      <td>Good</td>
      <td>200 Bags</td>
  </tr>
Using display for inline elements
As such, the CSS display property is used to change the behavior of inline and block elements.
If you have no idea, the block elements take full available space and start at a new line. For example, paragraphs, div are the block elements.
While the inline elements only take the required space and do not start at the new line. Examples of inline elements are the span, link tag, etc.
The display property allows us to change the behavior of inline and block elements by using these values:
To change a block element to inline:
display: inline;
To change an inline element to block element:
display: block;
In the following example, a span element is changed to a block element. And a paragraph is changed to an inline element by using the display CSS property.
To understand the difference, first have a look at this figure and online demo without using display property:

Code:
<!DOCTYPE html>
<html>
<head>
<style>
.div_cls{
    border: solid 1px black;
}
.span_cls{
    border: solid 1px blue;

}
.p_cls{
    border: solid 1px red;

}
</style>
<body>

<div class="div_cls">
This is a parent div <span class="span_cls">This is span element</span> <p class="p_cls">This is a paragraph!</p>
</div>


</body>
</html>
The example shows a parent div, a span, and a paragraph inside that div. Initially, the behavior is kept normal where you can see:
- The div is outlined with black that occupies the full available width.
- The span in blue, inside the div, is only taking its used space and starting at the same line.
- The paragraph which is red is also taking the full space and started at the new line.
Now, I will change the span to a block element and paragraph to an inline element by using the display property. The parent div will remain the same. See the output and live demo:

<!DOCTYPE html>
<html>
<head>
<style>
.div_cls{
    border: solid 1px black;
}
.span_cls{
    border: solid 1px blue;
    display: block;

}
.p_cls{
    border: solid 1px red;
    display: inline;
}
</style>
<body>

<div class="div_cls">
This is a parent div <span class="span_cls">This is span element</span> <p class="p_cls">This is a paragraph!</p>
</div>


</body>
</html>
You can see that the span is started at a new line, and the paragraph’s border is also ended where the text is ended. It did not take the full available width like the div or span.