
The table in Bootstrap
In Bootstrap table tutorial, I showed how you may create simple tables by using built-in classes in Bootstrap framework’s CSS.
The demos included using the striped rows, hover state, coloring the rows by using classes like .success and others, and using the custom colors while using Bootstrap classes as well. However, functionally, those tables were simple.
In professional-level applications, you may need certain features like adding the sorting feature, pagination by limiting the number of rows to be displayed at a time, adding checkboxes or radio buttons, etc.
In this tutorial, I will show you setting up HTML tables that use Bootstrap classes as well as a plug-in for adding useful features in the table, quite easily.
The plug-in name is bootstrap-table, which you can download from GitHub website here. In the examples, I will use CDN links, so you don’t necessarily need to download the plug-in and host it at your local or web hosting. So let me start demos from simple features.
For the demos, I will use MySQL table as the data source. The PHP file will fetch the rows from the table that will be used for examples.
A demo of simple table by using the plug-in
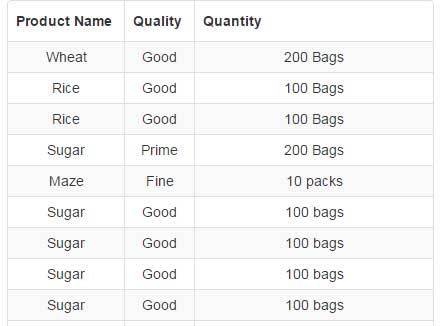
In this demo, the HTML table tag is simply given the data-toggle=”table” attribute along with a few built-in Bootstrap classes i.e. table table-hover table-condensed. See the code and demo online by clicking the links below:
Online demo and code
The markup:
<table data-toggle="table"

data-classes="table table-hover table-condensed"

data-striped="true">

<thead>

<tr>

<th class="col-xs-1" data-field="Product_Name">Product Name</th>

<th class="col-xs-1" data-field="Quality" >Quality</th>

<th class="col-xs-6" data-field="Quantity" >Quantity</th>

</tr>

</thead>

<tbody>

<?php while($row = mysql_fetch_array( $rec_select )) { ?>

<tr>

<td><?php echo $row['Product_Name']; ?></td>

<td><?php echo $row['Quality']; ?></td>

<td><?php echo $row['Quantity']; ?></td>

</tr>

<?php

}


mysql_close($conn);


?>

</tbody>

</table>
The column values are database-driven. Before using this code, you have to fetch data from the data source or use static HTML for table data.
An example with column sorting option
For sorting the records in a table, you may use data attributes at the table or <th> tags. Specify the default column that you want to sort as web page loads at table tag: e.g.
data-sort-name=”Quality”
Where Quality is the data-field name which is specified at <th> tag. You may also specify the ascending or descending order there:
data-sort-order=”desc”
Similarly, add the data attribute data-sortable=”true” to the columns where you want to enable sorting in that HTML table.
See the following demo where a table is sorted by Quality column initially. Only two columns are given the option to sort the table rows i.e. Product name and Quality. See the markup and output:

This is the table tag used:
<table data-toggle="table"

data-classes="table table-hover table-condensed"

data-striped="true"

data-sort-name="Quality"

data-sort-order="desc"

>
The following are the table headings <th>:
<tr>

<th class="col-xs-1" data-field="Product_Name" data-sortable="true">Product Name</th>

<th class="col-xs-1" data-field="Quality" data-sortable="true">Quality</th>

<th class="col-xs-6" data-field="Quantity" >Quantity</th>

</tr>
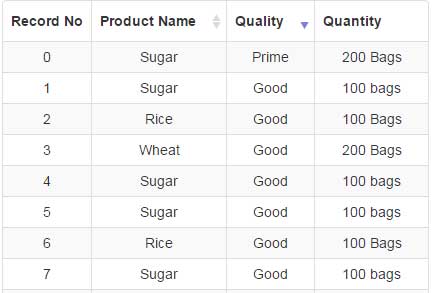
An example of row count
By using the attribute data-formatter=”runningFormatter”, you may add row count in the table. In this example, I simply added a new HTML table heading “Record No” and there I specified the “runningFormatter”:
Code for this demo
<!DOCTYPE html>
<html>
<head>
    <link rel="stylesheet" href="//netdna.bootstrapcdn.com/bootstrap/3.1.1/css/bootstrap.min.css">
    <link rel="stylesheet" href="//cdnjs.cloudflare.com/ajax/libs/bootstrap-table/1.10.1/bootstrap-table.min.css">
		<script src="//code.jquery.com/jquery.js"></script>
		<script src="//maxcdn.bootstrapcdn.com/bootstrap/3.3.4/js/bootstrap.min.js"></script>
        <script src="//cdnjs.cloudflare.com/ajax/libs/bootstrap-table/1.10.1/bootstrap-table.min.js"></script>


</head>
<body>

<div class="container text-center">

<table data-toggle="table"
       data-classes="table table-hover table-condensed"
       data-striped="true"
       data-sort-name="Quality"
       data-sort-order="desc"
       >
    <thead>
    <tr>
        <th data-formatter="runningFormatter">Index</th>
        <th class="col-xs-1" data-field="Product_Name" data-sortable="true">Product Name</th>
        <th class="col-xs-1" data-field="Quality" data-sortable="true">Quality</th>
        <th class="col-xs-6" data-field="Quantity" >Quantity</th>
    </tr>
    </thead>
    <tbody>
   <tr id="tr-id-2" class="tr-class-2">
        <td></td>
        <td>Wheat</td>
        <td>Good</td>
        <td>200 Bags</td>
    </tr>
    <tr id="tr-id-2" class="tr-class-2">
        <td></td>
        <td>Rice</td>
        <td>Good</td>
        <td>100 Bags</td>
    </tr>
    <tr id="tr-id-2" class="tr-class-2">
        <td></td>
        <td>Rice</td>
        <td>Good</td>
        <td>100 Bags</td>
    </tr>
    <tr id="tr-id-2" class="tr-class-2">
        <td></td>
        <td>Sugar</td>
        <td>Prime</td>
        <td>200 Bags</td>
    </tr>
    <tr id="tr-id-2" class="tr-class-2">
        <td></td>
        <td>Maze</td>
        <td>Fine</td>
        <td>10 Packs</td>
    </tr>
    <tr id="tr-id-2" class="tr-class-2">
        <td></td>
        <td>Sugar</td>
        <td>Prime</td>
        <td>200 Bags</td>
    </tr>
    <tr id="tr-id-2" class="tr-class-2">
        <td></td>
        <td>Sugar</td>
        <td>Prime</td>
        <td>200 Bags</td>
    </tr>
    <tr id="tr-id-2" class="tr-class-2">
        <td></td>
        <td>Sugar</td>
        <td>Prime</td>
        <td>200 Bags</td>
    </tr>
    <tr id="tr-id-2" class="tr-class-2">
        <td></td>
        <td>Sugar</td>
        <td>Prime</td>
        <td>200 Bags</td>
    </tr>
    <tr id="tr-id-2" class="tr-class-2">
        <td></td>
        <td>Sugar</td>
        <td>Prime</td>
        <td>200 Bags</td>
    </tr>
    <tr id="tr-id-2" class="tr-class-2">
        <td></td>
        <td>Sugar</td>
        <td>Prime</td>
        <td>200 Bags</td>
    </tr>
    </tbody>
</table>
</div>

<script>
function runningFormatter(value, row, index) {
    return index;
}
</script>

</body>
</html>
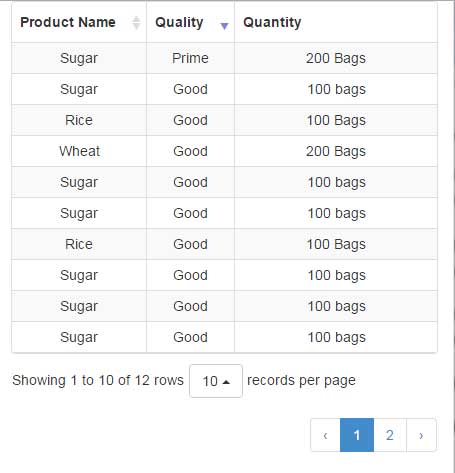
A demo of pagination by using Bootstrap-table plug-in
If you have a large table to present data, say over 100 records, then it is always better to present rows in a paginated way. Going through over a hundred records may be tedious for the readers.
The Bootstrap-table plug-in enables the creation of the paginated table easily. It’s a matter of adding a function in the <script> section and specifying the data attribute in the <table> tag, that’s it.
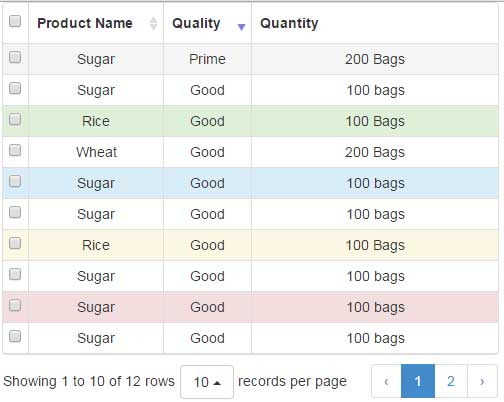
The following demo shows a table that breaks into pages after ten records. Along with pagination, two columns are sortable.
Online Demo
Markup with the script:
<body>

<div class="container text-center">

<table data-toggle="table"
       data-classes="table table-hover table-condensed"
       data-striped="true"
       data-sort-name="Quality"
       data-sort-order="desc"
       data-pagination="true"
       >
    <thead>
    <tr>
        <th class="col-xs-1" data-field="Product_Name" data-sortable="true">Product Name</th>
        <th class="col-xs-1" data-field="Quality" data-sortable="true">Quality</th>
        <th class="col-xs-6" data-field="Quantity" >Quantity</th>
    </tr>
    </thead>
    <tbody>
   <tr id="tr-id-2" class="tr-class-2">
        <td>Wheat</td>
        <td>Good</td>
        <td>200 Bags</td>
    </tr>
    <tr id="tr-id-2" class="tr-class-2">
        <td>Rice</td>
        <td>Good</td>
        <td>100 Bags</td>
    </tr>
    <tr id="tr-id-2" class="tr-class-2">
        <td>Rice</td>
        <td>Good</td>
        <td>100 Bags</td>
    </tr>
    <tr id="tr-id-2" class="tr-class-2">
        <td>Sugar</td>
        <td>Prime</td>
        <td>200 Bags</td>
    </tr>
    <tr id="tr-id-2" class="tr-class-2">
        <td>Maze</td>
        <td>Fine</td>
        <td>10 Packs</td>
    </tr>
    <tr id="tr-id-2" class="tr-class-2">
        <td>Sugar</td>
        <td>Prime</td>
        <td>200 Bags</td>
    </tr>
    <tr id="tr-id-2" class="tr-class-2">
        <td>Sugar</td>
        <td>Prime</td>
        <td>200 Bags</td>
    </tr>
    <tr id="tr-id-2" class="tr-class-2">
        <td>Sugar</td>
        <td>Prime</td>
        <td>200 Bags</td>
    </tr>
    <tr id="tr-id-2" class="tr-class-2">
        <td>Sugar</td>
        <td>Prime</td>
        <td>200 Bags</td>
    </tr>
    <tr id="tr-id-2" class="tr-class-2">
        <td>Sugar</td>
        <td>Prime</td>
        <td>200 Bags</td>
    </tr>
    <tr id="tr-id-2" class="tr-class-2">
        <td>Sugar</td>
        <td>Prime</td>
        <td>200 Bags</td>
    </tr>
    </tbody>
</table>
</div>

<script>
function queryParams() {
    return {
        type: 'owner',
        sort: 'updated',
        direction: 'desc',
        per_page: 100,
        page: 1
    };
}
</script>

</body>
For pagination, it is the data-pagination=”true”. Also, you can see a function in the <script> section (just above the </body> tag).
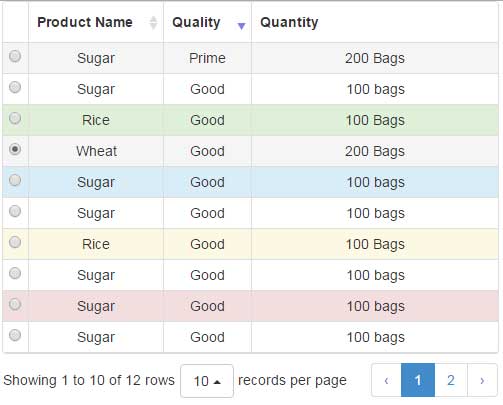
A demo of adding different colors in HTML table rows
As such, Bootstrap has built-in classes that you may use in table rows like success, info, danger, etc. You may manage it programmatically as well by using the table-bootstrap plug-in.
In this example, alternative rows are assigned ‘active’, ‘success’, ‘info’, ‘warning’, and ‘danger’ classes that have their own colors.

Online demo and code
See the rowColors function in <script> section that you have to reference in the table tag.
By using data attribute data-select-item-name=”myRadioName” and adding a <th> and <td> will also add a radio button in each row. This allows selecting a row. See a demo online:
Online demo and code
Adding checkboxes demo
Similarly, you may add data-click-to-select=”true” attribute in the <table> tag for adding a checkbox in each row.
This feature may be useful for performing bulk operations like deleting rows at one call. This option of plug-in makes it quite easier by just adding the simple code as shown in the example:
Code:
<!DOCTYPE html>
<html>
<head>
    <link rel="stylesheet" href="//netdna.bootstrapcdn.com/bootstrap/3.1.1/css/bootstrap.min.css">
    <link rel="stylesheet" href="//cdnjs.cloudflare.com/ajax/libs/bootstrap-table/1.10.1/bootstrap-table.min.css">
		<script src="//code.jquery.com/jquery.js"></script>
		<script src="//maxcdn.bootstrapcdn.com/bootstrap/3.3.4/js/bootstrap.min.js"></script>
        <script src="//cdnjs.cloudflare.com/ajax/libs/bootstrap-table/1.10.1/bootstrap-table.min.js"></script>


</head>
<body>

<div class="container text-center">

<table data-toggle="table"
       data-classes="table table-hover table-condensed"
       data-row-style="rowColors"
       data-striped="true"
       data-sort-name="Quality"
       data-sort-order="desc"
       data-pagination="true"
       data-click-to-select="true"
       >
    <thead>
    <tr>
        <th data-field="state" data-checkbox="true"></th>
        <th class="col-xs-1" data-field="Product_Name" data-sortable="true">Product Name</th>
        <th class="col-xs-1" data-field="Quality" data-sortable="true">Quality</th>
        <th class="col-xs-6" data-field="Quantity" >Quantity</th>
    </tr>
    </thead>
    <tbody>
   <tr id="tr-id-2" class="tr-class-2">
        <td></td>
        <td>Wheat</td>
        <td>Good</td>
        <td>200 Bags</td>
    </tr>
    <tr id="tr-id-2" class="tr-class-2">
        <td></td>
        <td>Rice</td>
        <td>Good</td>
        <td>100 Bags</td>
    </tr>
    <tr id="tr-id-2" class="tr-class-2">
        <td></td>
        <td>Rice</td>
        <td>Good</td>
        <td>100 Bags</td>
    </tr>
    <tr id="tr-id-2" class="tr-class-2">
        <td></td>
        <td>Sugar</td>
        <td>Prime</td>
        <td>200 Bags</td>
    </tr>
    <tr id="tr-id-2" class="tr-class-2">
        <td></td>
        <td>Maze</td>
        <td>Fine</td>
        <td>10 Packs</td>
    </tr>
    <tr id="tr-id-2" class="tr-class-2">
        <td></td>
        <td>Sugar</td>
        <td>Prime</td>
        <td>200 Bags</td>
    </tr>
    <tr id="tr-id-2" class="tr-class-2">
        <td></td>
        <td>Sugar</td>
        <td>Prime</td>
        <td>200 Bags</td>
    </tr>
    <tr id="tr-id-2" class="tr-class-2">
        <td>Sugar</td>
        <td>Prime</td>
        <td>200 Bags</td>
    </tr>
    <tr id="tr-id-2" class="tr-class-2">
        <td></td>
        <td>Sugar</td>
        <td>Prime</td>
        <td>200 Bags</td>
    </tr>
    <tr id="tr-id-2" class="tr-class-2">
        <td></td>
        <td>Sugar</td>
        <td>Prime</td>
        <td>200 Bags</td>
    </tr>
    <tr id="tr-id-2" class="tr-class-2">
        <td></td>
        <td>Sugar</td>
        <td>Prime</td>
        <td>200 Bags</td>
    </tr>
    </tbody>
</table>
</div>

<script>
function queryParams() {
    return {
        type: 'owner',
        sort: 'updated',
        direction: 'desc',
        per_page: 100,
        page: 1
    };
}
function rowColors(row, index) {
    var classes = ['active', 'success', 'info', 'warning', 'danger'];

    if (index % 2 === 0 && index / 2 < classes.length) {
        return {
            classes: classes[index / 2]
        };
    }
    return {};
}
</script>

</body>
</html>
There are plenty of other options as using this awesome plugin for Bootstrap-based tables.