
Shopping cart in Bootstrap
Bootstrap has many built-in components and a lot of developers are working to develop different web components with the increasing popularity of Bootstrap.
In this tutorial, I am going to show you a shopping cart component that uses Bootstrap and is developed by using jQuery. This jQuery plug-in can be easily integrated into your web pages. You only need to add the reference of jquery.mycart JS file above the </body> tag. A few lines of code are also added in the jQuery section – see the demo and how to set up this plug-in below.
A demo of the Bootstrap shopping cart using jQuery
In the demo page, a few dummy products are created that can be your product page in real-time with a different format. The main point is, as you click the “Add to Cart” button with each product, the product will be added to the basket.
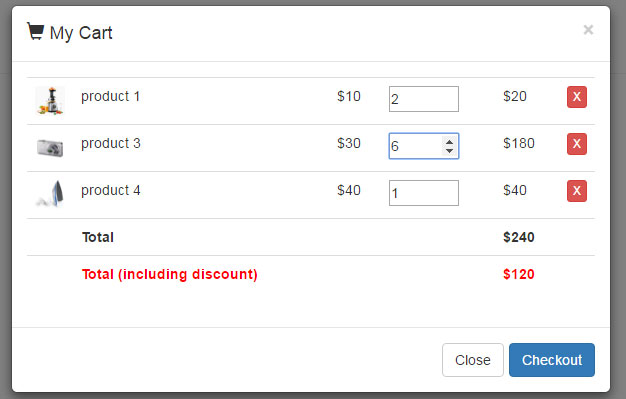
If you click on the basket at the top right, all products that are added to the basket will display in rows. Just like the normal shopping carts, the users may add or remove products. The products can be added by using the up/down key in each textbox in front of added items. For deleting a product, the user may click the cross button. Have a look at the live demo:
Online demo and code
If you destroy the session and come back at a later stage, the selected products will still be visible in the shopping cart.
To use this plugin on your web pages, you need to include the JS file of plug-in along with jQuery.
<script src=”https://ajax.googleapis.com/ajax/libs/jquery/1.11.3/jquery.min.js”></script>
<script src=”https://maxcdn.bootstrapcdn.com/bootstrap/3.3.6/js/bootstrap.min.js”></script>
<script type=’text/javascript’ src=”js/jquery.mycart/jquery.mycart.js”></script>
As such, the demos are based on Bootstrap, so Bootstrap CSS and JS files are also included.
You need to use a few data attributes to the button that acts as “Add to cart”, for example:
- data-id = ID of the products
- data-name = Name of the Product that you want to display in shopping cart
- data-price = The actual price of the product that will display in the shopping cart and also used for calculation.
- data-quantity = Initial quantity of the product which is kept 1 for this demo.
- data-image = The tiny image displayed with each selected product in the shopping cart.
This is how one of the products is created; look carefully at the button code:
<div class="col-md-3 text-center">

      <img src="images/product-img.png" width="250px" height="250px">

      <br>

      product 1 - <strong>$150</strong>

      <br>

      <button class="btn btn-danger my-cart-btn" data-id="prod-1" data-name="Product Name here" data-summary="Small description of product" data-price="150" data-quantity="1" data-image="images/product-img.png">Add to Cart</button>

      <a href="#" class="btn btn-info">Details</a>

</div>
You may get values of all these data attributes from the database that stores the product information, dynamically. Present the products in the format as you want and link the details page to the product information page.
The <script> section containing jQuery code also sets a few options for the shopping cart like classCartIcon, classCartBadge, classProductQuantity, and others.
You may contact the developer from the linked Github page in the above section.